

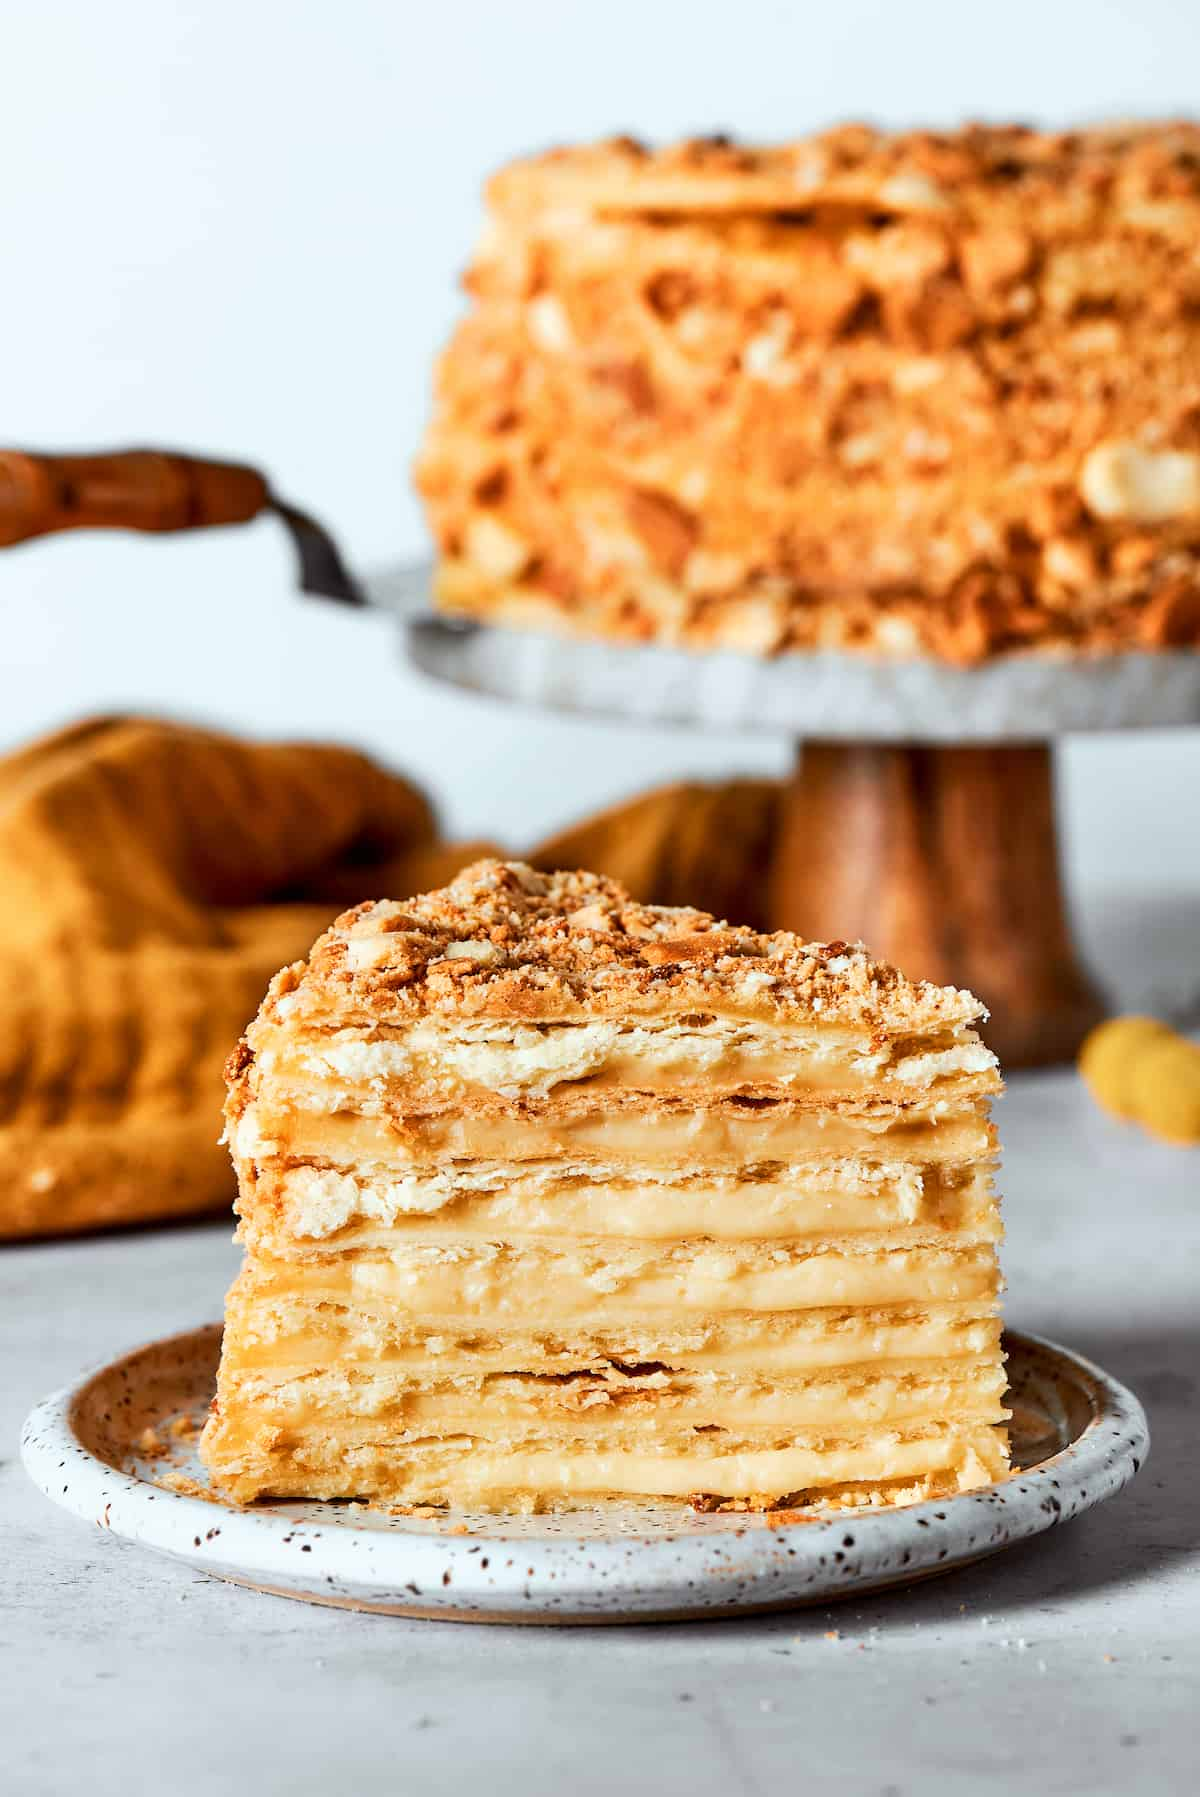
Russian Napoleon Cake is a spectacular layered dessert made with thin, crisp puff pastry and a rich, buttery egg-yolk custard. It takes a little patience, but the result is worth it: delicate pastry, creamy filling, and a beautifully crumb-covered finish.
Unlike a traditional French mille-feuille, Russian Napoleon usually contains many thin pastry layers and a generous amount of custard. As the cake rests, the cream gradually softens the pastry, creating that signature tender texture.
What Is Russian Napoleon Cake?
Russian Napoleon Cake is a classic layered dessert inspired by the French mille-feuille. Traditional mille-feuille typically features flaky pastry and pastry cream, while the Russian version is known for using numerous very thin pastry layers.
This version makes eight 11-inch cake layers. The layers are baked until lightly golden, trimmed into neat rounds, and stacked with creamy custard between each one. The leftover pastry scraps are crushed and pressed over the outside for the classic Napoleon appearance.
The finished cake can be enjoyed in two different ways. Serve it shortly after assembly for crisp, flaky layers, or refrigerate it for 24 to 48 hours for a much softer, more tender cake.
Why You’ll Love This Napoleon Cake
There is something special about the contrast in this dessert.
The freshly baked pastry provides delicate layers and a slight crunch, while the custard adds richness and moisture. After resting, the two components become almost melt-in-your-mouth tender.
You also don’t need complicated decorations. Crushed pastry crumbs cover the cake, giving it a rustic, homemade appearance that is part of its charm.
Russian Napoleon Cake Ingredients
For the Quick Puff Pastry
- 1 ¾ cups unsalted butter, cold or frozen and cubed
- 2 large eggs
- ⅔ cup cold water
- 4½ to 6 cups sifted all-purpose flour
- 3 tablespoons vodka or cognac, or water if preferred
- 2 tablespoons white vinegar
- ⅛ teaspoon kosher salt
The original recipe notes that the amount of flour can vary, so start with the lower amount and add more only as needed to bring the dough together.
For the Egg-Yolk Custard
- 7 large egg yolks
- 6 cups whole milk
- 2 cups granulated sugar
- ⅔ cup sifted all-purpose flour
- 1 tablespoon vanilla extract
- 1¾ cups unsalted butter
This generous amount of custard is what gives Russian Napoleon its characteristic creamy texture.
How to Make Russian Napoleon Cake
1. Make the Quick Puff Pastry
Start by whisking the eggs and salt together in a large measuring cup or bowl.
Add the cold water, white vinegar, and vodka or cognac. If you don’t want to use alcohol, water can be used instead. Set the liquid mixture aside.
Place the sifted flour and cold cubed butter into a food processor.
Pulse the mixture until the butter pieces become roughly pea-sized. Don’t process until the butter disappears completely. Small pieces of cold butter are important for creating flaky pastry.
Pour in the egg mixture and pulse just until the dough begins sticking together.
Don’t overwork the dough. The goal is to bring everything together without warming or melting the butter.
2. Chill the Dough
Turn the rough dough onto your work surface.
Gently gather it together with your hands and knead only enough to make it hold together. Divide the dough into four equal pieces.
Shape each portion into a ball and flatten it slightly into a disk.
Wrap the dough and refrigerate for 1 to 2 hours. Chilling gives the flour time to absorb the liquid while keeping the butter firm.
Prepare the Custard
While the dough chills, prepare the creamy filling.
Whisk the egg yolks and sugar together. Add a little of the milk to make the mixture easier to combine.
Whisk in the sifted flour until you have a smooth mixture without obvious lumps.
Meanwhile, heat the remaining milk in a saucepan until it is very hot and approaching a boil. Stir it occasionally so the milk doesn’t scorch.
Slowly pour the hot milk into the egg mixture while whisking constantly. This gradual process helps temper the eggs.
Return the mixture to the pot.
Cook over medium heat, whisking continuously, until the custard reaches a boil. Once boiling, continue cooking for about 2 to 3 minutes, while stirring constantly.
The custard should become noticeably thick.
Remove it from the heat and stir in the vanilla extract.
Add the butter and stir until it melts completely into the custard.
If you notice lumps, pass the custard through a fine-mesh sieve for a smoother result.
4. Cool the Custard Properly
Transfer the custard to a shallow rimmed pan.
Cover it directly with plastic wrap, pressing the plastic against the surface of the custard. This prevents a thick skin from forming.
For assembly, the custard should be cooled to room temperature. If you’re preparing it ahead, it can be refrigerated while covered and brought back to a workable temperature before assembling the cake.
Roll Out the Pastry Layers
Preheat your oven to 400°F and position the rack in the middle.
Take one chilled dough ball at a time.
Cut it into two equal pieces. Roll each piece into a very thin circle measuring approximately 12½ inches.
You can roll the dough on the back of an upside-down baking sheet or another flat surface that allows you to work comfortably.
Use enough flour to prevent sticking, but avoid adding excessive flour.
Prick the entire pastry surface with a fork every inch or two. This helps prevent the dough from puffing unevenly during baking.
6. Bake the Pastry
Bake each thin pastry layer for approximately 5 to 7 minutes, or until lightly golden.
Keep a close eye on the pastry because these thin layers bake quickly.
You want them lightly golden rather than pale or deeply browned.
Repeat the process until you have eight baked pastry layers.
Trim the Cake Layers
Immediately after removing a pastry layer from the oven, place an 11-inch plate, lid, or cake template over it.
Carefully cut around the template using a sharp knife or pizza cutter.
Don’t throw away the scraps.
Collect all the trimmings in a separate bowl. Once you’re finished, crush them into fine crumbs.
These crumbs will become part of the cake’s decoration and help create the traditional Russian Napoleon appearance.
Assemble the Napoleon Cake
Place a small dab of custard onto your serving platter.
Set the first pastry layer on top and gently press it into place.
If you have a cake ring, place it around the pastry. A ring isn’t absolutely necessary, but it can help keep the cake neat while you’re building the layers.
Spread approximately one-eighth of the custard evenly over the pastry.
Add another pastry layer and repeat.
Continue alternating pastry and custard until all eight layers have been used.
Gently press down on each layer as you work, but don’t crush the delicate pastry.
When you reach the final pastry layer, spread a thin layer of custard over the top.
Reserve enough custard to cover the sides.
Finish With Pastry Crumbs
Sprinkle crushed pastry crumbs over the top of the cake.
Allow the cake to settle briefly before removing the cake ring, if you’re using one.
Run a thin knife around the inside edge of the ring, then carefully lift it away.
Spread the remaining custard around the sides.
Gently press the reserved pastry crumbs onto the sides until the entire cake is covered.
Brush away excess crumbs from the serving platter for a clean finish.
How Long Should Napoleon Cake Rest?
This is one of the most important parts of the recipe because the resting time changes the texture dramatically.
For a Crispy Napoleon Cake
If you love crunchy, flaky pastry, serve the cake relatively soon after assembly.
The original recipe recommends enjoying it within about 1 to 2 hours for the crispiest texture.
This version gives you a wonderful contrast between crisp pastry and creamy custard.
For a Soft Napoleon Cake
For the traditional softer texture, cover the assembled cake and refrigerate it for 24 to 48 hours.
During this time, the custard gradually absorbs into the pastry layers.
The result is softer, more tender, and much easier to slice.
One important tip is not to serve the cake somewhere in between the crisp and fully softened stages if you’re specifically looking for one texture. The source recipe notes that the intermediate stage can leave the layers somewhat gummy and more difficult to cut.
Tips for Making the Best Russian Napoleon Cake
Keep the Butter Cold
Cold butter is essential for the pastry.
Work quickly and avoid handling the dough more than necessary. If the butter becomes soft while you’re working, return the dough to the refrigerator.
Don’t Overwork the Dough
The dough doesn’t need to become perfectly smooth like bread dough.
Overworking it can make the pastry tougher and reduce the flaky texture you’re looking for.
Prick Every Layer
Don’t skip the fork-pricking step.
Small holes help control the pastry’s expansion and encourage the layers to bake more evenly.
Watch the Oven Carefully
Thin pastry can go from lightly golden to burnt surprisingly quickly.
Start checking around the five-minute mark, especially if your oven runs hot.
Make Even Layers
Try to roll each pastry sheet to approximately the same thickness.
Even layers make the finished cake look more polished and help the custard distribute evenly.
Use a Cake Ring
A cake ring isn’t mandatory, but it’s especially helpful for keeping the sides straight while assembling the cake.
It’s also useful if you want a neat, professional-looking Napoleon.
Can You Make Russian Napoleon Cake Ahead?
Absolutely.
The pastry can be prepared in advance and refrigerated before baking. The custard can also be prepared ahead and stored covered in the refrigerator.
If you’re aiming for the crisp version, bake the pastry and prepare the custard ahead, then assemble the cake relatively close to serving time.
If you prefer the soft version, assemble the entire cake and refrigerate it for up to about 48 hours before serving.
What Does Russian Napoleon Cake Taste Like?
Russian Napoleon has a rich, buttery, creamy flavor.
The pastry itself is delicate and flaky, while the custard tastes sweet, vanilla-scented, and buttery.
When served shortly after assembly, every bite has noticeable pastry crunch.
After a longer resting period, the custard soaks into the layers, producing a soft texture that is closer to a rich custard cake.
Both versions are delicious, so the best choice really comes down to personal preference.
Frequently Asked Questions
Is Russian Napoleon Cake the same as mille-feuille?
Not exactly. Both desserts feature flaky pastry and creamy filling, but Russian Napoleon typically contains more, thinner pastry layers and is often allowed to soften as the custard absorbs into the pastry.
How many layers does this Napoleon Cake have?
This recipe produces eight round pastry layers, with custard between the layers.
Can I leave out the vodka?
Yes. The recipe specifies that vodka or cognac can be replaced with water if you prefer not to use alcohol.
Why do I need to prick the pastry?
Pricking the pastry with a fork helps prevent large bubbles and uneven puffing as it bakes.
Can I use store-bought puff pastry?
You can experiment with prepared puff pastry, but this particular recipe is designed around homemade quick puff pastry. Using store-bought pastry will change the thickness, texture, and number of layers.
Why are the pastry scraps used?
The baked scraps are crushed and pressed onto the cake’s top and sides. They provide the classic crumb-covered appearance and can also help protect the exposed custard surface.
Should Napoleon Cake be served cold?
The assembled cake should be refrigerated, but the recipe notes that it tastes best when the custard comes closer to room temperature before serving.
Russian Napoleon Cake Recipe at a Glance
Prep Time: About 1 hour 30 minutes
Cook Time: About 1 hour
Total Time: About 2½ hours, plus resting time
Yield: 24 servings
Cake Size: Approximately 11 inches
Cuisine: Russian-inspired
Category: Dessert
Main Components: Quick puff pastry and egg-yolk custard
Oven Temperature: 400°F
The published recipe lists approximately 464 calories per 140-gram serving.
Final Thoughts
Russian Napoleon Cake is the kind of dessert that rewards patience. The process involves several stages, from making the quick puff pastry and cooking the custard to rolling and baking eight delicate layers.
But once those layers are stacked with buttery vanilla custard and covered in golden pastry crumbs, the effort starts to make sense.
The best part is that you can choose your favorite texture. Serve it soon after assembly for crisp, flaky pastry and creamy filling, or let it rest for 24 to 48 hours for the classic soft and tender Napoleon experience.
Either way, this impressive layered cake makes a beautiful centerpiece for holidays, birthdays, family celebrations, or any occasion when you want a dessert that feels truly special.