Are you ready to simplify your life and finally cut back on toxic commercial cleaners? If you’re tired of slippery residues, overpowering smells, and chemical exposure in your home, switching to natural cleaning alternatives is a smart step. This heavy-duty tile floor cleaner is powerful enough to cut through dirt, grime, and sticky messes—all while being safe, effective, and easy to make with ingredients you already have at home.
This guide walks you through how to make a reliable homemade tile floor cleaner using four simple ingredients. Plus, you’ll learn how and why it works, tips for best results, and answers to frequently asked questions.
Why Choose a Homemade Tile Floor Cleaner?
Tile floors—especially in kitchens and bathrooms—can collect grease, bacteria, soap scum, and hard water deposits. Most store-bought cleaners are packed with harsh chemicals, synthetic fragrances, and unnecessary additives. These might give the illusion of cleanliness, but they often leave a film behind and may even damage your grout or tile over time.
Making your own cleaner at home gives you control over what touches your floors and keeps your space safe for kids, pets, and people with sensitivities. Plus, it’s budget-friendly and eco-conscious.
The Power Behind This Heavy-Duty Tile Floor Cleaner
This recipe uses a simple combination of household items that work together to lift dirt and cut through grime effectively.
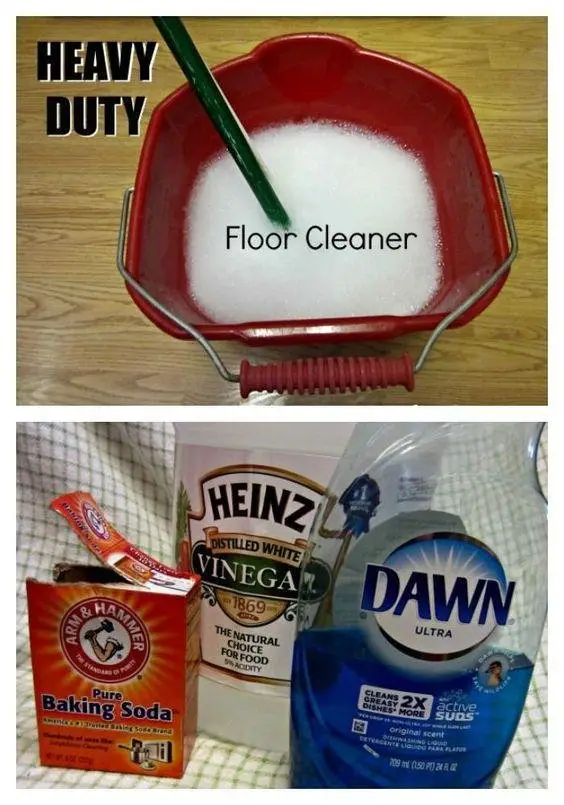
Ingredients
-
1/4 cup distilled white vinegar
A natural disinfectant and degreaser that breaks down hard water stains and soap scum. -
1/4 cup washing soda
A powerful cleaning agent that cuts through stubborn stains, neutralizes odors, and lifts grease. -
1 teaspoon liquid dish soap
Helps to dissolve oily messes and boosts cleaning power by breaking surface tension. -
2 gallons of very warm water
Enhances the effectiveness of the ingredients and helps dissolve grease and dirt faster.
Step-by-Step Instructions
Step 1: Combine Base Ingredients
In a large bucket, pour in the distilled white vinegar, washing soda, and dish soap. Stir them together until well blended. Washing soda dissolves slowly, so give it a minute to fully incorporate.
Step 2: Add Warm Water
Slowly pour in the 2 gallons of very warm water while stirring the mixture. This helps activate the washing soda and improves the overall cleaning performance.
Step 3: Mop Your Floors
Dip your mop into the solution, wring it out slightly, and mop the tile floor as usual. Focus on sticky spots or heavily soiled areas by going over them a few times.
Step 4: Optional Rinse
This solution is designed to leave minimal residue, so there’s no need to rinse afterward. However, if you see any suds or notice a slightly soapy finish, go over those areas with a damp mop or towel to wipe them off.
Step 5: Let It Air Dry
Allow your floors to dry naturally. You’ll notice a clean, streak-free finish without the harsh chemical smell left by many store-bought cleaners.
How Each Ingredient Helps Clean Effectively
Vinegar
Vinegar is a tried-and-true cleaner for a reason. It’s mildly acidic, which makes it excellent for cutting through mineral deposits, soap scum, and sticky residues without damaging tile. It also helps neutralize odors and kill bacteria.
Washing Soda
Often confused with baking soda, washing soda is far more powerful. It’s highly alkaline, which allows it to dissolve grease, lift dirt, and tackle grout grime. It also softens water, helping to prevent streaks on the tile surface.
Dish Soap
Just a teaspoon is all you need to help break down grease and oily spills. Dish soap makes the solution slightly sudsy, allowing it to cling to dirt longer and lift it off the floor surface.
Warm Water
Temperature matters. Warm water dissolves the ingredients more effectively and loosens stuck-on grime. It also enhances the performance of vinegar and washing soda.
Tips for Best Results
- Use a microfiber mop: These trap dirt more efficiently and help leave floors streak-free.
- Test in a small area first: Some tiles or grout types (especially natural stone) may react to acidic cleaners like vinegar.
- Avoid using on unsealed grout or natural stone tiles: For materials like marble or slate, skip vinegar and substitute with a neutral pH cleaner.
- Add essential oils (optional): For a fresh scent, add 5–10 drops of essential oil like lemon, lavender, or tea tree.
- Clean mop regularly: Rinse your mop thoroughly during use to avoid spreading dirt.
- Don’t store long-term: This solution is best used fresh. Washing soda may lose potency if stored in water for long periods.
When and How Often Should You Use This Cleaner?
This heavy-duty solution is ideal for weekly deep cleaning of your tile floors. If your home gets a lot of foot traffic or you have pets and kids, use it more often to stay ahead of buildup.
For light maintenance between deep cleans, you can simply mop with hot water and a splash of vinegar or dish soap.
FAQs
Can I use this cleaner on all types of tile?
This recipe is best for ceramic and porcelain tiles. Avoid using it on natural stone tiles (like marble, limestone, granite, or travertine), as vinegar can etch or damage the surface over time.
Is washing soda the same as baking soda?
No, washing soda (sodium carbonate) is stronger than baking soda (sodium bicarbonate). It’s more alkaline and effective at cutting grease and dissolving tough grime.
Can I make a smaller batch?
Absolutely. Simply divide the recipe by half or a quarter, depending on your needs. Just maintain the same ratio of ingredients for best results.
Is it safe for homes with pets and children?
Yes, once the floor is dry. All ingredients are natural and far less toxic than commercial alternatives. Just make sure the floor is completely dry before allowing pets or children to walk on it.
Can I use cold water instead of warm water?
Warm water helps activate the cleaning agents and removes dirt more efficiently. While cold water won’t ruin the cleaner, it may reduce its effectiveness.
Final Thoughts
This homemade heavy-duty tile floor cleaner proves that you don’t need a cabinet full of chemical-laden products to keep your floors shining. It’s simple, safe, affordable, and incredibly effective—perfect for busy households looking for a low-tox, high-impact solution.
By using ingredients you already have in your pantry, you can transform your tile-cleaning routine into a safer, more sustainable habit. Give it a try, and enjoy cleaner floors with less effort and no harsh chemical residue.