

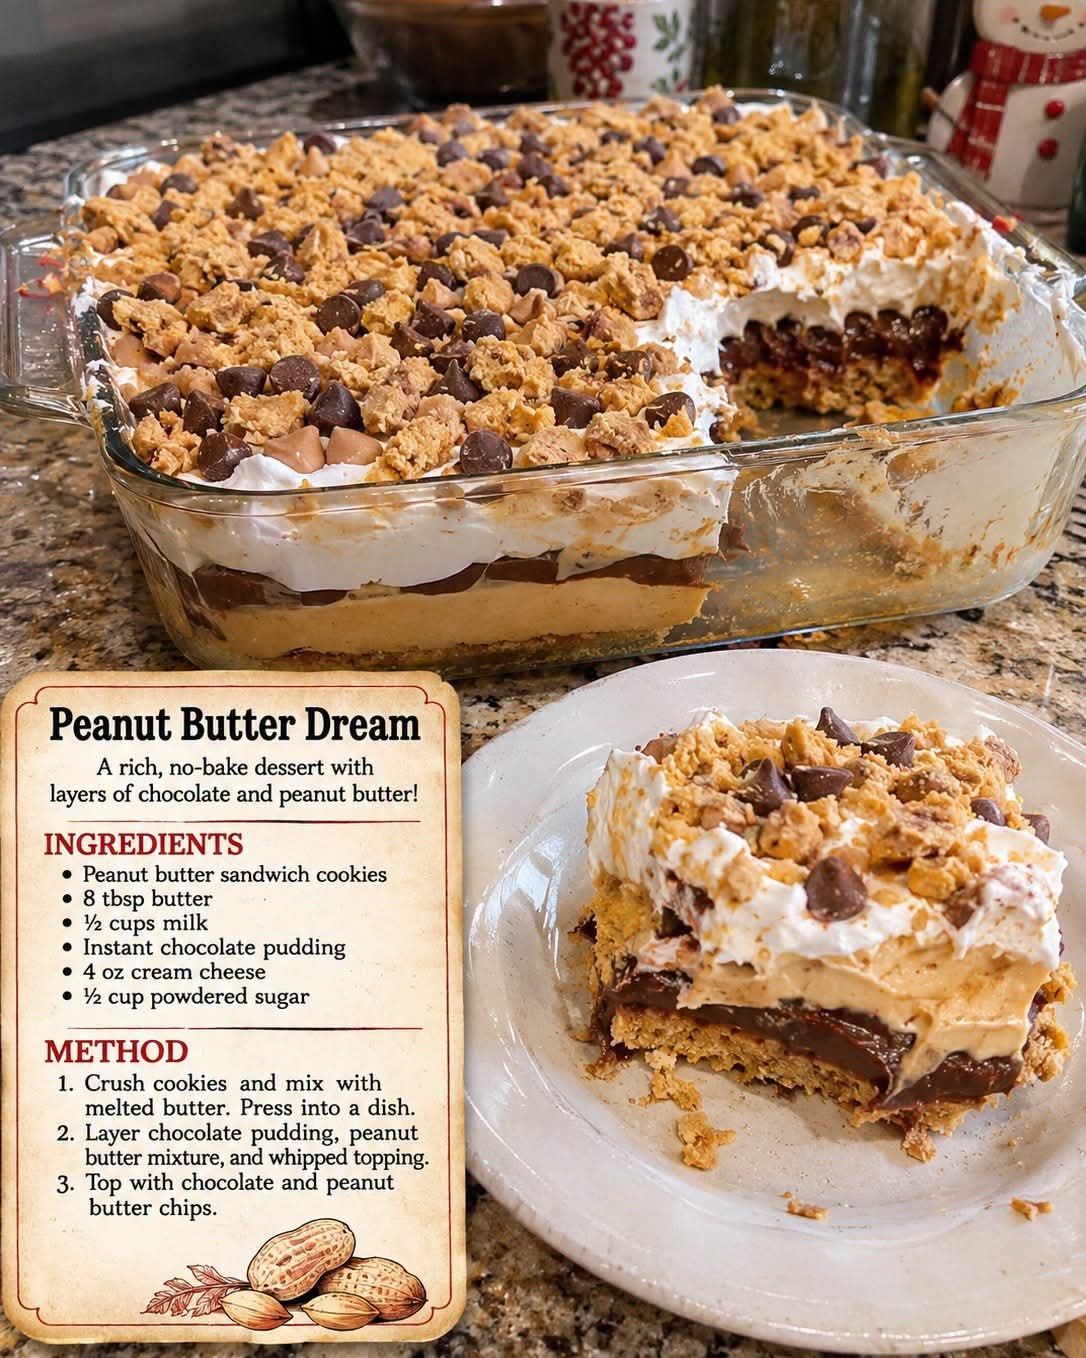
If you love the combination of chocolate and peanut butter, this Peanut Butter Dream is a dessert you won’t want to miss. With a crunchy peanut butter cookie crust, creamy chocolate pudding, a fluffy peanut butter cheesecake-style layer, and a generous topping of whipped cream and chocolate chips, every bite is rich, smooth, and delicious.
This easy no-bake dessert comes together with simple ingredients and requires no oven time. The layers create a beautiful contrast of textures, from the buttery cookie base to the silky chocolate pudding and the light, creamy peanut butter filling.
Perfect for potlucks, family gatherings, holiday celebrations, or a weekend treat, Peanut Butter Dream is a crowd-pleasing dessert that can be prepared ahead of time and chilled until you’re ready to serve.
Why You’ll Love This Peanut Butter Dream
- No baking required: Assemble the layers and let the refrigerator do the work.
- Chocolate and peanut butter: This classic flavor combination makes every bite satisfying.
- Creamy layered texture: Chocolate pudding, peanut butter filling, and whipped topping create a light yet indulgent dessert.
- Simple ingredients: Store-bought cookies, instant pudding, and whipped topping make preparation easy.
- Perfect for sharing: The dessert is made in a 9-by-9-inch dish and serves approximately 12 people.
- Make-ahead friendly: Prepare it several hours in advance so the layers have time to set.
Ingredients for Peanut Butter Dream
For the Cookie Crust
- 24 peanut butter sandwich cookies, crushed
- 8 tablespoons unsalted butter, melted
The crushed cookies provide a sweet, peanut buttery base, while the melted butter helps bind the crumbs together into a firm crust.
For the Chocolate Pudding Layer
- 1 box (3.9 ounces) instant chocolate pudding mix
- 1½ cups cold milk
Instant chocolate pudding creates a smooth, rich layer that complements the peanut butter filling. Use cold milk and whisk until the pudding thickens.
For the Creamy Peanut Butter Layer
- 4 ounces cream cheese, softened
- ½ cup creamy peanut butter
- ½ cup powdered sugar
- 4 ounces whipped topping, thawed
Softened cream cheese helps create a smooth filling, while creamy peanut butter provides the signature flavor. Powdered sugar adds sweetness without the graininess that granulated sugar can sometimes create in no-bake fillings.
Half of the whipped topping is folded into this layer to make it lighter and fluffier.
For the Topping
- 4 ounces whipped topping, thawed
- ¼ cup chocolate chips
- ¼ cup peanut butter chips
- Extra crushed peanut butter sandwich cookies, for garnish
The remaining whipped topping creates a soft, creamy finish. Chocolate chips, peanut butter chips, and cookie crumbs add texture and make the dessert look especially inviting.
How to Make Peanut Butter Dream
Step 1: Prepare the Cookie Crust
Place the peanut butter sandwich cookies in a food processor and pulse until they form fine crumbs. If you don’t have a food processor, place the cookies in a sealed bag and crush them with a rolling pin.
Transfer the crumbs to a mixing bowl and pour in the melted butter. Stir until the crumbs are evenly moistened.
Press the mixture firmly into the bottom of a 9-by-9-inch baking dish, creating an even layer. Use the bottom of a measuring cup or glass to compact the crust.
Place the dish in the refrigerator while preparing the other layers. Chilling the crust helps it become more stable and easier to serve.
Step 2: Make the Chocolate Pudding Layer
Pour the cold milk into a medium mixing bowl. Add the instant chocolate pudding mix and whisk according to the package directions until the mixture thickens.
Spread the pudding evenly over the prepared cookie crust.
Use a spatula to smooth the surface, reaching the corners of the dish so each serving has a consistent chocolate layer.
Step 3: Prepare the Peanut Butter Filling
In a separate bowl, beat the softened cream cheese, creamy peanut butter, and powdered sugar until smooth and creamy.
Scrape down the sides of the bowl as needed to remove any lumps. The cream cheese should be fully softened before mixing for the best texture.
Add 4 ounces of thawed whipped topping and gently fold it into the peanut butter mixture until combined. Avoid stirring too vigorously, as folding helps preserve the light texture.
Step 4: Spread the Peanut Butter Layer
Carefully spoon the peanut butter filling over the chocolate pudding layer.
Spread it gently with a spatula, taking care not to disturb the pudding underneath. Work from the center toward the edges until the surface is smooth and even.
The combination of chocolate pudding and fluffy peanut butter filling gives this dessert its signature layered appearance.
Step 5: Add the Whipped Topping
Spread the remaining 4 ounces of whipped topping over the peanut butter layer.
Smooth the top or create gentle swirls with the back of a spoon for a decorative finish.
Step 6: Add the Toppings
Sprinkle the chocolate chips and peanut butter chips evenly over the whipped topping.
Finish with extra crushed peanut butter sandwich cookies. The crumbs add a little crunch and reinforce the peanut butter flavor.
For a more polished presentation, reserve a small amount of each topping to sprinkle over individual servings just before serving.
Step 7: Chill Until Set
Cover the baking dish and refrigerate for at least 2 hours.
For the cleanest slices, chill the dessert for 4 hours or overnight. This gives the layers more time to firm up and helps the portions hold their shape when cut.
Step 8: Slice and Serve
Once chilled, cut the Peanut Butter Dream into 12 squares.
Use a sharp knife and wipe it clean between cuts for neat layers. Serve directly from the refrigerator while the filling is cool and creamy.
Tips for the Best Peanut Butter Dream
Soften the cream cheese first. Room-temperature cream cheese blends more easily with peanut butter and powdered sugar, helping prevent lumps in the filling.
Use cold milk for the pudding. Cold milk helps instant pudding thicken as directed on the package.
Press the crust firmly. A compact crust is less likely to crumble when you cut the dessert into squares.
Let the pudding thicken before layering. Follow the pudding package instructions and spread it over the crust once it has reached the proper consistency.
Fold in the whipped topping gently. Gentle folding helps keep the peanut butter layer light and fluffy.
Spread each layer carefully. Use a spatula and work slowly to maintain distinct layers.
Chill long enough. Two hours is the minimum, but a longer chill generally makes the dessert easier to slice.
Keep it refrigerated. Because the dessert contains dairy products, store it in the refrigerator until serving time.
Delicious Variations to Try
Chocolate Cookie Crust
For an even stronger chocolate flavor, replace the peanut butter sandwich cookies with chocolate sandwich cookies. The chocolate crust pairs beautifully with the peanut butter filling.
Extra Chocolate Peanut Butter Dream
Add a thin drizzle of melted chocolate over the top before chilling. Allow the chocolate to cool slightly before drizzling so it doesn’t melt the whipped topping.
Peanut Butter Cup Version
Chop a few peanut butter cups and sprinkle them over the whipped topping along with the chocolate and peanut butter chips. This adds extra chocolate-peanut butter flavor and a candy-like texture.
Crunchy Peanut Butter Filling
If you enjoy a little texture in your filling, replace the creamy peanut butter with crunchy peanut butter. The small peanut pieces create a pleasant contrast with the smooth pudding and whipped topping.
Salted Peanut Butter Topping
Sprinkle a small pinch of finely chopped salted peanuts over the finished dessert. The salty crunch balances the sweetness of the pudding and powdered sugar.
Individual Peanut Butter Dream Cups
Instead of using a 9-by-9-inch dish, divide the crust and filling among small dessert cups. Layer the ingredients in the same order and chill until set. Individual portions are convenient for parties and gatherings.
What to Serve with Peanut Butter Dream
Peanut Butter Dream is rich and creamy, so small portions are often enough to satisfy a sweet craving.
Serve it with:
- Fresh strawberries
- Sliced bananas
- A cup of black coffee
- Hot coffee with milk
- Unsweetened tea
- A glass of cold milk
- Fresh raspberries
For a dessert table, pair it with lighter fruit-based treats or simple cookies. The chocolate and peanut butter flavors also make it an excellent finish to a casual family dinner.
How to Store Peanut Butter Dream
Refrigerator Storage
Cover the baking dish tightly or transfer leftover portions to an airtight container. Keep the dessert refrigerated and enjoy it within 3–4 days for the best quality.
Because the filling contains cream cheese, milk, and whipped topping, avoid leaving it at room temperature for more than 2 hours, or 1 hour if the temperature is above 90°F (32°C).
Can You Freeze Peanut Butter Dream?
Freezing is possible, although the texture of the pudding and whipped topping may change slightly after thawing.
For best results, freeze individual portions in an airtight, freezer-safe container for up to 1 month for good quality. Thaw the portions in the refrigerator before serving and avoid refreezing previously thawed leftovers.
If you plan to make this dessert ahead for a gathering, refrigeration is generally the better option.
Frequently Asked Questions
Can I make Peanut Butter Dream the day before?
Yes. This dessert is ideal for preparing ahead of time. Assemble the layers, cover the dish, and refrigerate overnight. Add the final decorative toppings shortly before serving if you want them to remain especially crisp.
Can I use homemade whipped cream instead of Cool Whip?
Yes, you can use homemade whipped cream, provided it is whipped to firm peaks and stabilized if needed. Keep in mind that homemade whipped cream may soften more quickly than commercial whipped topping, so the dessert may not hold its shape for as long.
Why is my Peanut Butter Dream too soft?
The dessert may need more chilling time, or the pudding may not have thickened sufficiently before layering. Make sure you use the correct amount of cold milk for the instant pudding mix and refrigerate the finished dessert until firm.
Can I use a different size baking dish?
A similar-sized dish can work, but the thickness of the layers will change. A larger dish produces thinner layers, while a smaller dish creates thicker layers and may require a little more chilling time.
Do I need to bake the crust?
No. The cookie crumbs and melted butter form a no-bake crust. Press the mixture firmly into the dish and chill it before adding the pudding layer.
Can I use natural peanut butter?
Conventional creamy peanut butter is generally the most reliable choice because it has a consistent texture. Natural peanut butter can be used if it is thoroughly stirred and not excessively oily, but the filling may turn out softer.
How do I get clean slices?
Chill the dessert for at least 4 hours if possible. Use a sharp knife, wipe it clean between cuts, and lift each piece carefully with a small spatula.
Peanut Butter Dream Recipe Card
Prep Time: 20 minutes
Chill Time: At least 2 hours
Total Time: 2 hours 20 minutes
Servings: 12
Ingredients
For the crust:
- 24 peanut butter sandwich cookies, crushed
- 8 tablespoons butter, melted
For the chocolate pudding layer:
- 1 box (3.9 ounces) instant chocolate pudding mix
- 1½ cups cold milk
For the peanut butter layer:
- 4 ounces cream cheese, softened
- ½ cup creamy peanut butter
- ½ cup powdered sugar
- 4 ounces whipped topping, thawed
For the topping:
- 4 ounces whipped topping, thawed
- ¼ cup chocolate chips
- ¼ cup peanut butter chips
- Extra crushed cookies, for topping
Instructions
- Mix the crushed peanut butter sandwich cookies with the melted butter.
- Press the cookie mixture firmly into the bottom of a 9-by-9-inch baking dish. Refrigerate while preparing the filling.
- Whisk the instant chocolate pudding mix with the cold milk until thick, following the package directions. Spread over the crust.
- Beat the softened cream cheese, peanut butter, and powdered sugar until smooth.
- Gently fold in 4 ounces of whipped topping.
- Spread the peanut butter mixture over the chocolate pudding layer.
- Spread the remaining 4 ounces of whipped topping over the peanut butter layer.
- Sprinkle with chocolate chips, peanut butter chips, and extra crushed cookies.
- Cover and refrigerate for at least 2 hours, or longer for firmer slices.
- Cut into 12 squares and serve chilled.
Final Thoughts
Peanut Butter Dream is an easy no-bake dessert that brings together everything chocolate and peanut butter lovers enjoy: a crunchy cookie crust, smooth chocolate pudding, fluffy peanut butter filling, and a creamy topping finished with chocolate chips and cookie crumbs.
It’s simple enough for an everyday treat yet impressive enough to share at parties, potlucks, and family celebrations. Prepare it ahead, let the layers chill until firm, and enjoy a cool, creamy dessert that delivers delicious flavor in every bite.