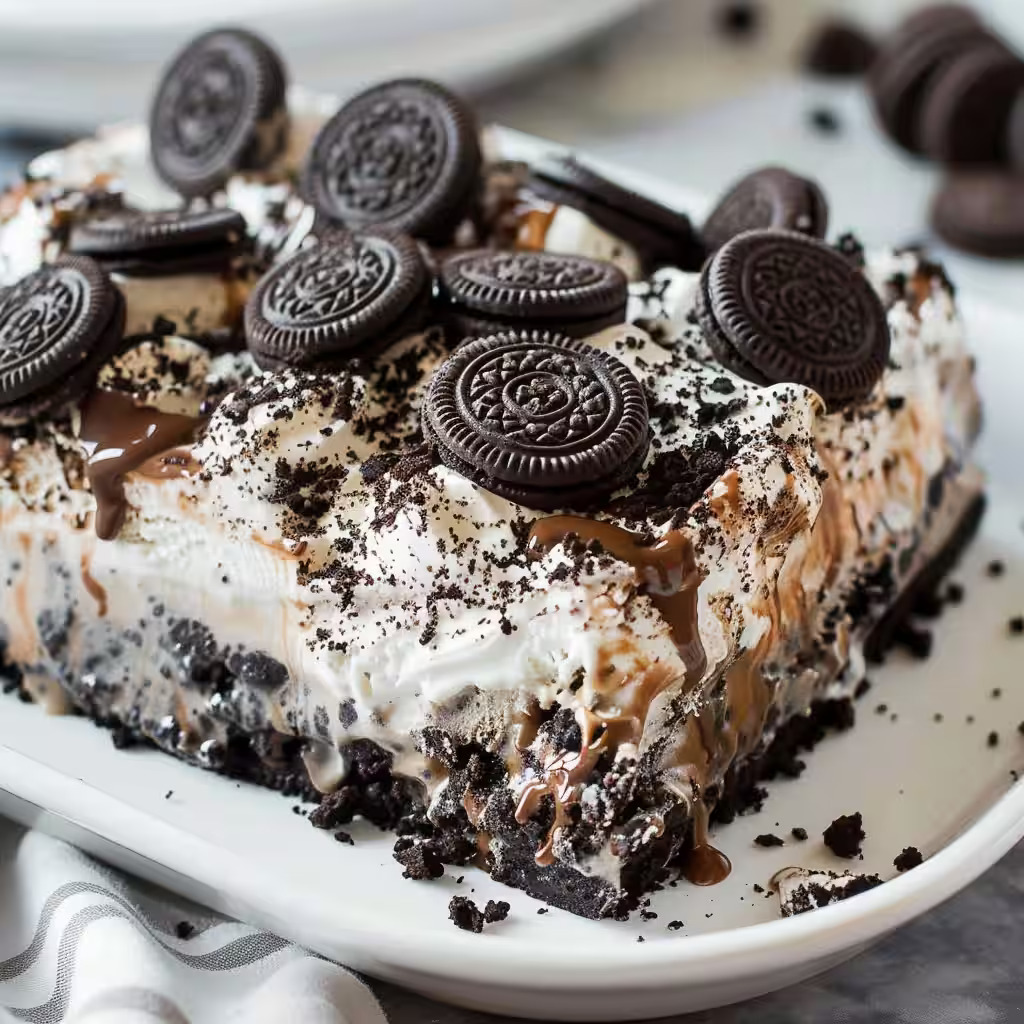
Few desserts generate as much excitement as an Oreo Ice Cream Cake. Combining a crunchy Oreo cookie crust, creamy vanilla ice cream, rich chocolate fudge, fluffy whipped topping, and extra Oreo cookie pieces, this frozen dessert delivers everything a sweet tooth could desire. It’s the perfect combination of cookies-and-cream flavor, smooth texture, and chocolate indulgence.
Whether you’re celebrating a birthday, hosting a summer gathering, planning a holiday dessert table, or simply craving a frozen treat, Oreo Ice Cream Cake offers a bakery-quality dessert that can easily be made at home. Best of all, this recipe requires no baking, making it both convenient and impressive.
Why You’ll Love Oreo Ice Cream Cake
There are countless reasons why this dessert remains a favorite among children and adults alike.
No-Bake Convenience
The entire cake comes together without turning on the oven.
Layers of Flavor
Every slice contains crunchy cookies, creamy ice cream, rich chocolate fudge, and fluffy whipped topping.
Perfect for Make-Ahead Desserts
Prepare it a day in advance and keep it frozen until needed.
Crowd-Pleasing Appeal
Oreo cookies and vanilla ice cream create a universally loved flavor combination.
Customizable
You can easily switch ice cream flavors or add extra toppings to create your own unique version.
Ingredients
For the Oreo Crust
- 38–42 classic Oreo cookies
- ½ cup unsalted butter, melted
For the Ice Cream Layer
- 1.5 quarts (about 1.4 liters) vanilla ice cream, slightly softened
For the Chocolate Fudge Layer
- 1 jar (12–14 ounces) hot fudge topping
- 1 cup heavy cream or half-and-half (optional)
For the Whipped Topping Layer
- 8–12 ounces whipped topping
For Decoration
- 8–10 Oreo cookies, crushed or chopped
- Optional chocolate drizzle
- Mini chocolate chips
- Sprinkles
- Cocoa powder
What Makes Oreo Ice Cream Cake So Popular?
The secret lies in the layers. Each layer contributes a different texture and flavor that work together perfectly.
The Oreo crust provides crunch, the vanilla ice cream delivers creamy sweetness, the fudge layer adds rich chocolate flavor, and the whipped topping creates a light and airy finish.
The result is a dessert that feels both indulgent and refreshing at the same time.
Step 1: Create the Oreo Crust
Place the Oreo cookies into a food processor.
Pulse until they become fine crumbs.
If you do not have a food processor, place the cookies in a sealed plastic bag and crush them with a rolling pin.
Transfer the crumbs to a mixing bowl.
Pour the melted butter over the cookie crumbs and stir until the mixture resembles wet sand.
Press the mixture firmly into the bottom of a 9×13-inch baking dish.
Use the bottom of a measuring cup to create a smooth and compact crust.
Place the pan in the freezer for 10 to 15 minutes.
This chilling step helps the crust firm up before adding additional layers.
Step 2: Add the Ice Cream Layer
Remove the vanilla ice cream from the freezer and allow it to soften for 10 to 15 minutes.
The ice cream should become spreadable but not melted.
Spoon the softened ice cream over the chilled Oreo crust.
Using an offset spatula or large spoon, spread the ice cream into an even layer.
Take time to smooth the surface for attractive layers when sliced.
Return the pan to the freezer for at least 1 hour.
This ensures the ice cream becomes fully firm before adding the fudge layer.
Step 3: Prepare the Chocolate Fudge Layer
Warm the hot fudge topping slightly in the microwave.
Heat it only until it becomes spreadable.
The fudge should remain thick and rich rather than hot and runny.
If desired, stir in a small amount of heavy cream or half-and-half for easier spreading.
Pour the fudge over the frozen ice cream layer.
Use gentle spatula strokes to spread it evenly across the surface.
Return the cake to the freezer for 45 to 60 minutes.
The fudge layer should feel firm before continuing.
Step 4: Add the Whipped Topping Layer
Spread the whipped topping over the chilled fudge layer.
Work carefully to create an even layer while maintaining the fluffy texture.
Smooth the top using a spatula.
This layer provides a light contrast to the richer chocolate and ice cream components.
Return the cake to the freezer for at least 2 hours.
This final freezing period allows all layers to firm up completely.
Step 5: Decorate the Cake
Just before serving, sprinkle crushed Oreo cookies generously across the top.
Adding them at the last moment helps preserve their crunch.
For additional decoration, consider:
- Chocolate drizzle
- Mini chocolate chips
- Colorful sprinkles
- Cocoa powder dusting
- Extra whipped cream swirls
The toppings make the cake look festive and enhance its flavor.
Tips for the Perfect Oreo Ice Cream Cake
Freeze Between Layers
Allowing each layer to firm before adding the next prevents mixing and creates clean slices.
Use Quality Ice Cream
Premium ice cream creates a creamier texture and richer flavor.
Don’t Overheat the Fudge
Warm fudge should remain thick enough to spread without melting the ice cream layer.
Press the Crust Firmly
A compact crust helps maintain structure when slicing.
Decorate Just Before Serving
Fresh toppings retain their texture and appearance better when added at the end.
Delicious Variations
Cookies and Cream Ice Cream Cake
Replace vanilla ice cream with cookies-and-cream ice cream for extra Oreo flavor.
Mint Oreo Ice Cream Cake
Use mint chocolate chip ice cream and Mint Oreo cookies.
Peanut Butter Oreo Cake
Add a layer of peanut butter sauce between the ice cream and fudge.
Birthday Celebration Cake
Decorate with colorful sprinkles and birthday candles.
Double Chocolate Oreo Cake
Use chocolate ice cream and chocolate whipped topping.
Best Occasions for Serving
Oreo Ice Cream Cake is ideal for:
- Birthday parties
- Summer barbecues
- Family celebrations
- Graduation parties
- Holiday gatherings
- Weekend desserts
- Children’s parties
- Potluck events
Its make-ahead convenience makes it especially useful for entertaining.
Storage Instructions
Store the cake tightly covered in the freezer.
For best quality, enjoy within 7 days.
Before slicing, allow the cake to sit at room temperature for approximately 5 minutes.
This slight softening makes cutting easier while maintaining the frozen texture.
Frequently Asked Questions
Can I make Oreo Ice Cream Cake ahead of time?
Yes. In fact, making it one day ahead often improves the texture and allows the layers to set completely.
What type of Oreo cookies work best?
Classic Oreo cookies provide the traditional flavor, but flavored varieties can also be used.
Can I use homemade whipped cream?
Absolutely. Homemade whipped cream works wonderfully as a substitute for whipped topping.
Can I change the ice cream flavor?
Yes. Chocolate, cookies-and-cream, mint chocolate chip, coffee, and strawberry all work well.
How do I get clean slices?
Use a sharp knife dipped in warm water and wipe it clean between cuts.
Can I use a different pan size?
Yes, although the layer thickness may vary depending on the pan dimensions.
Why is my crust falling apart?
The crumbs may need additional butter or firmer pressing before freezing.
Can I freeze leftovers?
Yes. Keep leftovers tightly wrapped in the freezer for up to one week.
Conclusion
Oreo Ice Cream Cake combines everything dessert lovers crave into one spectacular frozen treat. From the crunchy Oreo crust and creamy vanilla ice cream to the rich chocolate fudge and fluffy whipped topping, every layer contributes to an unforgettable dessert experience.
Easy to prepare, endlessly customizable, and perfect for special occasions, this no-bake cake consistently impresses guests while satisfying even the strongest sweet cravings. One slice is enough to understand why Oreo Ice Cream Cake remains one of the most popular homemade frozen desserts of all time.

A No-Bake Frozen Delight
Description
Oreo Ice Cream Cake combines a crunchy Oreo cookie crust, creamy vanilla ice cream, rich chocolate fudge, and fluffy whipped topping, making it the perfect no-bake dessert for any occasion.
Ingredients
Instructions
- Place the Oreo cookies in a food processor and pulse until fine crumbs. Transfer crumbs to a mixing bowl, add melted butter, and mix until it resembles wet sand. Press firmly into a 9×13-inch baking dish. Freeze for 10-15 minutes.
- Spoon softened vanilla ice cream over the crust; smooth to create an even layer. Return to the freezer for at least 1 hour.
- Warm hot fudge topping slightly in the microwave, then pour over the ice cream layer and smooth it out. Freeze for 45-60 minutes.
- Spread whipped topping over the fudge layer and smooth out. Freeze for at least 2 hours.
- Before serving, sprinkle crushed Oreo cookies on top and add any additional decorations like chocolate drizzle or sprinkles.
Notes
- Make ahead for best results. Store tightly covered in the freezer for up to 7 days.