Old-Fashioned Chocolate Pie: A Classic Dessert for All Occasions
There’s something irresistibly nostalgic about an old-fashioned chocolate pie. This classic dessert has been a staple in Southern kitchens for generations, offering a rich, creamy filling encased in a flaky, buttery crust. Whether you’re making it for a holiday gathering, a family dinner, or just because, this pie is sure to be a hit with chocolate lovers of all ages.
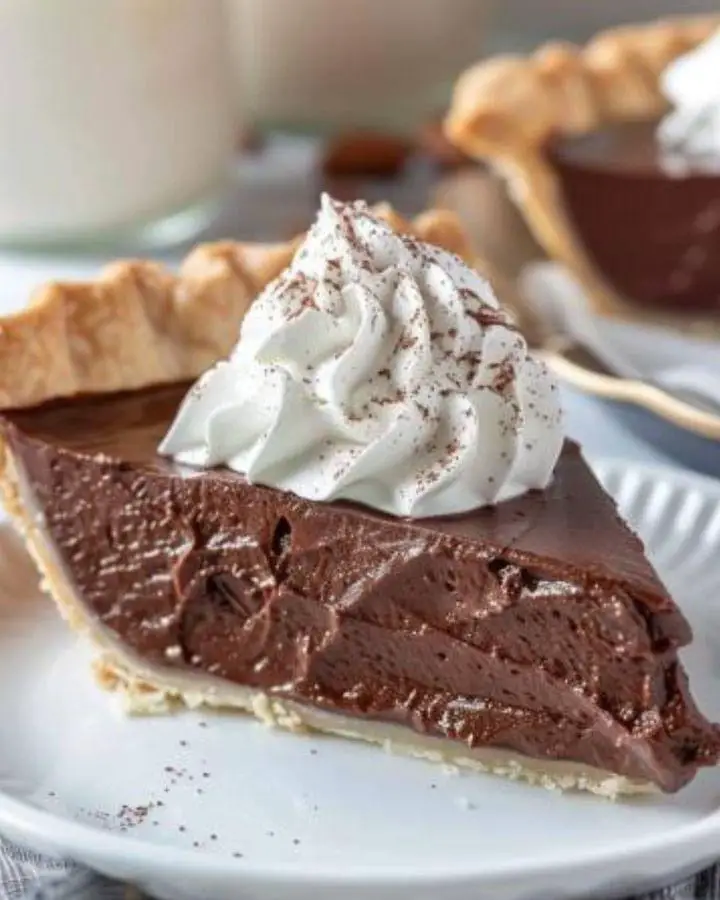
The combination of a perfectly baked crust, a velvety chocolate filling, and a light meringue topping (if you choose to add it) creates a harmonious balance of textures and flavors. Each bite delivers the comforting taste of homemade goodness, transporting you back to simpler times when desserts were made from scratch with love and care.
Ingredients for Old-Fashioned Chocolate Pie
For the Pie Crust:
- 1 1/4 cups all-purpose flour
- 1/2 teaspoon salt
- 1/2 cup unsalted butter, cold and cubed
- 3-4 tablespoons ice water
For the Chocolate Filling:
- 1 cup granulated sugar
- 3 tablespoons cocoa powder
- 1/4 cup cornstarch
- 1/4 teaspoon salt
- 3 cups whole milk
- 4 large egg yolks, lightly beaten
- 2 tablespoons unsalted butter
- 1 teaspoon vanilla extract
For the Meringue Topping (Optional):
- 4 large egg whites
- 1/4 teaspoon cream of tartar
- 1/4 cup granulated sugar
Instructions: How to Make an Old-Fashioned Chocolate Pie
Preparing the Pie Crust
A good pie starts with a well-made crust. Follow these steps to create a flaky and delicious base for your chocolate pie.
Step 1: Mix the Dry Ingredients
In a large bowl, combine 1 1/4 cups of all-purpose flour with 1/2 teaspoon of salt. This will be the base of your pie crust.
Step 2: Cut in the Butter
Add 1/2 cup of cold, cubed unsalted butter to the flour mixture. Using a pastry cutter or your fingers, cut the butter into the flour until the mixture resembles coarse crumbs. The key here is to work quickly to keep the butter cold, which will result in a flaky crust.
Step 3: Add the Water
Gradually add 3-4 tablespoons of ice water, one tablespoon at a time, to the flour mixture. Stir gently after each addition until the dough begins to come together. Be careful not to add too much water, as this can make the crust tough.
Step 4: Form the Dough
Once the dough comes together, shape it into a disk. Wrap the disk in plastic wrap and refrigerate it for at least 30 minutes. Chilling the dough helps to relax the gluten and makes it easier to roll out.
Step 5: Roll Out the Dough
On a lightly floured surface, roll out the chilled dough to fit a 9-inch pie pan. Carefully transfer the dough to the pie pan, pressing it gently into the corners and trimming any excess dough from the edges. Prick the bottom of the crust with a fork to prevent it from puffing up during baking.
Step 6: Bake the Crust
Preheat your oven to 375°F (190°C). Line the pie crust with parchment paper and fill it with pie weights or dried beans to keep the crust from shrinking. Bake the crust for 15 minutes. Then, remove the parchment and weights, and bake for an additional 10 minutes, or until the crust is golden brown. Let the crust cool completely before adding the filling.
Making the Chocolate Filling
The heart of this pie is its rich, creamy chocolate filling. Follow these steps to achieve the perfect consistency and flavor.
Step 1: Mix the Dry Ingredients
In a medium saucepan, whisk together 1 cup of granulated sugar, 3 tablespoons of cocoa powder, 1/4 cup of cornstarch, and 1/4 teaspoon of salt. Mixing these dry ingredients ensures even distribution, which is key for a smooth filling.
Step 2: Add the Milk and Egg Yolks
Gradually whisk in 3 cups of whole milk, ensuring that the mixture is smooth and free of lumps. Then, whisk in the 4 lightly beaten egg yolks. The egg yolks will give the filling its rich, custardy texture.
Step 3: Cook the Filling
Place the saucepan over medium heat. Cook the mixture, whisking constantly, until it comes to a boil and thickens. This process should take about 7-10 minutes. Once the mixture has thickened, continue to cook for an additional 2 minutes to ensure that the cornstarch is fully cooked and the filling is smooth.
Step 4: Add Butter and Vanilla
Remove the saucepan from the heat. Stir in 2 tablespoons of unsalted butter and 1 teaspoon of vanilla extract until the butter is completely melted and the filling is smooth and glossy.
Step 5: Pour into the Crust
Immediately pour the hot filling into the cooled pie crust, spreading it out evenly with a spatula. The filling will set as it cools, so it’s important to work quickly.
Preparing the Meringue Topping (Optional)
If you want to add a light, airy topping to your pie, meringue is the way to go. Follow these steps to make a perfect meringue.
Step 1: Whip the Egg Whites
In a large mixing bowl, beat 4 large egg whites and 1/4 teaspoon of cream of tartar with an electric mixer on medium speed until soft peaks form. Soft peaks are when the egg whites hold their shape but are still slightly floppy.
Step 2: Add Sugar
Gradually add 1/4 cup of granulated sugar, one tablespoon at a time, while beating on high speed. Continue beating until stiff peaks form, and the sugar is completely dissolved. Stiff peaks stand straight up when the beaters are lifted, and the meringue should be glossy.
Step 3: Spread the Meringue
Spread the meringue over the hot chocolate filling, sealing it to the edges of the crust to prevent shrinking. Use a spatula to create decorative swirls and peaks in the meringue.
Baking and Serving the Pie
Step 1: Bake the Meringue
If you’re using meringue, bake the pie at 350°F (175°C) for 10-12 minutes, or until the meringue is golden brown. Keep an eye on it to prevent burning.
Step 2: Cool the Pie
Allow the pie to cool completely on a wire rack. Once cooled, refrigerate the pie for at least 2 hours before serving. This chilling time allows the filling to set, making it easier to slice.
Step 3: Serve
Slice and serve your old-fashioned chocolate pie chilled. Enjoy the rich, creamy filling, flaky crust, and, if you’ve added it, the light and airy meringue topping. This pie is a true comfort food that never fails to please.
Tips for Perfect Old-Fashioned Chocolate Pie
1. Use Cold Butter for the Crust
- Cold butter is crucial for a flaky pie crust. It creates layers in the dough that bake up crisp and tender.
2. Whisk Constantly When Cooking the Filling
- Whisking constantly while cooking the chocolate filling prevents lumps and ensures a smooth, creamy texture.
3. Let the Pie Cool Completely
- Allowing the pie to cool and refrigerate fully helps the filling set properly, making it easier to slice and serve.
4. Experiment with Toppings
- While meringue is traditional, you can also top this pie with whipped cream, chocolate shavings, or even a sprinkle of sea salt for a different twist.
Frequently Asked Questions (FAQs)
Q1: Can I make the pie crust ahead of time?
A: Yes, you can prepare the pie crust up to two days in advance. Keep it wrapped in plastic wrap in the refrigerator until you’re ready to use it.
Q2: Can I use a store-bought pie crust?
A: Absolutely! If you’re short on time, a store-bought crust will work just fine. Just make sure to bake it according to the package instructions before adding the filling.
Q3: How do I prevent my meringue from weeping?
A: Ensure that the meringue is spread over the hot filling and that it is sealed to the edges of the crust. This helps prevent the meringue from weeping or shrinking.
Q4: Can I make this pie without the meringue?
A: Yes, you can skip the meringue altogether. The pie is delicious on its own, or you can top it with whipped cream instead.
Q5: How long does the chocolate pie last?
A: The pie can be stored in the refrigerator for up to 3 days. Keep it covered to prevent the filling from drying out.
Old-fashioned chocolate pie is a timeless dessert that brings comfort and joy to any occasion. With its rich, creamy filling and flaky crust, this pie is sure to become a favorite in your household. Enjoy a slice of this classic treat and savor the taste of tradition!