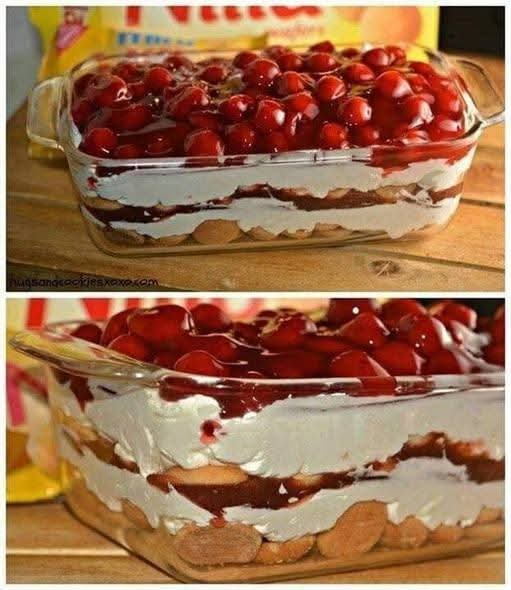
If you love classic cherry cheesecake but want something easier, faster, and completely oven-free, this No-Bake Cherry Cheesecake Cookie Lasagna is the perfect dessert. Creamy cheesecake filling, layers of vanilla wafers, sweet cherry preserves, and luscious cherry pie filling come together in a chilled, sliceable treat that feels indulgent yet effortless.
This dessert is ideal for holidays, potlucks, summer gatherings, or anytime you need a crowd-pleasing sweet without turning on the oven. With simple ingredients and minimal prep time, it’s a guaranteed favorite.
Why You’ll Love This Dessert
No-Bake Cherry Cheesecake Cookie Lasagna is:
- Completely oven-free
- Easy to assemble
- Perfect for making ahead
- Creamy, fruity, and perfectly balanced
- Great for serving in slices
The layers soften overnight, creating a cake-like texture that holds together beautifully when cut.
Ingredient Breakdown
Nilla Wafer Minis (5 mini bags)
These form the base and layers of the “lasagna.” As the dessert chills, the cookies soften and absorb moisture from the filling, creating a tender texture similar to cake.
You can also use regular-sized vanilla wafers if mini versions aren’t available.
Cream Cheese (8 ounces, softened)
The foundation of the cheesecake layer. It provides richness and tang.
Sugar (⅓ cup)
Sweetens the cream cheese and balances its tanginess.
Cool Whip (8-ounce tub)
Lightens the cheesecake mixture, creating a fluffy, mousse-like texture.
Cherry Preserves (½ cup)
Adds an extra layer of concentrated cherry flavor between the cheesecake layers.
Cherry Pie Filling (1 can)
Creates the glossy, vibrant top layer packed with whole cherries.
Step-by-Step Instructions
Step 1: Prepare the Pan
Line a loaf pan with Nilla Wafers across the bottom. Arrange them in a single layer, covering as much surface area as possible.
This creates the first structural layer.
Step 2: Make the Cheesecake Filling
In a mixing bowl, beat the softened cream cheese and sugar until smooth and creamy. Make sure there are no lumps.
Once smooth, gently beat in the Cool Whip until fully incorporated. The mixture should be light, fluffy, and spreadable.
Step 3: First Cheesecake Layer
Spread half of the cheesecake mixture over the cookie layer. Use a spatula and spread gently to avoid shifting the cookies underneath.
Step 4: Add Cherry Preserves
Stir the cherry preserves to loosen them slightly.
Dollop spoonfuls evenly over the cheesecake layer, then gently spread to create a thin, even layer.
Step 5: Second Cookie Layer
Add another layer of Nilla Wafers on top of the preserves.
Press lightly to help them settle into place.
Step 6: Final Cheesecake Layer
Spread the remaining cheesecake mixture over the second cookie layer.
Smooth the top evenly.
Step 7: Cherry Pie Topping
Pour the cherry pie filling over the top.
Spread gently to distribute the cherries evenly across the surface.
Step 8: Chill Overnight
Cover the loaf pan and refrigerate overnight.
This step is essential. The cookies need time to soften and absorb moisture from the filling. Overnight chilling transforms the layered cookies into a cohesive, sliceable dessert.
Step 9: Serve
Slice and serve with additional whipped cream if desired.
Expert Tips for Perfect Results
Use Softened Cream Cheese
Room-temperature cream cheese blends smoothly and prevents lumps.
Spread Gently
Because the base is made of loose cookies, use light pressure when spreading layers to keep them aligned.
Chill Fully
At least 8 hours is ideal. The texture improves significantly after a full night in the refrigerator.
Line with Parchment for Easy Removal
If you want to lift the dessert out cleanly, line the loaf pan with parchment paper before layering.
Texture and Flavor Profile
After chilling, the dessert develops a layered consistency similar to an icebox cake. The cookies become tender but still structured, while the cheesecake filling remains creamy and fluffy.
The combination of tangy cream cheese, sweet cherries, and soft vanilla wafers creates a balanced bite — rich but not overly heavy.
Variations to Try
Chocolate Cherry Version
Add a layer of mini chocolate chips between layers.
Berry Mix Version
Substitute strawberry or mixed berry pie filling for a different fruit flavor.
Lemon Twist
Add a teaspoon of lemon zest to the cheesecake mixture for brightness.
Homemade Whipped Cream
Replace Cool Whip with freshly whipped cream (about 2 cups whipped from heavy cream).
Storage Instructions
Store covered in the refrigerator for up to 4 days.
This dessert is not ideal for freezing, as the texture of the cream filling may change after thawing.
Frequently Asked Questions
Can I use a different pan?
Yes. A small square baking dish works well. You may need to adjust cookie quantity to fit.
Can I make this ahead of time?
Yes. In fact, it tastes better when made a day in advance.
What if I don’t have cherry preserves?
You can skip them, but they add concentrated flavor between layers.
Can I use fresh cherries?
Fresh cherries can be used if cooked down with sugar to create a thick topping.
How do I slice it cleanly?
Use a sharp knife and wipe it clean between cuts for neat slices.
Serving Suggestions
This dessert pairs well with:
- Coffee
- Iced tea
- Milk
- Vanilla ice cream
It also works beautifully as part of a dessert buffet or holiday spread.
Final Thoughts
No-Bake Cherry Cheesecake Cookie Lasagna combines simplicity with indulgence. The layers of vanilla wafers, creamy cheesecake filling, and sweet cherries create a dessert that feels impressive but requires minimal effort.
Make it once, chill overnight, and enjoy a perfectly sliceable, crowd-pleasing treat that tastes like classic cherry cheesecake — with a fun, layered twist.