Growing Plump, White Bean Sprouts at Home Using Plastic Bottles: A Simple DIY Guide
Bean sprouts are not only a nutritious addition to your meals but also a fun and rewarding DIY project. By growing your own bean sprouts at home using plastic bottles, you can ensure a fresh and constant supply of these crunchy greens for your culinary adventures. This guide will walk you through the step-by-step process of sprouting plump, white bean sprouts right in your kitchen.
Materials You’ll Need:
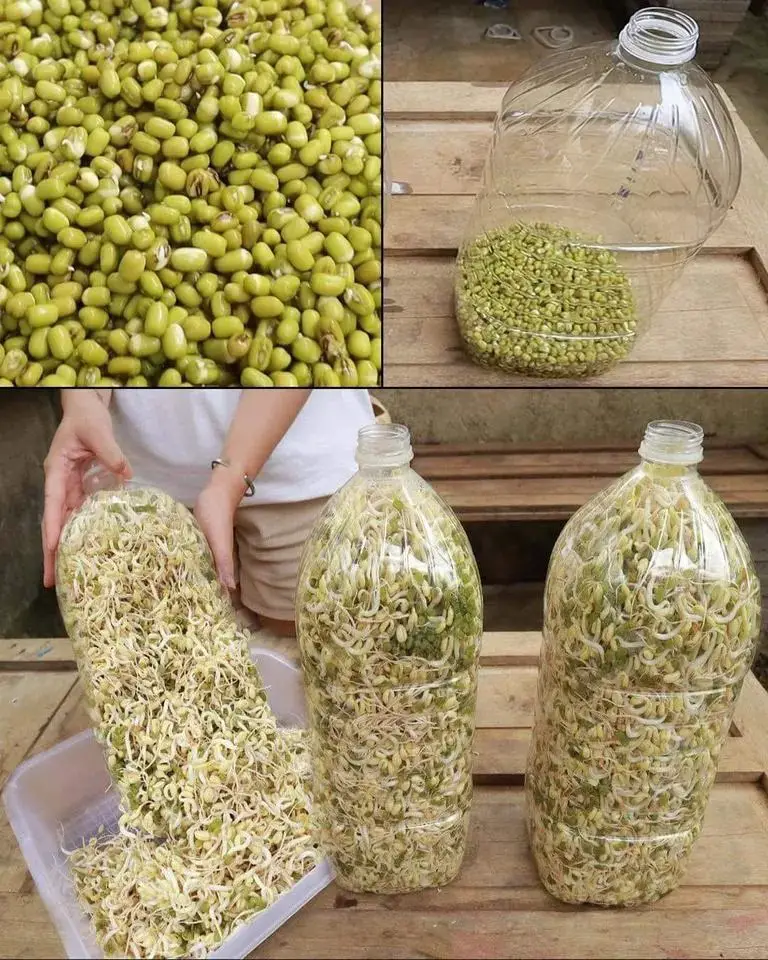
- Green beans (mung beans are ideal for sprouting).
- Warm water
- Three large plastic bottles (at least 5 liters each).
- A smaller bottle to assist with seed distribution.
- A drill or a sharp object to make holes in bottle caps.
- Towels
- A knife or scissors for cutting bottles.
The Step-by-Step Guide:
1. Prepare the Beans:
Begin by taking a bowl and placing your green beans in it. Ensure you have thoroughly cleaned and rinsed them. Then, add warm water to the bowl, covering the beans entirely. Mix them gently to make sure they are well-moistened. Allow them to soak for about four hours. This soaking period helps initiate the sprouting process by hydrating the beans.
2. Bottle Preparation:
While the beans are soaking, you can prepare the large plastic bottles. You’ll need to create holes in the bottle caps to facilitate proper aeration. Use a drill or a sharp object to make small holes in the caps. These holes will allow air circulation, essential for sprout growth.
3. Distribute the Beans:
Once the beans have soaked for the required time, take a smaller bottle and cut off the top part to create a funnel. This funnel will make it easier to transfer the beans into the large bottles. Gently pour the soaked beans into the large bottles, distributing them evenly across the three containers.
4. Cover with Caps and Towels:
After evenly distributing the beans, place the caps on the large bottles. To ensure the sprouts remain in a dark, moist environment, cover the bottles with towels. These towels should ideally be kept slightly damp. You can achieve this by lightly spraying them with water.
5. Watering and Draining:
For the next four days, you’ll need to care for your sprouts. Water the beans three times a day, ensuring they receive enough moisture for healthy growth. Water each session for approximately five minutes. After each watering, replace the caps on the bottles and turn them upside down. This allows excess water to drain away, ensuring that the sprouts aren’t waterlogged. Remember to re-cover the bottles with towels after each session to maintain the desired darkness.
6. Harvest Your Sprouts:
After four days of careful nurturing, your plastic bottles will be filled with plump, white bean sprouts. To harvest them, you’ll need to cut open the bottles. Be cautious during this step to avoid damaging the delicate sprouts. Once you’ve removed the sprouts from the bottles, give them a thorough rinse before adding them to your favorite dishes.
Tips for Successful Sprouting:
- Ensure proper ventilation by making small holes in the bottle caps.
- Keep the towels covering the bottles slightly damp to maintain the desired level of moisture.
- Avoid overwatering to prevent mold growth.
- Place the bottles in a warm, dark place to encourage sprout growth.
FAQs:
Q: Can I use other types of beans for sprouting?
A: Yes, you can experiment with different types of beans, but mung beans are commonly used for sprouting due to their quick sprouting time and mild flavor.
Q: How long do bean sprouts last after harvesting?
A: Bean sprouts are best when consumed fresh but can be stored in the refrigerator for up to five days. Rinse them thoroughly before storing and check for any signs of spoilage before use.
Q: Can I reuse the plastic bottles for future sprouting?
A: Yes, you can wash and sterilize the bottles after each use to grow more sprouts. Ensure they are completely dry before starting a new batch to prevent mold growth.
Q: What should I do if I notice mold on my sprouts?
A: If mold develops on your sprouts, it’s best to discard them to avoid any risk of contamination. Review your sprouting process to identify any potential causes of mold, such as overwatering or inadequate ventilation, and adjust accordingly for your next batch.
Q: Can I grow bean sprouts without plastic bottles?
A: While plastic bottles provide a convenient container for sprouting, you can also use other containers like glass jars or trays lined with paper towels. The key is to provide a dark, moist environment for the sprouts to thrive.
By following this simple DIY guide, you can enjoy the satisfaction of growing your own plump, white bean sprouts at home. With just a few plastic bottles and some basic materials, you can elevate your culinary creations with fresh, homegrown sprouts. Happy sprouting!