How to Make No-Bake Dessert: A Quick and Delicious Dairy-Free Treat
Are you in the mood for a delicious dessert but don’t want to deal with the hassle of baking? This No-Bake Dairy-Free Dessert is the perfect solution! With just a few simple ingredients and no need to turn on the oven, this dessert is easy to make, smooth in texture, and bursting with flavor. Whether you’re hosting a gathering, craving a sweet treat, or need something quick and convenient, this recipe will become your go-to.
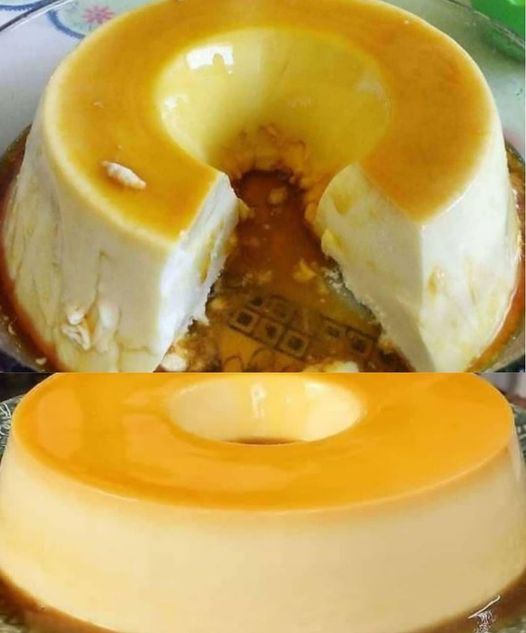
This dessert is not only easy to prepare, but it’s also dairy-free, making it a perfect option for those with lactose intolerance or anyone looking to reduce dairy in their diet. It has a creamy, luscious texture thanks to the combination of condensed milk, cream, and unflavored gelatin, with a light and delicate sweetness that melts in your mouth.
Ingredients for No-Bake Dairy-Free Dessert
To make this simple no-bake dessert, you’ll need the following ingredients:
- 1 can of condensed milk (395 grams/14 oz): This provides the sweetness and creamy consistency that defines this dessert.
- 1 small box of dairy-free cream (200 grams/7.05 oz): Adds richness and a silky texture without using dairy.
- 1 packet of unflavored gelatin (12 grams/0.4 oz): The gelatin is essential for helping the dessert set into a firm yet smooth consistency.
Step-by-Step Instructions
Step 1: Hydrate the Gelatin
- Begin by hydrating the unflavored gelatin. Follow the instructions on the packet to do this correctly. Typically, you’ll need to dissolve the gelatin in a small amount of water (usually a couple of tablespoons) and let it sit for a few minutes to absorb the liquid and swell.
Tip: Ensure the water is warm, but not boiling, when dissolving the gelatin. Boiling water can reduce the effectiveness of the gelatin, which may prevent the dessert from setting properly.
Step 2: Blend the Ingredients
- In a blender, add the condensed milk, dairy-free cream, and the hydrated gelatin.
- Blend the mixture on medium speed for about 1-2 minutes, or until the ingredients are well combined and the texture is smooth and creamy.
Tip: Scrape down the sides of the blender halfway through blending to ensure that all the ingredients are fully incorporated.
Step 3: Pour into the Mold
- Lightly moisten a pudding mold or any dessert mold with water. This will help prevent the dessert from sticking to the mold when it’s time to unmold it.
- Pour the blended mixture into the prepared mold, making sure it spreads evenly.
Tip: If you want to add some flair, you can sprinkle a little cocoa powder or finely chopped nuts into the mold before pouring the mixture. This adds a decorative touch when you unmold the dessert later.
Step 4: Refrigerate and Set
- Place the mold in the refrigerator and allow the dessert to chill for at least 4 hours or until it has fully set. The gelatin will work its magic, firming up the dessert into a smooth, sliceable treat.
Tip: For the best results, leave the dessert in the fridge overnight. This will give the gelatin ample time to fully set, and the flavors will meld together even more.
Step 5: Serve and Enjoy
- Once the dessert is fully set, remove it from the refrigerator. To unmold, run a thin knife along the edges of the mold and gently flip it onto a serving plate.
- Slice and serve chilled.
Serving Suggestions and Tips
Serving Tips:
- Top with Fruit: This dessert pairs wonderfully with fresh fruit, such as berries, kiwi, or mango. The natural sweetness and acidity of the fruit provide a nice contrast to the creamy texture of the dessert.
- Drizzle with Sauce: Add an extra layer of flavor by drizzling caramel, chocolate, or fruit syrup over the top of the dessert. This enhances the presentation and adds depth to each bite.
- Garnish with Mint: A sprig of fresh mint on top makes for an elegant and refreshing garnish that brightens the dish.
- Layer in Parfaits: You can also serve this dessert as part of a layered parfait. Alternate layers of the creamy dessert with granola, crushed cookies, or fruit for a beautiful and delicious presentation.
Storage Tips:
- Refrigeration: Store the dessert in the refrigerator in an airtight container for up to 5 days. Keep it covered to prevent it from drying out or absorbing any unwanted odors from the fridge.
- Freezing: Although freezing is not typically recommended for gelatin-based desserts, you can freeze it if needed. Just be aware that the texture may change slightly after thawing. If you freeze it, let it thaw in the fridge for a few hours before serving.
Variations of the No-Bake Dessert
1. Chocolate No-Bake Dessert
- Add 2-3 tablespoons of cocoa powder to the blender for a chocolate twist. The rich chocolate flavor complements the creamy texture, making it a hit for chocolate lovers.
2. Coconut No-Bake Dessert
- Replace the dairy-free cream with coconut cream to create a tropical flavor. You can also sprinkle shredded coconut on top for extra coconut goodness.
3. Citrus-Infused No-Bake Dessert
- Add a tablespoon of fresh lemon or lime juice to the mixture before blending. This will give the dessert a tangy, refreshing twist that balances the sweetness perfectly.
4. Coffee-Flavored No-Bake Dessert
- Dissolve a teaspoon of instant coffee granules in a tablespoon of warm water and add it to the blender for a subtle coffee flavor. This variation pairs well with chocolate or caramel toppings.
5. Berry Swirl No-Bake Dessert
- After pouring the blended mixture into the mold, swirl in some berry puree or jam for a beautiful, fruity pattern that adds both flavor and visual appeal.
Frequently Asked Questions (FAQs)
1. Can I use flavored gelatin instead of unflavored gelatin?
You can, but it will change the flavor and color of the dessert. If you prefer a specific flavor, like strawberry or lemon, using flavored gelatin is a fun option. Just keep in mind that it will no longer be dairy-free if the flavored gelatin contains dairy.
2. Can I make this dessert without gelatin?
Yes, you can substitute gelatin with agar-agar for a plant-based alternative. Follow the instructions on the agar-agar packet for proper usage, as it requires different preparation than gelatin.
3. How long does it take for the dessert to set in the refrigerator?
It typically takes about 4 hours for the dessert to set properly, but for best results, leave it in the fridge overnight. The longer it chills, the firmer and smoother the texture will become.
4. Can I add other ingredients to this recipe?
Absolutely! You can customize this dessert with various mix-ins like chocolate chips, fruit pieces, or nuts. Just be sure to fold them into the mixture before pouring it into the mold.
5. Can I make this dessert in individual servings?
Yes! Instead of using a large mold, you can pour the mixture into small individual ramekins or cups for single-serving portions. This is a great option for parties or gatherings.
6. Is this dessert suitable for vegans?
To make this dessert vegan, you can replace the gelatin with agar-agar and ensure that the condensed milk and cream are plant-based alternatives. Many stores carry vegan versions of these ingredients, making it easy to adapt the recipe.
7. Can I use regular cream instead of dairy-free cream?
Yes, if you are not concerned about keeping the recipe dairy-free, you can use regular heavy cream or any other cream of your choice. The result will still be delicious and creamy.
8. How do I prevent the dessert from sticking to the mold?
Moisten the mold with water before pouring in the mixture, and let the dessert fully set before attempting to unmold it. Running a thin knife along the edges of the mold can help release the dessert easily.
Conclusion
This No-Bake Dairy-Free Dessert is a quick, easy, and incredibly satisfying treat that requires minimal effort and no baking. Whether you’re preparing it for a special occasion or just want a simple dessert to enjoy during the week, this recipe delivers on flavor and texture. Plus, with its versatility, you can easily adapt it to suit your taste preferences. Try it today and enjoy a sweet, creamy dessert that’s sure to impress!