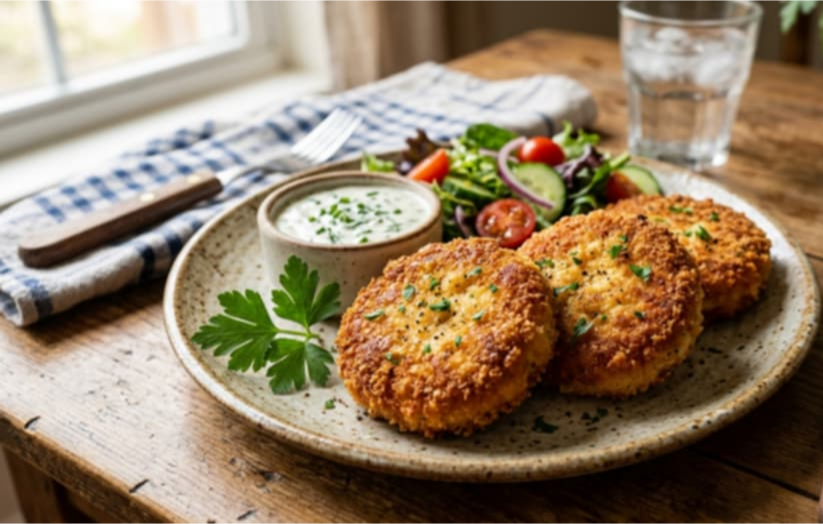
Chicken Cutlets are one of the most loved homemade snacks across many kitchens because they combine crispy texture, juicy chicken, aromatic spices, and rich flavor in every bite. Whether you serve them as an evening snack, party appetizer, or side dish, these golden cutlets always disappear quickly from the plate.
This Chicken Cutlets recipe uses boneless chicken, fresh vegetables, warming spices, creamy milk sauce, eggs, and breadcrumbs to create a soft interior with a crunchy outer coating. The result feels comforting, satisfying, and packed with flavor.
In this complete guide, you will learn how to prepare Chicken Cutlets step by step, understand why each ingredient matters, discover helpful cooking tips, and explore delicious serving ideas and variations.
Chicken Cutlets
Why Homemade Chicken Cutlets Taste Better
Homemade Chicken Cutlets offer freshness and flavor that frozen store-bought versions often lack. When you prepare them from scratch, you control the seasoning, texture, and ingredients.
Fresh vegetables add sweetness and crunch, while the spice blend creates warmth and depth. The creamy white sauce made with butter, flour, and milk binds the filling together and gives the cutlets a rich texture.
Another advantage is versatility. You can make them spicy, mild, cheesy, or even healthier depending on your preferences.
Most importantly, homemade Chicken Cutlets feel comforting and satisfying because they use simple ingredients prepared with care.
Ingredients for Chicken Cutlets
Main Ingredients
- 1/2 kg boneless chicken
- 2 tsp ginger garlic paste
- 1/2 cup beans, finely chopped
- 1/2 cup carrot, finely chopped
- 3 green chilies, finely chopped
- 1/4 cup spring onion, finely chopped
- 1 1/2 tsp chili powder
- 1 tsp garam masala
- 1 tsp cumin powder
- 1/2 tsp black pepper
- 1/4 cup water
- 2 tbsp unsalted butter
- 2 tbsp maida (all-purpose flour)
- 3/4 cup boiled milk
- 1 tbsp salt
- 2 eggs
- Bread crumbs as needed
Understanding the Ingredients
Each ingredient contributes something important to the final texture and flavor.
Boneless Chicken
Chicken forms the hearty protein base of the cutlets. Boneless chicken cooks quickly and shreds easily, creating a soft and flavorful filling.
Ginger Garlic Paste
This ingredient builds the savory foundation of the recipe. It adds warmth, aroma, and depth to the chicken mixture.
Beans and Carrots
These vegetables provide texture, freshness, and natural sweetness. Finely chopping them helps them blend smoothly into the filling.
Green Chilies
Green chilies bring gentle heat and brightness. You can adjust the amount depending on your spice preference.
Spring Onion
Spring onion adds mild onion flavor and freshness that balances the richness of the cutlets.
Spice Powders
The chili powder, garam masala, cumin powder, and black pepper create a warm and aromatic flavor profile.
Butter, Flour, and Milk
These ingredients create a creamy binding sauce that keeps the cutlets soft inside while holding the filling together.
Eggs and Bread Crumbs
Eggs help the breadcrumbs stick to the cutlets, while breadcrumbs create the crispy golden coating.
Step-by-Step Instructions
Step 1: Cook the Chicken
Place the boneless chicken in a pan with ginger garlic paste, chili powder, salt, and water.
Cook over medium heat until the chicken becomes tender and fully cooked. Allow the water to reduce completely.
Once cooked, shred or finely mince the chicken and set it aside.
Step 2: Cook the Vegetables
Heat a pan over medium heat and add a little butter or oil.
Add the finely chopped beans, carrots, green chilies, and spring onions.
Cook for several minutes until the vegetables soften slightly while still keeping some texture.
Add the shredded chicken to the vegetables and mix well.
Then add garam masala, cumin powder, black pepper, and additional salt if needed.
Cook for another few minutes so the flavors combine properly.
Step 3: Prepare the Creamy Binding Sauce
In another pan, melt the unsalted butter over low heat.
Add the maida and stir continuously for about one minute. This removes the raw flour taste.
Slowly pour in the boiled milk while stirring constantly to avoid lumps.
Cook until the mixture thickens into a smooth white sauce.
Add this sauce to the chicken mixture and mix thoroughly. The filling should become creamy and easy to shape.
Allow the mixture to cool completely.
Step 4: Shape the Chicken Cutlets
Once the mixture cools, take small portions and shape them into oval or round cutlets.
You can lightly grease your hands to prevent sticking.
Place the shaped cutlets on a tray.
Step 5: Coat the Cutlets
Beat the eggs in a bowl.
Place breadcrumbs in another shallow plate.
Dip each cutlet into the beaten egg first, ensuring all sides are coated.
Then roll the cutlet in breadcrumbs until fully covered.
For extra crispiness, repeat the egg and breadcrumb coating one more time.
Step 6: Fry the Chicken Cutlets
Heat oil in a deep frying pan over medium heat.
Carefully place the cutlets into the hot oil.
Fry until golden brown and crispy on both sides.
Avoid overcrowding the pan because that lowers the oil temperature and reduces crispiness.
Once fried, transfer the Chicken Cutlets to a paper towel-lined plate to remove excess oil.
Serve hot.
Tips for Perfect Chicken Cutlets
Use Fresh Breadcrumbs
Fresh breadcrumbs create a lighter and crispier coating compared to stale breadcrumbs.
Cool the Filling Before Shaping
Warm filling feels sticky and difficult to handle. Cooling helps the cutlets hold their shape.
Maintain Medium Heat
Very hot oil browns the outside too quickly while leaving the inside cold. Medium heat ensures even frying.
Double Coat for Extra Crunch
Dipping the cutlets twice in egg and breadcrumbs creates a thicker and crunchier crust.
Delicious Serving Suggestions
Chicken Cutlets pair wonderfully with many sauces and side dishes.
Serve them with:
- Tomato ketchup
- Garlic mayonnaise
- Mint chutney
- Chili sauce
- Ranch dressing
You can also use Chicken Cutlets inside burgers, wraps, or sandwiches.
For a complete meal, serve them with salad, fries, or soup.
Healthy Alternatives
If you prefer a lighter version, you can bake or air fry the cutlets.
Baking Method
Preheat the oven to 400°F (200°C).
Place the cutlets on a lined baking tray and lightly brush them with oil.
Bake for about 20 to 25 minutes, flipping halfway through.
Air Fryer Method
Air fry at 375°F for around 12 to 15 minutes until golden and crisp.
Both methods reduce oil while still delivering good texture.
Common Mistakes to Avoid
Overcooking the Chicken
Dry chicken creates tough cutlets. Cook only until tender.
Using Watery Filling
Excess moisture prevents the cutlets from holding shape properly.
Frying at Low Temperature
Low oil temperature causes greasy cutlets instead of crispy ones.
Skipping Cooling Time
Warm filling can break apart during shaping and frying.
Frequently Asked Questions
1. Can I make Chicken Cutlets ahead of time?
Yes. You can shape and coat the cutlets in advance and refrigerate them for up to 24 hours before frying.
2. Can I freeze Chicken Cutlets?
Yes. Arrange uncooked cutlets on a tray and freeze them. Once frozen, transfer them to freezer bags. Fry directly from frozen or thaw slightly before cooking.
3. What type of chicken works best?
Boneless chicken breast or boneless thigh meat both work well. Thigh meat usually gives juicier cutlets.
4. Can I make Chicken Cutlets without eggs?
Yes. You can use a flour slurry or milk mixture instead of eggs for coating.
5. Why are my cutlets breaking while frying?
This usually happens because the filling contains too much moisture or the oil temperature is too low.
6. Can I add cheese to the filling?
Absolutely. Mozzarella or cheddar cheese adds delicious richness and creates a gooey center.
Conclusion
Chicken Cutlets combine crispy coating, juicy chicken, aromatic spices, and creamy texture into one irresistible snack. They work beautifully for family dinners, tea-time snacks, lunch boxes, and parties.
With simple ingredients and proper technique, you can easily prepare restaurant-style Chicken Cutlets at home. Whether you fry, bake, or air fry them, these cutlets deliver comfort, flavor, and crunch in every bite.
Once you try this homemade recipe, you will likely keep it as a regular favorite in your kitchen.

Crispy and Juicy Homemade Snack
Description
Delicious homemade Chicken Cutlets with a crispy coating and a soft, flavorful filling made from boneless chicken, fresh vegetables, and a creamy sauce.
Ingredients
Instructions
- Place the boneless chicken in a pan with ginger garlic paste, chili powder, salt, and water. Cook over medium heat until tender. Shred the cooked chicken and set aside.
- Heat butter in a pan and add chopped beans, carrots, green chilies, and spring onions. Cook until softened, then mix in shredded chicken and spices. Cook another few minutes.
- Melt butter in another pan, add maida and stir for one minute. Pour in boiled milk, stirring to avoid lumps. Cook until thick. Mix with chicken mixture once cooled.
- Once the mixture cools, shape into cutlets and place on a tray.
- Dip each cutlet in beaten egg, then roll in breadcrumbs. For extra crunch, repeat this step.
- Heat oil in a deep frying pan and fry the cutlets until golden brown on both sides. Drain on paper towels and serve hot.
Notes
- For a healthier option, bake or air fry the cutlets.