If you enjoy simple desserts that look impressive yet require very little effort, this two-layer floating gelatin dessert is a perfect recipe to try. It combines the tropical sweetness of pineapple gelatin with the fruity brightness of strawberry gelatin, creating a beautiful layered treat with contrasting textures. The creamy pineapple layer floats gently above the strawberry base, forming a visually striking dessert that tastes just as good as it looks.
This dessert is ideal for family gatherings, summer meals, potlucks, or whenever you want something light and refreshing. Because it relies on gelatin and cream rather than baking, it is also a convenient option when you prefer a no-bake dessert. With only a few ingredients and a blender, you can prepare a colorful dish that feels both nostalgic and elegant.
In this article, you will learn how to make the two-layer floating gelatin dessert step by step, understand the science behind the floating effect, discover tips for perfect texture, and explore variations you can try at home.
Why This Gelatin Dessert Is So Popular
Gelatin desserts have remained popular for generations because they are simple, versatile, and refreshing. This specific recipe stands out because it uses two different textures and flavors that complement each other.
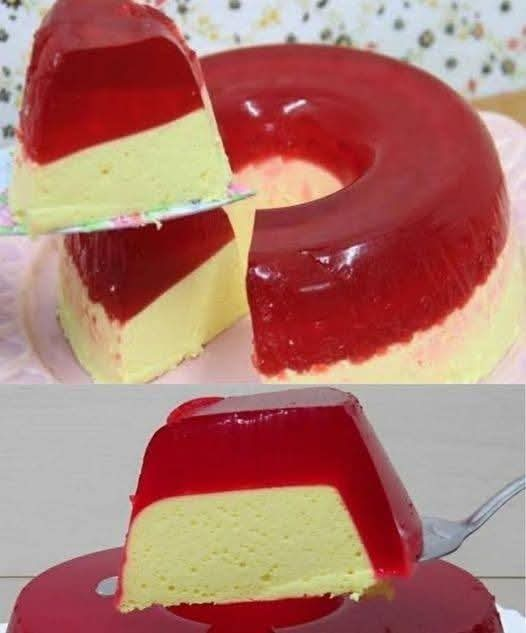
The pineapple layer contains heavy cream, which gives it a light, mousse-like texture. The strawberry layer, on the other hand, stays clear and firm, creating a classic gelatin consistency.
The result offers a pleasant contrast: creamy and smooth on top, fruity and slightly firm underneath. The flavors also balance well, since pineapple provides tropical sweetness while strawberry delivers bright berry notes.
Another appealing aspect is the visual presentation. When you pour the cooled strawberry gelatin over the partially set pineapple mixture, the creamy layer rises and floats. Once the dessert sets, the layers remain distinct, producing a beautiful effect when sliced.
Ingredients Overview
This dessert uses very few ingredients, but each one plays an important role in texture and flavor.
Pineapple Gelatin
Pineapple gelatin provides the base flavor for the creamy top layer. It dissolves in hot water and sets when chilled, helping form the light mousse-like structure when blended with cream.
Heavy Cream
Heavy cream gives the pineapple layer richness and a smooth texture. When blended with the gelatin mixture, it creates a creamy consistency that feels similar to a light custard or mousse.
Strawberry Gelatin
Strawberry gelatin forms the clear bottom layer. Its vibrant color contrasts beautifully with the pale pineapple layer, making the dessert visually appealing.
Water
Water dissolves the gelatin powder and activates its gelling properties. Using boiling water ensures that the gelatin crystals dissolve completely.
Step-by-Step Instructions
Step 1: Prepare the Pineapple Cream Layer
Start by boiling one cup of water. Once the water reaches a rolling boil, pour it carefully into a blender.
Add the two packets of pineapple-flavored gelatin to the hot water. Blend the mixture for about one minute. This step ensures that the gelatin dissolves completely without leaving any granules.
Next, add the heavy cream to the blender. Blend again for about two minutes until the mixture becomes smooth and fully combined. The color will appear pale yellow and slightly creamy.
Lightly grease a mold or gelatin dish with a thin layer of oil or cooking spray. This step makes it easier to release the dessert later.
Pour the pineapple mixture into the prepared mold. Place it in the refrigerator and allow it to chill for about 60 minutes, or until it becomes firm enough to hold its shape.
Step 2: Prepare the Strawberry Gelatin Layer
Boil two and a half cups of water.
Pour the hot water into the blender and add the three packets of strawberry gelatin.
Blend the mixture for about two minutes until the gelatin dissolves completely. The liquid should appear clear and vibrant red.
Once blended, allow the strawberry gelatin mixture to cool completely at room temperature. This step is essential. If you pour the mixture while it remains hot, it may melt the pineapple layer and ruin the layered effect.
Step 3: Assemble the Dessert
Once the pineapple layer has firmed up, remove the mold from the refrigerator.
Use a spatula to gently loosen the edges of the pineapple gelatin. This step helps the layer move slightly when the second layer is added.
Carefully pour the cooled strawberry gelatin mixture into the mold. Pour slowly along the side of the mold rather than directly on top of the pineapple layer.
As the liquid settles, the pineapple cream layer will naturally float upward while the strawberry gelatin fills the bottom of the mold.
Return the mold to the refrigerator and chill the dessert for about three hours, or until completely set.
Why the Pineapple Layer Floats
The floating effect occurs because the pineapple layer contains heavy cream, which makes it lighter and less dense than the strawberry gelatin mixture.
When you pour the liquid strawberry gelatin into the mold, gravity pulls the heavier liquid downward while the lighter pineapple layer rises slightly. Once the strawberry gelatin begins to set, it locks the layers in place.
This simple scientific principle creates a dessert that looks complicated even though the process is very easy.
Tips for Perfect Results
Achieving clean layers and smooth texture requires attention to a few key details.
Always dissolve gelatin completely in boiling water before adding other ingredients. Undissolved granules can create a grainy texture.
Allow the strawberry gelatin to cool fully before pouring it into the mold. Warm liquid can melt the first layer and blend the colors.
Refrigerate the pineapple layer long enough to firm up, but do not allow it to become extremely hard. A slightly soft texture helps the floating effect occur more easily.
Pour the second layer slowly to avoid disturbing the first layer.
Serving Suggestions
Once the dessert has fully set, you can unmold it onto a serving plate or slice it directly in the dish.
This dessert tastes wonderful when served chilled on a warm day. You can also garnish it with fresh fruit such as strawberries, pineapple chunks, or mint leaves for extra color and flavor.
For special occasions, try serving individual portions in clear cups or glasses so guests can admire the layered effect.
Variations You Can Try
One of the best things about gelatin desserts is their flexibility.
You can replace pineapple gelatin with mango, lemon, or peach gelatin for a different flavor. The creamy layer will still work beautifully.
You can also experiment with different bottom layers, such as raspberry or cherry gelatin.
For a lighter version, substitute part of the heavy cream with evaporated milk or whipped topping.
If you prefer a more decorative appearance, use silicone molds or bundt-shaped molds to create elegant shapes.
Frequently Asked Questions
1. Can I make this dessert ahead of time?
Yes. This dessert works well when prepared a day in advance. Store it covered in the refrigerator until ready to serve.
2. Why did my layers mix together?
This usually happens if the strawberry gelatin was still warm when poured. Always allow it to cool completely before assembling the dessert.
3. Can I use a different type of cream?
You can use whipping cream or evaporated milk as substitutes, though the texture may become slightly lighter.
4. How do I remove the dessert from the mold easily?
Dip the bottom of the mold briefly in warm water for about 10 seconds. Then place a plate on top and gently invert the mold.
5. Can I add fruit to the gelatin?
Yes. Small fruit pieces such as diced strawberries or pineapple chunks work well, especially in the strawberry layer.
6. How long does this dessert last in the refrigerator?
It usually stays fresh for up to three days when stored in a covered container in the refrigerator.
Conclusion
This two-layer floating gelatin dessert combines simplicity, flavor, and visual appeal in one delightful dish. The creamy pineapple layer and vibrant strawberry base create a refreshing contrast that feels both nostalgic and elegant.
Because the recipe requires minimal ingredients and no baking, it is accessible even for beginner cooks. Yet the final presentation looks impressive enough for parties and celebrations.
With a little patience during the chilling process and careful pouring during assembly, you can create a beautiful layered dessert that everyone will enjoy. Once you try it, you may find yourself experimenting with different flavors and colors to make the recipe your own.