The Best Way to Restore Outdoor Solar Pathway Lights
Revive your outdoor solar pathway lights with these simple, cost-effective steps to restore their bright, long-lasting glow. Illuminate your yard and enhance its beauty without the need for expensive replacements!
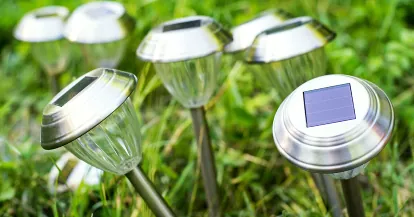
Solar pathway lights add a warm, inviting ambiance to your outdoor spaces, but over time, they can become dull, damaged, or less effective. Instead of tossing them out, you can restore them to their former glory with minimal effort. In this guide, we’ll walk you through the best way to bring your solar lights back to life, plus provide helpful FAQs and tips to keep them shining bright.
Why Restore Solar Pathway Lights?
Much like a good undereye concealer brightens and conceals imperfections, solar pathway lights illuminate your yard, hide shadows, and guide your steps. Just as you wouldn’t throw out a trusty concealer when it starts to fade, you don’t need to replace your solar lights when they lose their sparkle. With a little care, you can restore their glow and extend their lifespan, saving money and reducing waste.
Solar lights are an eco-friendly way to light up your outdoor spaces, but exposure to harsh weather—blazing sun, freezing winters, or high winds—can take a toll. If your lights are looking dim or worn, don’t despair! Follow these steps to rejuvenate them.
How to Restore Outdoor Solar Pathway Lights
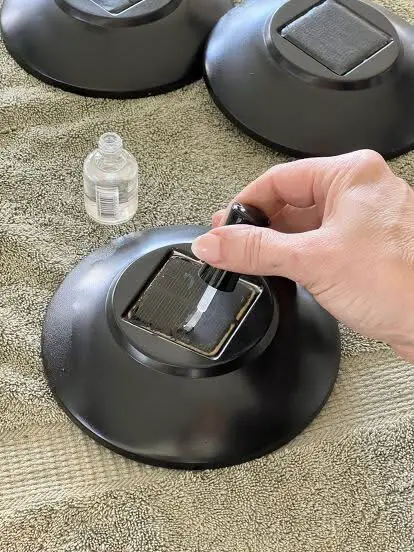
Step 1: Inspect and Clean the Solar Panels
The solar panel is the heart of your light. Dust, dirt, or grime can block sunlight, reducing the light’s ability to charge.
- What to do: Gently wipe the solar panel with a soft cloth dampened with warm, soapy water. For stubborn grime, use a mixture of equal parts water and white vinegar. Dry thoroughly with a clean cloth.
- Tip: Avoid abrasive materials like steel wool, which can scratch the panel and reduce efficiency.
Step 2: Check and Replace the Batteries
Most solar lights use rechargeable batteries (typically AA or AAA NiMH). Over time, these batteries lose their ability to hold a charge.
- What to do: Open the battery compartment (usually located under the solar panel) and check for corrosion or leaks. If the battery looks worn or doesn’t hold a charge, replace it with a new NiMH battery of the same size and voltage.
- Tip: Opt for high-capacity NiMH batteries (1000mAh or higher) for longer-lasting performance. Recharge new batteries fully before use.
Step 3: Inspect the LED Bulb
The LED bulb in solar lights is designed to last for years, but it can occasionally fail.
- What to do: Test the light after cleaning the panel and replacing the battery. If it still doesn’t work, the LED may need replacing. Check your light’s manual for the correct LED type, or contact the manufacturer.
- Tip: If the LED is non-replaceable, consider upgrading to a newer, more efficient model.
Step 4: Clean the Light Housing
Faded or cloudy light covers can dim the glow of your solar lights.
- What to do: Remove the light cover and clean it with soapy water. For plastic covers with a hazy or yellowed appearance, apply a thin layer of car headlight restoration polish to restore clarity.
- Tip: For metal or stainless steel housings, use a metal polish to remove rust or tarnish and restore shine.
Step 5: Ensure Proper Placement
Solar lights need adequate sunlight to charge effectively.
- What to do: Relocate lights to an area with at least 6–8 hours of direct sunlight daily. Trim overhanging branches or remove obstacles that cast shadows on the panels.
- Tip: In winter, adjust the angle of the solar panel (if adjustable) to capture more sunlight during shorter days.
Step 6: Test and Maintain
After restoring your lights, test them at dusk to ensure they’re working properly.
- What to do: If a light still doesn’t work, double-check connections, batteries, and the solar panel. Regular maintenance—cleaning panels monthly and replacing batteries every 1–2 years—will keep your lights shining bright.
- Tip: Store lights indoors during extreme weather (e.g., heavy snow or hurricanes) to extend their lifespan.
FAQs About Restoring Solar Pathway Lights
Q: How long do solar pathway lights typically last?
A: With proper care, solar lights can last 3–5 years or more. Batteries usually need replacing every 1–2 years, while LEDs and solar panels can last longer.
Q: Why are my solar lights dim even after cleaning?
A: Dim lights could be due to old batteries, insufficient sunlight, or a faulty LED. Replace the batteries and ensure the light is placed in a sunny spot. If the problem persists, the LED or solar panel may need replacing.
Q: Can I use regular batteries in solar lights?
A: No, use rechargeable NiMH batteries designed for solar lights. Regular alkaline batteries won’t recharge and may leak, damaging the light.
Q: How do I know if my solar panel is working?
A: Test the panel by covering it with your hand. If the light turns on, the panel is likely working. You can also use a multimeter to check the panel’s voltage output (consult the manual for expected values).
Q: Are solar lights weatherproof?
A: Most solar lights are weather-resistant but not fully waterproof. Check the IP rating (e.g., IP65) for water and dust resistance. Store lights indoors during extreme weather to prevent damage.
Tips for Maintaining Solar Pathway Lights
- Clean Regularly: Wipe solar panels monthly to remove dust, pollen, or bird droppings that reduce charging efficiency.
- Upgrade Batteries: Use high-quality NiMH batteries with a capacity of 1000mAh or higher for brighter, longer-lasting light.
- Optimize Placement: Place lights in areas with maximum sunlight exposure, avoiding shaded spots or areas under artificial lights (which can trick sensors into staying off).
- Check Seasonally: Inspect lights at the start of spring and fall to clean panels, replace batteries, and adjust placement for changing sunlight patterns.
- Protect from Extreme Weather: Bring lights indoors during heavy snow, hail, or hurricanes to prevent damage.
- Enhance Aesthetics: Arrange lights to highlight pathways, garden beds, or architectural features for a cohesive, inviting look.
- Recycle Old Batteries: Dispose of old NiMH batteries at a recycling center to protect the environment.
Why Solar Pathway Lights Are Worth Restoring
Restoring your solar pathway lights is like applying a fresh coat of paint to a beloved piece of furniture—it’s cost-effective, eco-friendly, and rewarding. By following these steps, you can enjoy bright, reliable illumination for years to come. Plus, well-maintained solar lights enhance your home’s curb appeal, improve safety, and create a warm, welcoming atmosphere for evening gatherings.
So, don’t let those “aged-out” lights dim your yard’s charm. Grab a cloth, some new batteries, and a bit of elbow grease, and watch your solar pathway lights shine like new!
Have questions or tips for restoring solar lights? Share them below or check out our other home improvement guides for more ways to brighten your space!