When it comes to festive desserts, few treats are as fun and eye-catching as Strawberry Shortcake Easter Cheesecake Eggs. These no-bake delights combine the creamy richness of cheesecake with the sweet, fruity flavor of strawberries and the crunch of cookie crumbs—all shaped into adorable egg forms perfect for spring celebrations.
They are ideal for Easter gatherings, dessert tables, or even as edible gifts. The best part? You don’t need an oven. With just a few simple steps, you can create a dessert that looks impressive and tastes even better.
In this complete guide, you will learn how to make these cheesecake eggs from scratch, along with expert tips, variations, and answers to common questions to ensure perfect results every time.
Why You Will Love This Recipe
No-Bake Convenience
No oven required. This makes it perfect for quick preparation and stress-free dessert planning.
Festive and Fun
The egg shape makes these treats perfect for Easter and spring-themed events.
Creamy and Crunchy Texture
You get a smooth cheesecake filling paired with a slightly crunchy coating.
Easy to Customize
You can change flavors, coatings, or decorations to suit your style.
Ingredients
Cheesecake Filling
- 8 oz cream cheese, softened
- ½ cup powdered sugar
- 1 teaspoon vanilla extract
Mix-Ins
- 1 cup crushed golden cookies
- ½ cup freeze-dried strawberries (or strawberry crumble)
Coating
- 2 cups white chocolate, melted
Decoration
- Extra crushed cookies and strawberries for topping
Ingredient Notes and Substitutions
Cream Cheese
Use full-fat cream cheese for the best texture and flavor. Reduced-fat versions may be softer and harder to shape.
Cookies
Golden cookies provide a classic shortcake flavor. You can also use:
- Vanilla wafers
- Graham crackers
Freeze-Dried Strawberries
These add strong flavor and color without extra moisture. Fresh strawberries are not recommended because they can make the mixture too wet.
White Chocolate
Choose good-quality white chocolate for smooth melting and better coating.
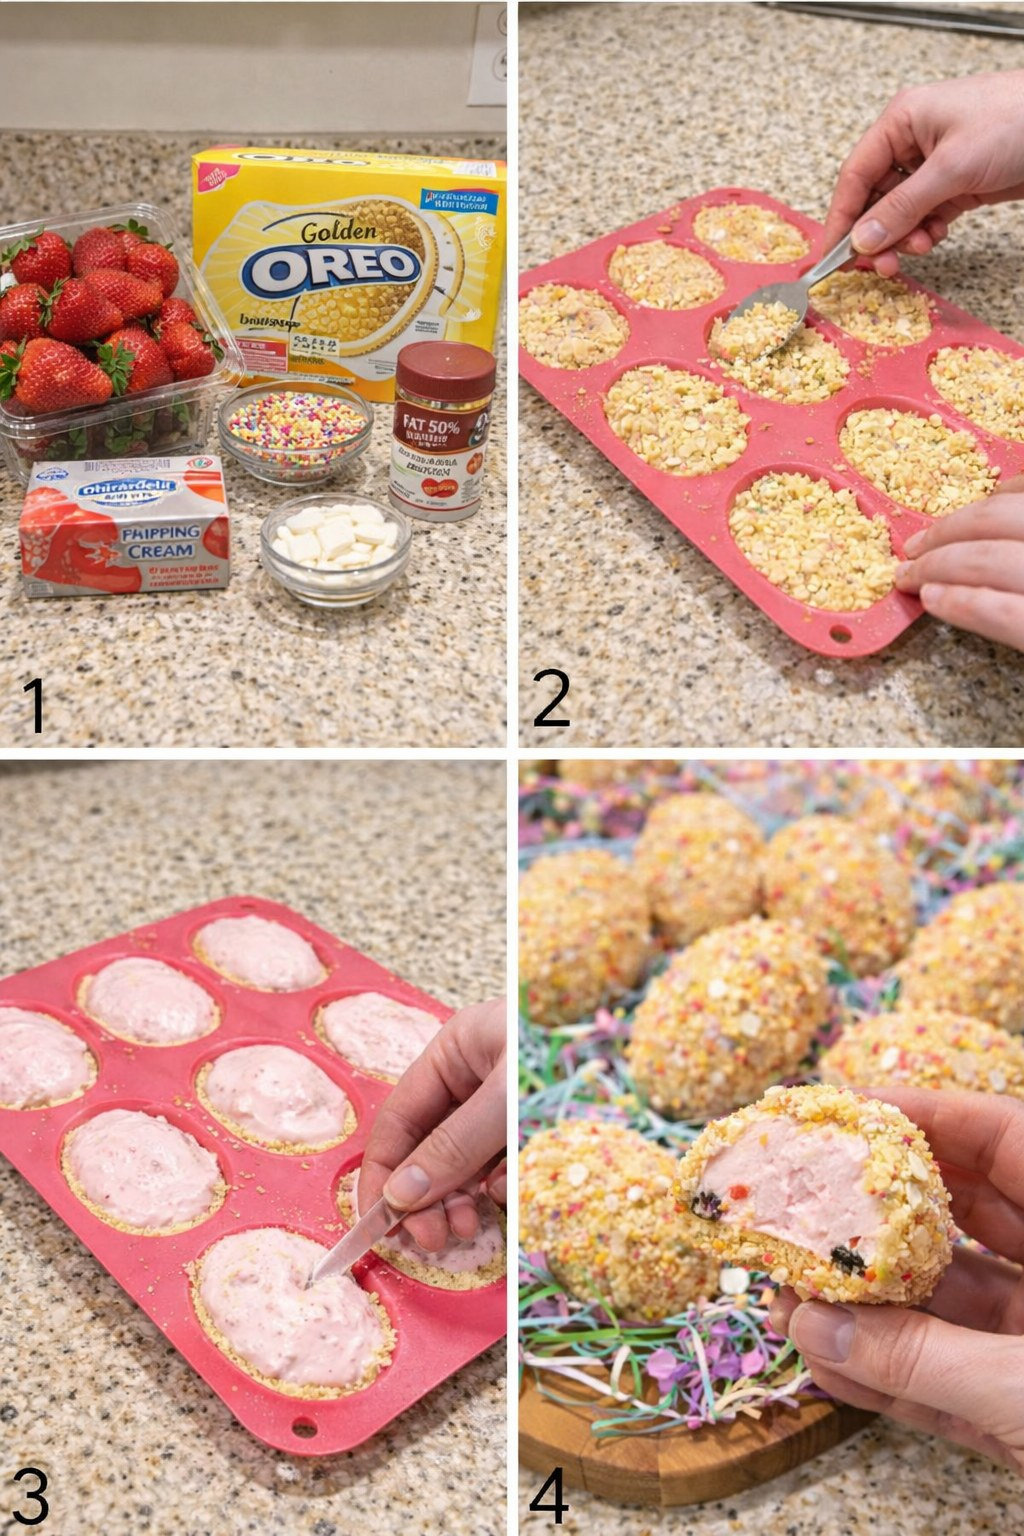
Step-by-Step Instructions
Prepare the Cheesecake Filling
Mix Until Smooth
In a bowl, beat the softened cream cheese, powdered sugar, and vanilla extract.
Continue mixing until the texture becomes smooth and creamy with no lumps.
Add Texture and Flavor
Fold in the Mix-Ins
Gently fold in the crushed cookies and freeze-dried strawberries.
Mix until evenly combined. The mixture should be thick enough to hold its shape.
Shape the Eggs
Form Even Portions
Scoop small portions of the mixture using a spoon or cookie scoop.
Shape by Hand
Roll and shape each portion into an egg form using your hands.
Try to keep sizes uniform for even chilling and coating.
Freeze Until Firm
Chill the Shapes
Place the shaped eggs on a lined baking sheet.
Freeze for 30–45 minutes until they become firm. This step is important for easy dipping.
Melt the Chocolate
Use Short Intervals
Place white chocolate in a microwave-safe bowl.
Heat in short intervals, stirring between each one, until smooth and fully melted.
Coat the Cheesecake Eggs
Dip Carefully
Remove the eggs from the freezer.
Dip each one into the melted white chocolate, making sure it is fully coated.
Place on Tray
Return coated eggs to the lined baking sheet.
Add Decoration
Sprinkle Immediately
Before the chocolate sets, sprinkle crushed cookies and strawberry pieces over each egg.
This creates the classic strawberry shortcake look.
Refrigerate to Set
Final Chill
Place the tray in the refrigerator for 20–30 minutes until the chocolate shell is firm.
Serve and Enjoy
Best Served Chilled
Serve the cheesecake eggs cold for the best texture and flavor.
Serving Ideas
Easter Dessert Table
Arrange them in a basket or on a decorative tray for a festive display.
Gift Treats
Wrap individual eggs in decorative paper or boxes for gifting.
Party Dessert
Serve alongside other mini desserts for variety.
Flavor Variations
Chocolate Strawberry Version
Add cocoa powder to the filling or drizzle with dark chocolate.
Lemon Cheesecake Eggs
Replace strawberries with lemon zest and crushed lemon cookies.
Mixed Berry Version
Use freeze-dried raspberries and blueberries for a colorful twist.
Nutty Crunch
Add finely chopped nuts for extra texture.
Storage Tips
Refrigeration
Store in an airtight container in the refrigerator for up to 5 days.
Freezing
You can freeze them for longer storage. Thaw in the fridge before serving.
Tips for Perfect Results
Use Softened Cream Cheese
This ensures a smooth and lump-free filling.
Chill Before Dipping
Freezing helps the eggs hold their shape during coating.
Melt Chocolate Slowly
Avoid overheating to prevent thick or clumpy chocolate.
Work Quickly
Decorate immediately after dipping before the chocolate hardens.
Keep Hands Clean and Cool
This makes shaping easier and prevents sticking.
Use Parchment Paper
Prevents sticking and makes cleanup easier.
Common Mistakes to Avoid
Skipping the Freezing Step
This can cause the eggs to fall apart when dipping.
Using Fresh Strawberries
They add moisture and can ruin the texture.
Overheating Chocolate
Leads to thick, unusable coating.
Making Eggs Too Large
Smaller sizes are easier to handle and coat evenly.
FAQs
Can I make these ahead of time?
Yes, they can be made a day or two in advance and stored in the refrigerator.
Can I use milk or dark chocolate instead?
Yes, you can substitute white chocolate with milk or dark chocolate for a different flavor.
Why are my cheesecake eggs too soft?
This usually happens if the mixture is too warm or not chilled enough. Freeze longer before dipping.
Can I skip the cookie crumbs?
Yes, but they add texture and the classic shortcake flavor.
How do I make them more firm?
Add more crushed cookies to thicken the mixture.
Are these safe at room temperature?
They should not stay out too long because of the cream cheese. Keep them chilled.
Can I make them without freeze-dried strawberries?
Yes, but the flavor will be milder. You can use strawberry extract instead.
Conclusion
Strawberry Shortcake Easter Cheesecake Eggs are a simple yet impressive dessert that combines creamy cheesecake, fruity strawberry flavor, and a crisp chocolate coating. Their festive shape and vibrant look make them perfect for Easter celebrations and spring gatherings.
With no baking required and endless customization options, this recipe is both beginner-friendly and versatile. By following the steps and tips in this guide, you can create a dessert that looks beautiful and tastes amazing.