How to Make Simple Garlic Bread in the Air Fryer: Quick, Delicious, and Effortless
Garlic bread is a classic side dish that pairs perfectly with everything from pasta dishes to soups, or even as a savory snack all on its own. Whether you’re serving it alongside a big family meal or just craving something indulgent and flavorful, this simple garlic bread recipe is an absolute must-try.
With just a handful of ingredients and minimal prep, you’ll have golden, crispy garlic bread in minutes using your Air Fryer. The Air Fryer is ideal for this recipe because it gives the bread that perfect crunch while keeping the center soft and chewy. Plus, it takes only about five minutes to cook, making it an incredibly fast option for busy days or last-minute dinners.
Let’s walk through the process step-by-step, including some useful tips to ensure your garlic bread comes out perfect every time.
Ingredients for Simple Garlic Bread
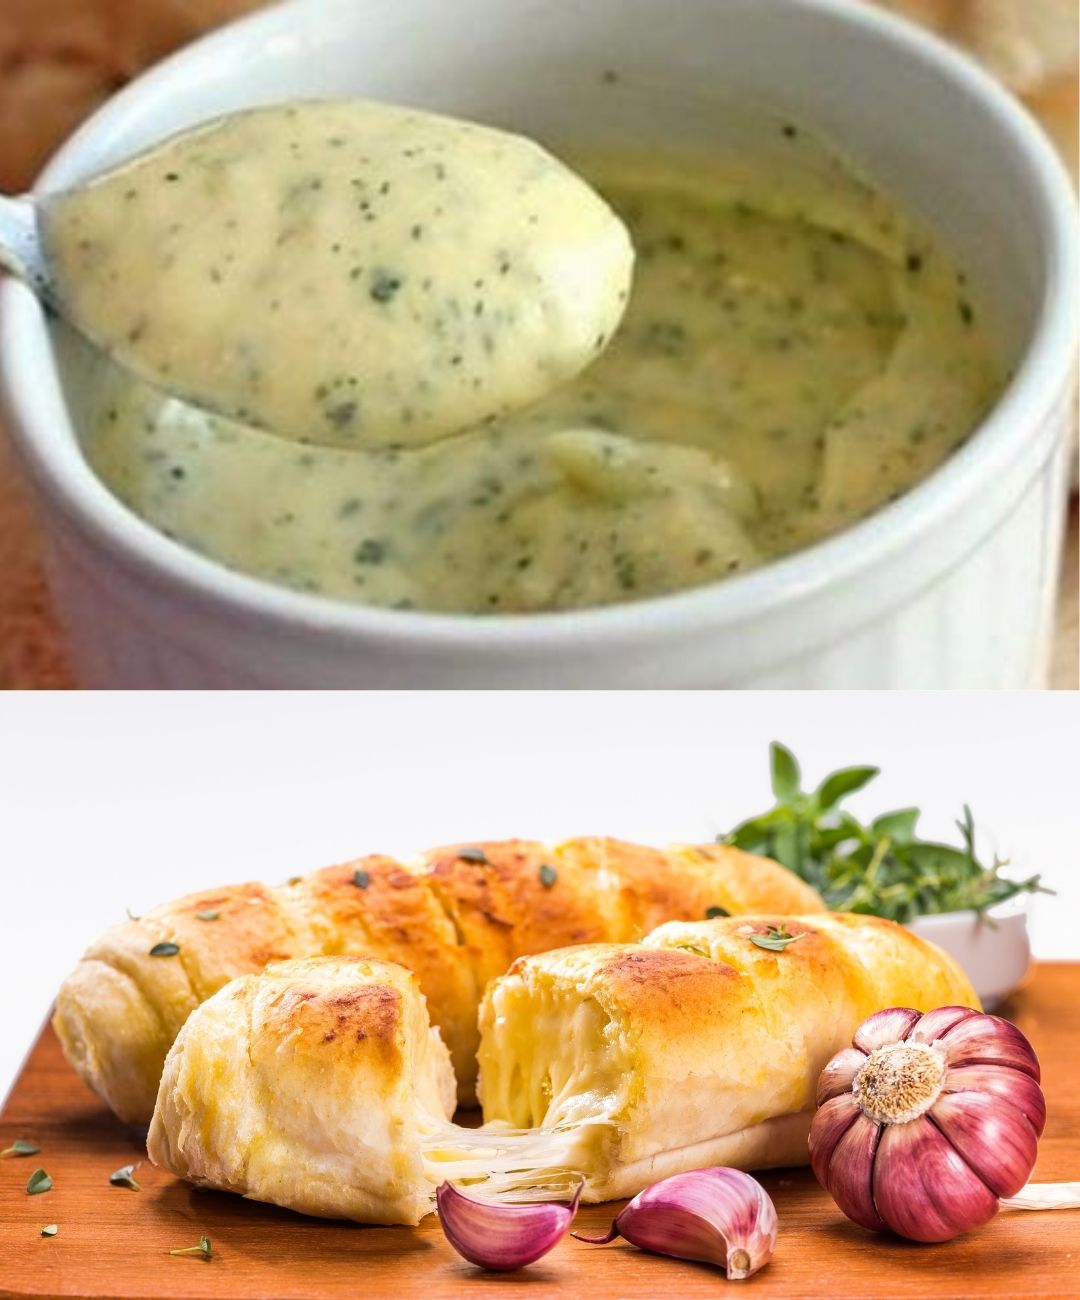
Before diving into the preparation, gather these essential ingredients. This recipe uses basic, everyday items that you might already have in your kitchen, making it even easier to whip up on the fly.
Ingredient List:
- Bread rolls (quantity as desired) – You can use any type of bread rolls you like. Choose fresh, soft rolls for the best result.
- 2 tablespoons of mayonnaise – Adds creaminess to the spread and helps the garlic stick to the bread.
- 4 tablespoons of minced garlic – The star ingredient. Freshly minced garlic will give you the boldest flavor, but jarred minced garlic works too.
- 250 grams (8.8 oz) of grated cheese – Choose a cheese that melts well, such as mozzarella, cheddar, or a blend of both for extra flavor.
- 1 tablespoon of olive oil – Helps the bread crisp up in the Air Fryer while enhancing the flavor.
- Chopped chives, parsley, and other seasonings to taste – Fresh herbs add a pop of color and flavor. Feel free to experiment with your favorite seasonings such as oregano or basil.
Instructions: How to Prepare Garlic Bread in the Air Fryer
Step 1: Mix the Garlic Spread
In a bowl, combine the mayonnaise, minced garlic, grated cheese, olive oil, and your chosen herbs and seasonings. Stir everything together until it forms a well-blended, creamy mixture. This garlic spread is the key to ensuring your bread is loaded with flavor and perfectly cheesy.
Tip: For an even bolder garlic flavor, consider using roasted garlic instead of raw. Roasting garlic takes away some of its sharpness and brings out a sweeter, more mellow taste.
Step 2: Prepare the Bread Rolls
Take your bread rolls and slice them open, being careful not to slice them completely through. You want them to remain connected so they hold together well when spreading the mixture. Once sliced, generously spread the garlic and cheese mixture onto each half of the bread roll.
Tip: Use a spatula or butter knife to evenly distribute the spread across the rolls. The more spread you apply, the more flavorful the garlic bread will be, so don’t hold back!
Step 3: Preheat the Air Fryer
Set your Air Fryer to 180°C (350°F) and allow it to preheat for a couple of minutes. Preheating ensures that your garlic bread will cook evenly and crisp up properly.
Tip: If your Air Fryer tends to cook hotter or cooler than expected, adjust the temperature slightly to avoid burning the bread. Every Air Fryer model can be a bit different, so getting to know your appliance is essential.
Step 4: Cook the Garlic Bread
Once the Air Fryer is preheated, place the prepared bread rolls inside the basket in a single layer. Avoid overcrowding the basket to ensure the bread cooks evenly. Cook the garlic bread for about 5 minutes or until it turns golden brown and the cheese is bubbly and melted to perfection.
Tip: Keep an eye on the garlic bread while it’s cooking. If it seems like it’s browning too quickly, reduce the temperature slightly or cook it for a shorter period of time.
Step 5: Serve and Enjoy
After 5 minutes, carefully remove the garlic bread from the Air Fryer using tongs or a spatula. The bread will be hot and crispy, with the cheese melted to perfection. Serve immediately as a side dish or snack, and enjoy the amazing flavors of this quick and easy recipe.
Tip: Garnish with extra fresh herbs or a sprinkle of parmesan for added texture and flavor.
Tips for Perfect Garlic Bread
-
Choose the Right Bread
While this recipe works with almost any type of bread roll, using a softer, fresher roll will give you the best texture. French bread, ciabatta, or even leftover sandwich rolls can be used in place of standard rolls. Avoid stale bread, as it may not crisp up as nicely. -
Customize the Cheese
The recipe calls for 250 grams (8.8 oz) of grated cheese, but you can adjust this amount depending on how cheesy you like your garlic bread. Try mixing cheeses like mozzarella, cheddar, or even parmesan for a more complex flavor. A cheese blend will melt beautifully and give your garlic bread that extra stretch. -
Make It Spicy
If you like a little heat, consider adding a pinch of red pepper flakes or a dash of hot sauce to the garlic spread. This adds a spicy kick that pairs nicely with the creamy cheese and garlic. -
Don’t Skip the Herbs
Fresh herbs like parsley or chives brighten up the garlic bread and provide a fresh contrast to the rich, cheesy filling. Feel free to get creative with herbs – basil, thyme, or oregano would also taste fantastic. -
Perfect Air Fryer Settings
Every Air Fryer model varies slightly, so it’s important to monitor the cooking process closely. If the garlic bread is browning too quickly, lower the temperature. If it’s taking longer than expected, give it another minute or two in the fryer. -
Make Ahead Option
Want to prepare the garlic bread in advance? You can assemble the bread with the garlic and cheese mixture ahead of time and store it in the refrigerator for a few hours. When you’re ready to cook, just pop the bread into the Air Fryer and follow the normal cooking instructions.
Frequently Asked Questions
1. Can I Use a Conventional Oven Instead of an Air Fryer?
Yes, you can absolutely make garlic bread in a conventional oven. Preheat your oven to 180°C (350°F) and bake the bread on a baking sheet for about 10 minutes, or until golden and crispy. The Air Fryer is quicker, but the oven will still yield delicious results.
2. What Other Cheeses Work Well for Garlic Bread?
Mozzarella and cheddar are popular choices, but you can also use parmesan, gouda, or Monterey Jack. Each cheese will bring a different flavor and texture to your garlic bread, so feel free to experiment with your favorites.
3. Can I Add Other Toppings to My Garlic Bread?
Absolutely! You can sprinkle some bacon bits, sun-dried tomatoes, or sliced olives on top of the bread before cooking. These add-ins will bring more flavor and texture to your garlic bread, making it even more indulgent.
4. How Can I Store Leftover Garlic Bread?
Store any leftover garlic bread in an airtight container in the refrigerator for up to 2 days. To reheat, simply pop it back into the Air Fryer or toaster oven for a few minutes to bring back the crispiness.
5. Can I Use Butter Instead of Mayonnaise?
Yes, if you prefer a more traditional garlic bread, you can substitute the mayonnaise with softened butter. The butter will create a richer, more classic flavor, while the mayonnaise gives a slightly tangier taste and creamier texture.
Conclusion
This simple garlic bread recipe made in the Air Fryer is quick, easy, and incredibly satisfying. With a perfect balance of crispy bread, gooey cheese, and bold garlic flavor, it’s bound to become a favorite in your household. Whether you’re serving it as a side dish or enjoying it as a snack, this garlic bread is sure to impress everyone with its delicious taste and simplicity. So grab your Air Fryer, gather your ingredients, and get ready to enjoy this easy, cheesy treat!