Grimy burner rings on your gas stove can be more than just unsightly — they can affect your cooking efficiency and even release unwanted odors. Fortunately, bringing them back to a like-new shine doesn’t require harsh chemicals or expensive products. With simple, effective ingredients like blue soap, white vinegar, and baking soda, you can clean your burner rings and other stove components easily at home.
This comprehensive guide walks you through two tried-and-true methods, complete with extra tips, techniques for cleaning other parts of the stove, and FAQs for long-lasting kitchen cleanliness.
Why Clean Your Gas Burner Rings Regularly?
Over time, gas burner rings collect grease, food residue, and soot, especially if you do a lot of stovetop cooking. Neglecting them can result in:
- Uneven flames or poor burner performance
- Lingering food smells and smoke
- A less sanitary cooking surface
- Reduced lifespan of your stove parts
By incorporating regular burner ring cleaning into your kitchen routine, you not only improve your cooking environment but also extend the longevity of your appliances.
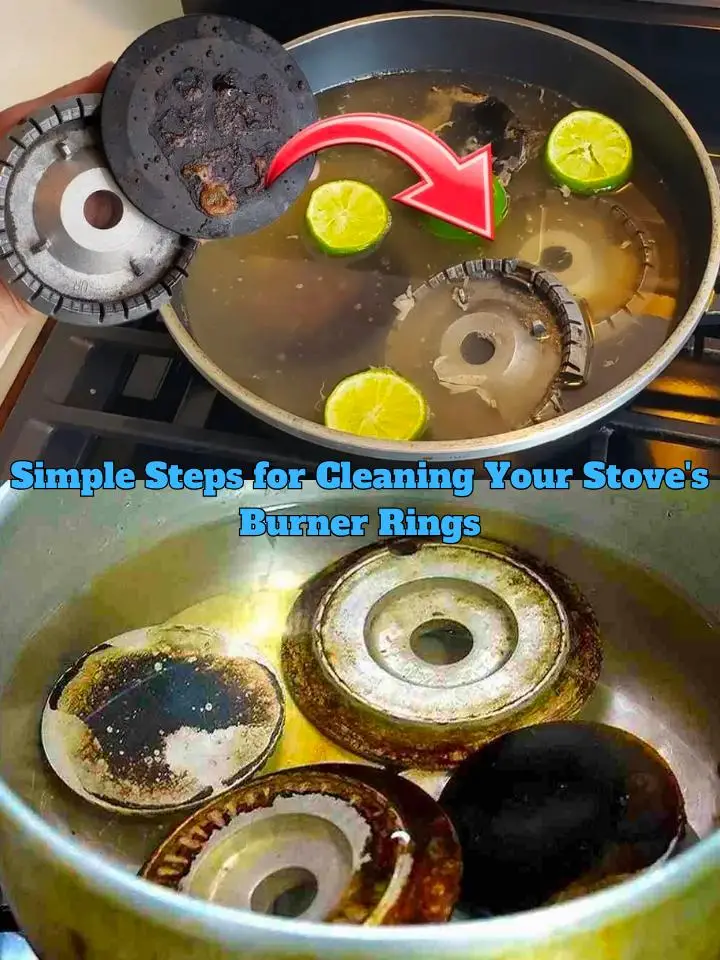
Method One: Blue Soap and White Vinegar Solution
This is a powerful degreasing method using traditional blue soap and vinegar — both known for their cleaning strength. Ideal for heavily soiled burners.
What You’ll Need
- 2 liters of water
- A bar of blue soap (grated)
- White vinegar (around ½ cup)
- A used toothbrush with stiff bristles
- Large heatproof bowl or basin
- Clean cloth or kitchen towel
Step-by-Step Instructions
-
Boil the water.
Heat 2 liters of water in a kettle or large saucepan until it reaches a rolling boil. -
Add grated blue soap.
Stir in enough grated blue soap to create a consistent, milky solution. Mix until fully dissolved. -
Add white vinegar.
Pour in about half a cup of white vinegar and stir well to blend the solution. -
Soak the burner rings.
Submerge your gas burner rings completely in the solution. Let them soak for 30–40 minutes. This will loosen grease, grime, and burnt-on food. -
Scrub thoroughly.
After soaking, use a stiff toothbrush to scrub the rings. Pay close attention to corners and edges where buildup hides. -
Rinse and dry.
Rinse thoroughly with clean water to remove soap and vinegar residue. Pat dry with a cloth or towel and let air-dry fully before reinstalling.
Method Two: White Vinegar and Baking Soda Soak
Perfect for less intense buildup, this natural method relies on the fizzing reaction of baking soda and vinegar to break down stubborn grime.
What You’ll Need
- 2 liters of boiling water
- 3 tablespoons baking soda
- ½ cup white vinegar
- A sponge (with a rough side)
- Large bowl or basin
Step-by-Step Instructions
-
Boil the water.
Bring 2 liters of water to a boil and pour into a large bowl or basin. -
Add baking soda and vinegar.
Stir in the baking soda, followed by the vinegar. Expect some fizzing — that’s the active cleaning reaction at work. -
Soak the burner rings.
Place your dirty gas burners into the solution. Let them soak for at least 2 hours, or overnight for tougher stains. -
Scrub with a sponge.
After soaking, use the rough side of a sponge to scrub off loosened dirt and grease. -
Rinse and dry.
Rinse with warm water, then dry thoroughly with a clean towel before reattaching to your stove.
Bonus Cleaning: Other Parts of Your Gas Stove
Stove Plates
If your stove plates are grimy, make a paste of baking soda and hot water. Apply it directly, let it sit for 15 minutes, and scrub. For hardened stains, use a cloth soaked in white vinegar.
Control Knobs
Knobs get greasy quickly. Remove them if possible and clean using a damp sponge with a bit of dish soap. Wipe dry before reinstalling.
Grates
Soak cast iron or steel grates in a basin filled with pure white vinegar for at least an hour. Scrub with a steel wool pad or tough sponge, rinse well, and dry fully to prevent rusting.
Expert Tips for Cleaner Stove Components
- Label your cleaning jars. For frequent cleaning, pre-mix solutions and label containers with ingredient ratios.
- Use heat-resistant gloves. Protect your hands when handling hot water or scrubbing burners fresh from boiling water.
- Clean regularly. A monthly deep clean avoids heavy buildup. A quick wipe-down after each cooking session can make deep cleaning much easier.
- Avoid steel wool on coated surfaces. While effective, steel wool can scratch enamel or non-stick coatings.
- Dry completely. After rinsing any stove part, be sure it’s fully dry before using to prevent rust or electrical issues.
FAQs
How often should I clean my burner rings?
For regular home cooking, clean burner rings every 2–4 weeks. Heavy-use kitchens may need weekly cleaning.
Can I use dish soap instead of blue soap?
Yes, but blue soap (especially traditional laundry types) offers stronger degreasing properties. Dish soap may work for lighter grime.
Is it safe to soak the burners overnight?
Yes — just ensure they’re fully submerged. Overnight soaking is often the most effective way to loosen stubborn grime.
What if my burner rings are rusty?
You can remove rust using a paste of baking soda and water, or scrub with steel wool. Apply a light coating of cooking oil afterward to prevent future rust.
Do I need to remove burner rings for cleaning?
Yes. Always remove them for deep cleaning to access all surfaces and avoid water damage to the stove itself.
Can I clean cast iron burner rings this way?
If your burner rings are cast iron, avoid prolonged vinegar soaking (over 1–2 hours), as it can affect the metal. Dry thoroughly and season lightly with oil after cleaning.
What’s the best way to dry burner rings?
After towel drying, place them on a baking sheet and dry in a warm oven (200°F/95°C) for 10–15 minutes to ensure they’re completely moisture-free.
Final Thoughts
Grimy gas burner rings are a common household issue — but with the right mix of household ingredients and a little time, they’re incredibly easy to clean. Whether you prefer the powerful combination of blue soap and vinegar or the fizzy reaction of baking soda and white vinegar, both methods leave your stove parts looking refreshed and working efficiently.
A clean stove not only improves the look of your kitchen, but also enhances your cooking performance and safety. So next time your burners start looking dull, don’t replace them — revive them.