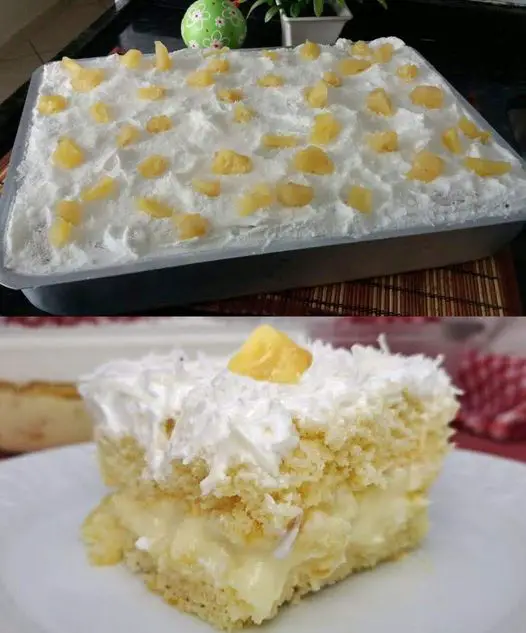
How to Make Pineapple Cake in a Glass Dish
Pineapple Tray Cake is a show-stopping dessert that combines a soft, fluffy cake base with layers of creamy filling and the tropical sweetness of pineapple. Perfect for celebrations, potlucks, or family dinners, this cake is as visually appealing as it is delicious. The best part? It’s made in a glass dish, making it convenient to assemble, serve, and store.
This guide walks you through each step of the process, from crafting the perfect sponge cake to assembling the layers, with plenty of tips and FAQs to ensure your success.
Why Make Pineapple Cake in a Glass Dish?
- Tropical Flavors: The pineapple and creamy filling create a perfect balance of sweetness and tang.
- Elegant Presentation: The glass dish lets you showcase the beautiful layers of cake and filling.
- Perfect for Sharing: This recipe is ideal for feeding a crowd and can be made ahead of time.
- Easy to Assemble: No fancy tools are needed—just layer and chill!
Ingredients
For the Cake:
- 6 large eggs
- 1 cup sugar
- 1 teaspoon baking powder
- 1 cup all-purpose flour, sifted
- 1 cup hot milk
For the White Cream Filling:
- 4 cups whole milk
- 2 egg yolks, strained
- 1 can (14 oz) sweetened condensed milk
- 5 tablespoons powdered milk
- 4 tablespoons cornstarch
- A few drops of vanilla extract
- 1 small carton (7 oz) heavy cream
For the Whipped Cream Topping:
- 3 egg whites
- 6 tablespoons sugar
- 1 can (7 oz) cream, without serum
For Assembly:
- Pineapple jam or crushed pineapple
- Coconut milk mixed with 1 tablespoon sugar
Step-by-Step Instructions
Step 1: Make the Sponge Cake
- Beat the Eggs: In a mixing bowl, beat the egg whites until stiff peaks form. Gradually add the egg yolks one at a time, beating well after each addition.
- Add Sugar: Slowly add the sugar while beating until the mixture turns light and creamy.
- Incorporate Dry Ingredients: Gently fold in the sifted flour and baking powder, ensuring no lumps remain.
- Add Milk: Pour in the hot milk and mix gently until fully combined.
- Bake: Pour the batter into a greased and floured baking dish. Bake in a preheated oven at 350°F (180°C) for 25-30 minutes or until a toothpick inserted in the center comes out clean. Allow the cake to cool completely before slicing.
Step 2: Prepare the White Cream Filling
- Mix Ingredients: In a saucepan, combine the whole milk, strained egg yolks, sweetened condensed milk, powdered milk, and cornstarch.
- Cook: Heat the mixture over medium-low heat, stirring constantly until it thickens.
- Add Flavor: Once thickened, remove from heat and stir in a few drops of vanilla extract.
- Finish with Cream: Allow the mixture to cool slightly, then fold in the heavy cream for a smooth texture.
Step 3: Make the Whipped Cream Topping
- Beat Egg Whites: Using a mixer, beat the egg whites until stiff peaks form.
- Add Sugar: Gradually add sugar while beating until the mixture is glossy.
- Incorporate Cream: Gently fold in the cream without serum until fully combined.
Step 4: Assemble the Pineapple Cake
- Slice the Cake: Carefully cut the cooled cake horizontally into two layers.
- Layer the Bottom Half: Place one half of the cake at the bottom of the glass dish and drizzle generously with pineapple jam or crushed pineapple.
- Add White Cream: Spread the prepared white cream evenly over the pineapple layer.
- Top with Second Layer: Place the second layer of cake on top, cut-side down, and drizzle with the coconut milk mixture.
- Finish with Whipped Cream: Spread the whipped cream topping over the entire surface, creating a smooth finish.
Step 5: Chill and Serve
- Cover the dish with aluminum foil and refrigerate for at least 2 hours, or overnight for best results.
- Slice and serve chilled, garnished with additional pineapple or shredded coconut, if desired.
Tips for Success
1. Use Fresh Pineapple
For an extra burst of flavor, use fresh pineapple to make the jam or topping. Cook it down with a bit of sugar until it thickens.
2. Chill for Better Flavor
The longer the cake chills, the better the flavors meld together. Make it a day ahead for the best taste.
3. Avoid Overmixing
When incorporating the dry ingredients into the cake batter, fold gently to maintain the light and airy texture.
4. Customize the Layers
Add a sprinkle of shredded coconut or chopped nuts between the layers for added texture.
Frequently Asked Questions
1. Can I use canned pineapple?
Yes! Canned pineapple works well for the jam or topping. Just drain it thoroughly to avoid excess moisture.
2. Can I make this cake gluten-free?
Absolutely. Substitute the all-purpose flour with a gluten-free flour blend to make the cake gluten-free.
3. How do I store leftovers?
Cover the dish with plastic wrap or transfer slices to an airtight container. Refrigerate for up to 3 days.
4. Can I freeze the cake?
Yes, you can freeze the assembled cake for up to 2 months. Thaw in the refrigerator overnight before serving.
5. Can I replace the whipped cream topping?
If you prefer, you can use store-bought whipped topping or a frosting of your choice.
Final Thoughts
Pineapple Tray Cake in a glass dish is a versatile dessert that impresses with its presentation and flavor. Whether for a party, holiday gathering, or family dinner, this cake is guaranteed to be a hit. The combination of tropical pineapple, creamy filling, and light sponge cake makes it an irresistible treat.
Gather your ingredients and give this recipe a try—it’s sure to become a favorite in your dessert rotation!

