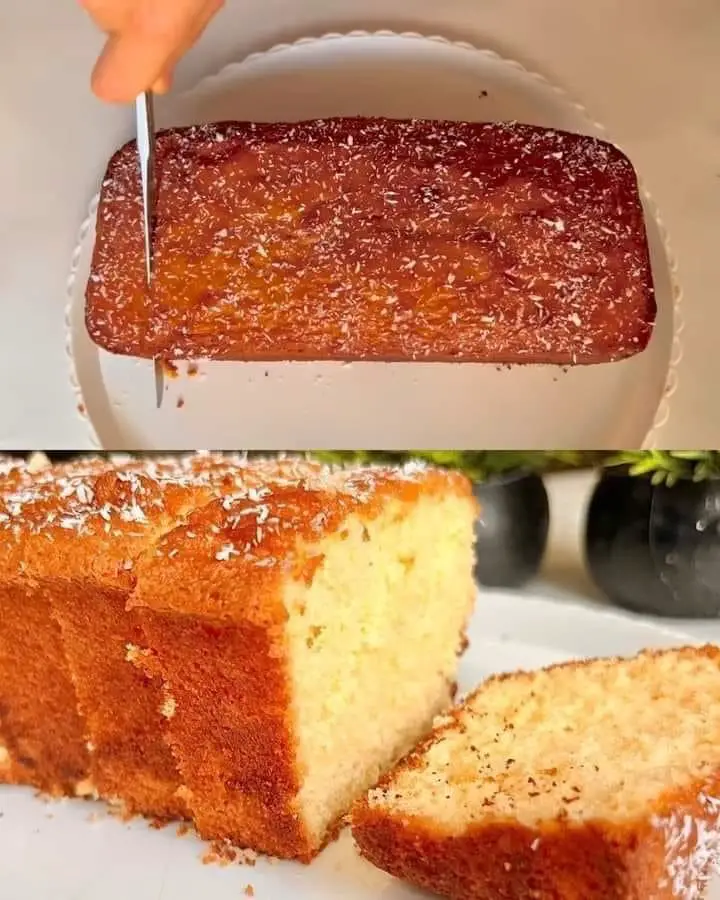
Orange Coconut Cake with Honey Glaze: A Delightful Citrus Treat
If you’re looking for a cake that’s light, fragrant, and full of zesty flavor, this Orange Coconut Cake with Honey Glaze is the perfect choice. The combination of orange zest and juice creates a burst of citrus flavor, while the coconut milk adds richness. The addition of honey gives it a natural sweetness that pairs beautifully with the glaze, making this cake an ideal dessert for any occasion, whether it’s a family dinner, brunch, or a special gathering. Follow these step-by-step instructions to create a moist and delicious cake that will leave your guests asking for seconds!
Ingredients
For the Cake:
- 1 ½ teaspoons baking powder
- ¼ teaspoon baking soda
- 1 ½ cups all-purpose flour
- ¼ teaspoon salt
- ½ cup honey
- ½ cup unsalted butter, room temperature
- ¾ cup granulated sugar
- 2 large eggs
- 2 teaspoons orange zest (from about 2 oranges)
- ½ cup freshly squeezed orange juice
- ½ cup full-fat coconut milk
For the Glaze:
- ¼ cup honey
- ¼ cup freshly squeezed orange juice
- 2 tablespoons unsweetened shredded coconut (for topping)
Instructions
Step 1: Preheat the Oven
Preheat your oven to 350°F (175°C). Grease and flour an 8-inch round cake pan or line it with parchment paper. This ensures that the cake doesn’t stick to the pan and makes it easier to remove later.
Step 2: Prepare the Dry Ingredients
In a medium-sized bowl, whisk together:
- 1 ½ teaspoons baking powder
- ¼ teaspoon baking soda
- 1 ½ cups all-purpose flour
- ¼ teaspoon salt
- 2 tablespoons unsweetened shredded coconut
Mixing the dry ingredients beforehand ensures they are evenly distributed in the batter. Set the bowl aside.
Step 3: Cream the Butter, Honey, and Sugar
In a large mixing bowl, combine:
- ½ cup unsalted butter (at room temperature)
- ½ cup honey
- ¾ cup granulated sugar
Using an electric mixer, beat the mixture for about 3-4 minutes until it becomes light and fluffy. This step is crucial for incorporating air into the batter, which will result in a lighter cake texture.
Step 4: Add the Eggs and Orange Zest
Add the eggs one at a time to the butter mixture, beating well after each addition. This ensures that the eggs are fully incorporated and the mixture remains smooth. Then, gently stir in:
- 2 teaspoons orange zest (about 2 oranges)
The orange zest adds a bright citrus flavor to the cake that complements the sweetness of the honey and coconut milk.
Step 5: Combine the Wet and Dry Ingredients
Now it’s time to bring everything together:
- Alternate mixing: Gradually add the dry flour mixture to the butter mixture, alternating with the wet ingredients:
- ½ cup freshly squeezed orange juice
- ½ cup full-fat coconut milk
- Mix gently: Start and end with the dry ingredients, mixing just until combined after each addition. Be careful not to overmix, as this can result in a dense cake. The batter should be smooth and slightly thick.
Step 6: Bake the Cake
Pour the batter into the prepared cake pan and smooth the top with a spatula. Bake in the preheated oven for 30-35 minutes or until a toothpick inserted into the center comes out clean. If the top starts browning too quickly, you can tent the cake with foil during the last 10 minutes of baking.
Once done, let the cake cool in the pan for 10 minutes, then transfer it to a wire rack to cool completely before glazing.
Step 7: Prepare the Honey Orange Glaze
While the cake cools, prepare the glaze:
- In a small saucepan, combine:
- ¼ cup honey
- ¼ cup freshly squeezed orange juice
- Heat over low heat, stirring constantly until the honey has dissolved and the mixture is smooth and warm.
Step 8: Glaze the Cake
Once the cake has cooled, use a skewer or fork to poke small holes all over the surface of the cake. This will allow the glaze to seep into the cake and add extra moisture and flavor.
- Slowly pour the warm glaze over the cake, letting it soak in.
- Sprinkle 2 tablespoons of unsweetened shredded coconut over the top for an added touch of texture and flavor.
Let the glaze set for about 10 minutes before serving.
Tips for the Perfect Orange Coconut Cake
- Use fresh ingredients: Freshly squeezed orange juice and zest make a huge difference in flavor. Avoid bottled juice, as it lacks the vibrant citrus taste that fresh juice provides.
- Room-temperature butter and eggs: Ensure your butter is at room temperature before creaming it with the sugar. Cold butter won’t mix well and can result in a dense cake. Similarly, room-temperature eggs mix more evenly into the batter.
- Don’t overmix the batter: Once you’ve added the flour mixture, be gentle. Overmixing the batter can cause the cake to be tough instead of light and airy.
- Check for doneness early: Every oven is different, so start checking your cake for doneness at the 30-minute mark. Insert a toothpick into the center of the cake—if it comes out clean or with just a few crumbs, your cake is ready.
Frequently Asked Questions (FAQs)
1. Can I use a different type of flour?
Yes, you can substitute all-purpose flour with a gluten-free flour blend if you’re looking to make this cake gluten-free. However, make sure to choose a blend that includes xanthan gum or another binder to maintain the cake’s structure.
2. Can I use a different type of milk?
Yes, you can substitute the coconut milk with any other full-fat milk, such as whole milk or almond milk. However, using coconut milk adds a subtle tropical flavor that pairs well with the orange.
3. How long does the cake stay fresh?
The cake can be stored at room temperature for up to 2 days in an airtight container. If you want it to last longer, you can refrigerate it for up to 5 days.
4. Can I make this cake ahead of time?
Absolutely! You can bake the cake a day in advance and store it in an airtight container. Just glaze it before serving to keep it fresh and moist.
5. Can I freeze the cake?
Yes, you can freeze the cake (without the glaze). Once the cake is completely cooled, wrap it tightly in plastic wrap and aluminum foil, and freeze for up to 3 months. When ready to serve, thaw the cake at room temperature and add the glaze just before serving.
6. Can I add other toppings?
Yes, you can get creative with toppings. Try adding toasted coconut, chopped nuts like almonds or pecans, or even a drizzle of chocolate for an indulgent twist.
This Orange Coconut Cake with Honey Glaze is a beautiful dessert that combines the best of citrus and coconut flavors. It’s simple to make yet elegant enough for special occasions. Enjoy!