When you need a decadent dessert without turning on the oven, No-Bake Chocolate Pudding is the perfect solution. Smooth, intensely chocolatey, and luxuriously creamy, this dessert delivers maximum flavor with minimal effort. It requires simple ingredients, a blender, and a few hours of chilling time. The result is a firm yet silky pudding that slices beautifully and melts in your mouth.
Whether you’re preparing a family dessert, hosting guests, or simply craving something chocolatey, this no-bake pudding is a reliable, crowd-pleasing option.
Why You’ll Love This Recipe
This chocolate pudding stands out for several reasons:
- No oven required
- Simple pantry ingredients
- Quick blender preparation
- Rich, mousse-like texture
- Perfect for make-ahead desserts
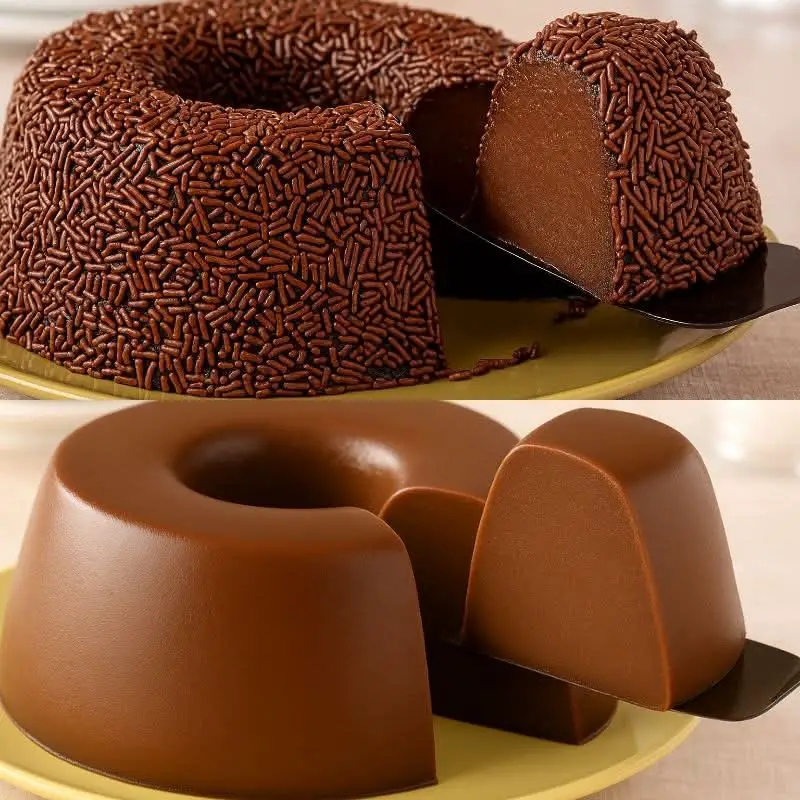
Because it uses gelatin, the pudding sets firmly enough to unmold from a bundt pan or silicone mold, making it visually impressive without complicated techniques.
Ingredient Overview and Their Purpose
Understanding each ingredient helps ensure perfect results.
Heavy Cream (200g / 7 oz)
Adds richness and creates the smooth, velvety texture. The fat content is essential for a creamy mouthfeel.
Sweetened Condensed Milk (395g / 14 oz)
Provides sweetness and thickness. It also enhances the chocolate flavor while contributing to the pudding’s structure.
Cocoa Powder (1 cup / 100g)
The main flavor component. Use high-quality unsweetened cocoa powder for deep chocolate intensity.
Milk (1 cup / 240ml)
Balances the richness of the cream and helps achieve a smooth consistency when blending.
Sugar (2 tablespoons)
Enhances the chocolate flavor. You may adjust slightly depending on how sweet you prefer your dessert.
Unflavored Gelatin (12g packet)
The setting agent that gives the pudding structure. Without it, the mixture would remain too soft to slice.
Water (5 tablespoons / 75ml)
Used to hydrate the gelatin so it dissolves properly and blends smoothly.
Chocolate Sprinkles (Optional)
A decorative finishing touch that adds texture and visual appeal.
Step-by-Step Instructions Explained
Step 1: Hydrate the Gelatin
In a small bowl, mix the gelatin with water and allow it to sit for about 5 minutes. This process, called blooming, allows the gelatin granules to absorb water evenly. Proper hydration ensures smooth incorporation without lumps.
If needed, gently warm the bloomed gelatin for a few seconds in the microwave to fully dissolve, but do not boil.
Step 2: Blend the Base
In a blender, combine:
- Sweetened condensed milk
- Heavy cream
- Cocoa powder
- Milk
- Sugar
Blend for about 1 minute until completely smooth. This step ensures the cocoa powder is fully dissolved and evenly distributed.
Scrape down the sides of the blender if necessary to prevent dry cocoa pockets.
Step 3: Add the Gelatin
Add the hydrated gelatin to the blender and blend for another minute. This ensures the gelatin is evenly distributed throughout the mixture, which guarantees uniform setting.
Step 4: Pour and Chill
Lightly grease a bundt pan or silicone mold with a neutral oil. This makes unmolding easier later.
Pour the chocolate mixture into the mold and tap gently on the counter to release air bubbles.
Refrigerate for at least 4 hours, or until completely firm. For best results, allow 6 hours or overnight.
Step 5: Unmold and Serve
To unmold, gently loosen the edges with clean fingers or briefly dip the bottom of the mold in warm water for a few seconds.
Invert onto a serving plate, decorate with chocolate sprinkles if desired, and serve chilled.
Texture and Flavor Profile
This pudding is:
- Smooth and creamy
- Firm enough to slice cleanly
- Intensely chocolatey
- Rich without being overly dense
The combination of heavy cream and condensed milk creates a texture similar to a cross between chocolate mousse and panna cotta.
Tips for Perfect Results
Use Quality Cocoa Powder
Since cocoa is the main flavor component, choose a good-quality brand for the best taste.
Properly Bloom the Gelatin
Skipping this step can cause lumps or uneven setting.
Blend Thoroughly
Ensure the mixture is fully smooth before pouring into the mold.
Chill Completely
Do not rush the chilling process. The pudding needs adequate time to set firmly.
Grease Lightly
A thin coating of oil prevents sticking without affecting flavor.
Serving Ideas
You can elevate this dessert by:
- Drizzling chocolate or caramel sauce on top
- Adding whipped cream
- Decorating with chocolate curls
- Serving with fresh berries
- Sprinkling sea salt for contrast
This pudding works beautifully as a celebration dessert because it looks elegant yet requires minimal effort.
Storage Instructions
- Store in the refrigerator, covered, for up to 4 days.
- Keep chilled until serving.
- Do not freeze, as freezing can affect the gelatin texture.
Variations to Try
Dark Chocolate Version
Use Dutch-process or dark cocoa powder for a deeper, more intense flavor.
Mocha Pudding
Add 1 teaspoon of instant coffee powder to enhance the chocolate flavor.
Chocolate Coconut
Replace half the milk with coconut milk for a subtle tropical twist.
Chocolate Orange
Add ½ teaspoon orange zest for a bright citrus contrast.
Frequently Asked Questions (FAQs)
Can I make this pudding without gelatin?
Without gelatin, the pudding will not set firmly enough to unmold. For a vegetarian alternative, you can substitute agar-agar, but the quantity and method will differ.
Can I use chocolate instead of cocoa powder?
Yes. Melted dark chocolate can be used, but you may need to slightly reduce the cream to maintain the correct consistency.
Why didn’t my pudding set?
Common causes include not properly hydrating the gelatin, insufficient chilling time, or incorrect gelatin measurement.
Can I reduce the sweetness?
Yes. You can reduce or omit the added sugar. However, the sweetened condensed milk will still provide significant sweetness.
How do I unmold cleanly?
Dip the bottom of the mold in warm water for 5–10 seconds, then invert onto a plate. Avoid leaving it in warm water too long.
Can I make it in individual cups?
Yes. Pour the mixture into serving glasses and chill. In this case, you do not need to grease the containers.
Final Thoughts
No-Bake Chocolate Pudding is the ideal dessert when you want something rich, elegant, and effortless. With just a blender and a refrigerator, you can create a silky chocolate treat that looks impressive and tastes indulgent. It is perfect for gatherings, holidays, or simply satisfying a chocolate craving without baking.
Simple ingredients, straightforward preparation, and luxurious results make this pudding a dessert you will return to again and again.