No-Bake Cherry Cheesecake Recipe
Introduction
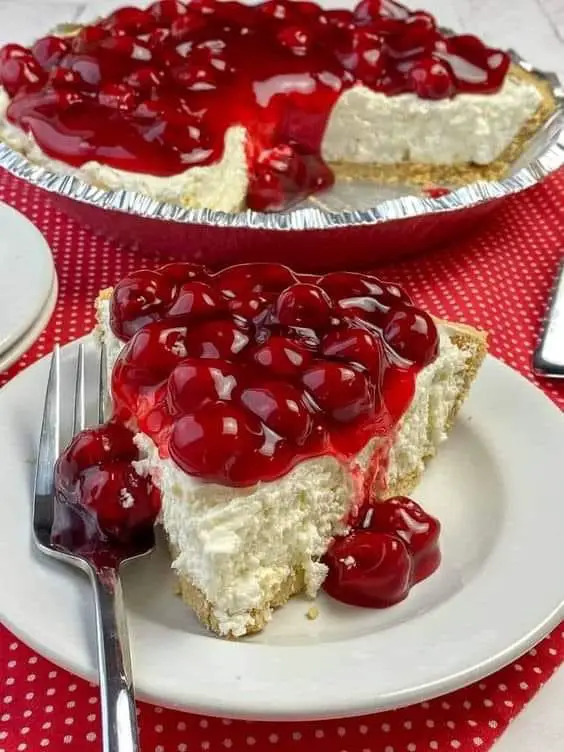
This No-Bake Cherry Cheesecake combines a buttery graham cracker crust with a rich, creamy filling and a delightful cherry topping. It’s a quick and easy dessert, perfect for any gathering or as a delicious treat for your family. With no oven required, this cheesecake is a great choice when you want a hassle-free dessert that looks and tastes amazing!
Ingredients
For the Crust:
- 1 1/2 cups graham cracker crumbs
- 1/3 cup sugar
- 6 tablespoons unsalted butter, melted
For the Filling:
- 1 (8 ounce) package cream cheese, softened
- 1 (14 ounce) can sweetened condensed milk
- 1/3 cup lemon juice
- 1 teaspoon vanilla extract
For the Topping:
- 1 can (21 ounces) cherry pie filling
Equipment:
- 9-inch pie dish or springform pan
- Mixing bowl
- Electric mixer
Instructions
1. Prepare the Crust
Step 1: Mix the Ingredients
In a medium bowl, combine 1 1/2 cups graham cracker crumbs, 1/3 cup sugar, and 6 tablespoons melted butter. Stir until the mixture is well combined and resembles wet sand.
Step 2: Form the Crust
Press the graham cracker mixture firmly into the bottom and up the sides of a 9-inch pie dish or springform pan. Use the back of a spoon or a flat-bottomed cup to create an even layer. Place the crust in the refrigerator to chill while you prepare the filling.
2. Make the Filling
Step 1: Cream the Cheese
In a large mixing bowl, use an electric mixer to beat 1 (8 ounce) package of softened cream cheese until smooth and creamy, making sure there are no lumps.
Step 2: Add the Sweetened Condensed Milk
Gradually beat in 1 (14 ounce) can of sweetened condensed milk into the cream cheese, mixing until smooth and well incorporated.
Step 3: Add Flavor
Mix in 1/3 cup lemon juice and 1 teaspoon vanilla extract, ensuring the mixture is creamy and fully combined.
3. Assemble the Cheesecake
Step 1: Pour the Filling
Pour the cream cheese mixture over the prepared crust. Use a spatula to smooth out the top, creating an even layer.
Step 2: Set the Cheesecake
Place the cheesecake in the refrigerator and chill for at least 3 hours or until the filling is firm and set.
4. Add the Cherry Topping
Step 1: Add the Cherry Filling
Once the cheesecake is fully set, top it with 1 can (21 ounces) of cherry pie filling. Spread the cherries evenly across the top for a beautiful presentation.
5. Serve
Step 1: Slice and Enjoy
Cut the cheesecake into slices and serve chilled. Each slice offers a perfect balance of buttery crust, creamy filling, and sweet cherries.
Conclusion
This No-Bake Cherry Cheesecake is a simple yet impressive dessert, ideal for parties, potlucks, or a family treat. The creamy filling, tangy lemon flavor, and sweet cherry topping make this cheesecake irresistible. Enjoy making this easy, no-fuss dessert, and savor each delectable bite!
Tips for Success:
- Use Room Temperature Cream Cheese: For a smooth filling, make sure your cream cheese is softened to room temperature before beating it.
- Chilling Time: Be sure to give the cheesecake enough time to set in the fridge. Rushing this step can result in a runny filling.
- Topping Variations: If cherries aren’t your favorite, you can substitute with blueberry, strawberry, or raspberry pie filling.
Frequently Asked Questions
Q: Can I make this cheesecake ahead of time?
A: Yes! This cheesecake can be made the day before and stored in the refrigerator until ready to serve.
Q: How long does the cheesecake last in the fridge?
A: The cheesecake will stay fresh in the refrigerator for up to 5 days. Keep it covered to maintain its texture.
Q: Can I freeze this cheesecake?
A: Yes, you can freeze this cheesecake without the cherry topping for up to 2 months. Thaw it in the refrigerator before serving and add the cherry topping fresh.
Q: Can I use a different fruit topping?
A: Absolutely! Feel free to use your favorite pie filling, like blueberry, raspberry, or even apple, for a twist on the classic cherry cheesecake.
Enjoy your cheesecake creation, and feel free to ask if you need more recipes or suggestions!