Few desserts hold the nostalgic charm and old-fashioned goodness of a traditional fruit cake. And this particular recipe — the Never Fail Fruit Cake — truly lives up to its name. Whether you’re a seasoned baker or making fruit cake for the first time, this version guarantees perfect results every single time.
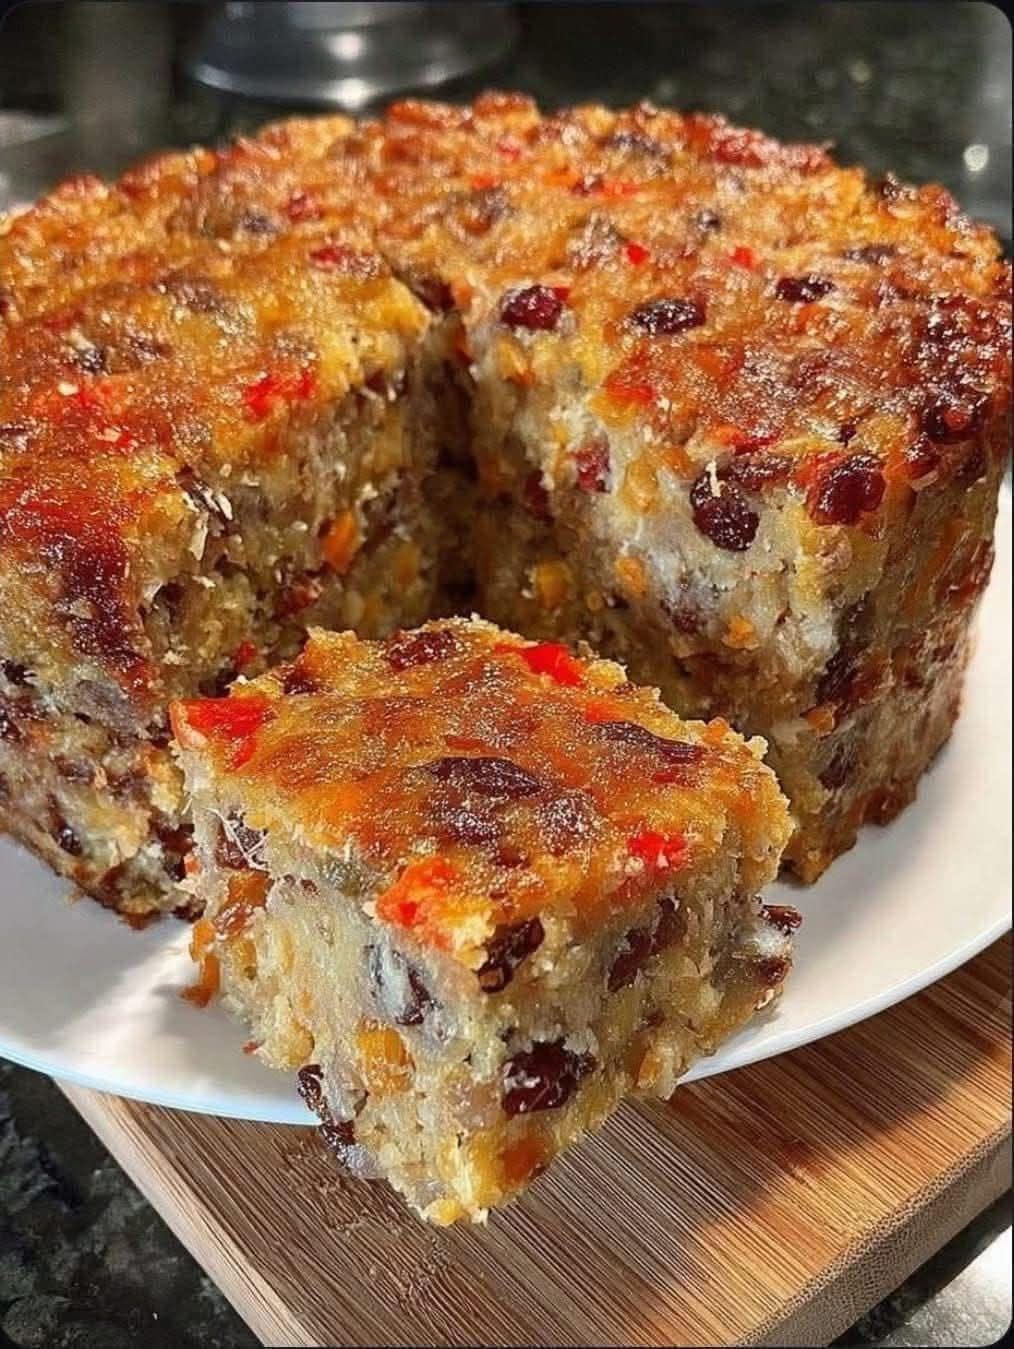
Rich, colorful, and bursting with candied fruit, dates, and pecans, it’s the kind of cake that brightens any holiday table. The combination of sweetened condensed milk, coconut, and a hint of flour creates a moist, chewy texture that never turns dry or crumbly. Even better, this cake is virtually impossible to mess up — there’s no need for precise timing or fancy baking skills.
In this detailed guide, we’ll walk through everything you need to know — from ingredient preparation to baking and storing — to make a perfect Never Fail Fruit Cake that will wow your family and friends for generations to come.
The Legacy of the Never Fail Fruit Cake
Before we dive into the recipe itself, it’s worth appreciating the heritage of fruit cake. Traditionally, fruit cakes were made as celebratory desserts, often prepared during the holidays and soaked in alcohol to preserve them for weeks or months.
But this particular recipe — a “no-fuss” or “never fail” version — came into popularity in mid-20th-century America. It became a staple at church gatherings, family reunions, and especially Christmas celebrations. Unlike traditional fruit cakes that rely on butter, sugar, and eggs, this one uses sweetened condensed milk as the main binding ingredient, ensuring both richness and moisture.
The result? A soft, sticky, sweet cake filled with festive colors and textures that’s nearly foolproof.
Ingredients Breakdown
Let’s take a closer look at the ingredients that make this cake so special:
1. Candied Cherries (1 pound)
Candied cherries add both sweetness and color to the cake. The red and green cherries are often used during the holidays for a festive look. They provide a chewy texture that complements the crunch of the nuts and the softness of the dates.
2. Candied Pineapple (1 pound)
Candied pineapple brings a tropical brightness to the mix. Its subtle tartness cuts through the richness of the condensed milk and coconut, balancing the flavors perfectly.
3. Pitted Dates (1 pound)
Dates are a natural sweetener and lend a deep, caramel-like flavor. Their soft texture adds moisture and helps hold the cake together. Make sure to chop them roughly before mixing.
4. Chopped Pecans (1 pound)
Pecans provide crunch and a buttery nut flavor that complements the sweetness of the fruits. Toasting them lightly before mixing can enhance their depth of flavor.
5. Flaked Coconut (4 packages of 8 oz each)
Coconut gives this cake its distinctive chewy texture and tropical aroma. It also helps bind the fruit and nuts together while adding richness.
6. All-Purpose Flour (3 tablespoons)
Surprisingly, this cake uses very little flour. It’s not a traditional batter-based cake but more of a molded fruit-and-nut confection. The flour simply helps absorb excess moisture and ensures the cake sets properly as it bakes.
7. Sweetened Condensed Milk (2 cans, 14 oz each)
This is the “magic ingredient.” It replaces butter, sugar, and eggs, binding everything together while adding sweetness and creaminess. It ensures that the cake stays moist for weeks after baking.
Step-by-Step Instructions
Step 1: Preheat and Prepare Your Pan
Start by preheating your oven to 300°F (150°C).
This moderate temperature is key — fruit cakes need to bake slowly so that the dense mixture cooks evenly without burning the outside.
Next, lightly grease a 10-inch tube pan (also known as an angel food cake pan). Cut a piece of parchment paper to fit the bottom and grease it as well. This extra step ensures the cake releases easily once baked.
Step 2: Prepare the Fruit and Nuts
In a large mixing bowl, combine the candied cherries, candied pineapple, dates, and chopped pecans.
This is where the magic starts. Use your hands or a sturdy spatula to toss the ingredients together, ensuring the fruit and nuts are evenly distributed.
Add in the flaked coconut, and mix well again. The coconut will coat the fruits and nuts, helping to prevent them from sticking together.
Step 3: Add Flour and Condensed Milk
Sprinkle the flour over the fruit-and-nut mixture and toss lightly to coat. This helps the condensed milk adhere better and keeps the mixture from becoming too wet.
Next, pour in the sweetened condensed milk. Using a large spoon (or your hands, if you prefer), blend everything together thoroughly.
You’ll notice the mixture becoming thick and sticky — that’s exactly what you want. Every piece of fruit should be coated in the milk mixture, creating a glossy, cohesive mass.
Step 4: Pack into the Pan
Spoon the mixture into your prepared tube pan. Since it’s so dense, it won’t pour like traditional cake batter. Use the back of a spoon or spatula to press it down firmly, removing any air pockets.
This cake doesn’t rise much, so the way you pack it now will determine its final shape. Smooth the top evenly for a neat finish.
Step 5: Bake Slowly
Place the pan in your preheated oven and bake for about 1½ hours (90 minutes).
Because the batter is so dense, it needs time to cook through evenly. You’ll know it’s done when the top looks golden brown and slightly glossy, and the cake feels firm to the touch.
If you insert a knife or skewer near the edge, it should come out mostly clean, though a little stickiness from the caramelized fruit is normal.
Step 6: Cool and Remove from Pan
Once baked, remove the cake from the oven. Let it cool for 10–15 minutes, then run a knife gently around the edges to loosen it.
Remove the outer rim of the tube pan and let it cool for another 15 minutes. When it’s barely warm, carefully lift off the tube base and peel away the parchment paper.
Allow the cake to cool completely before slicing — this helps it set fully and makes cutting easier.
The Perfect Texture and Flavor
When you slice into this Never Fail Fruit Cake, you’ll notice it’s packed — every bite filled with fruit, nuts, and coconut. It’s not fluffy like a sponge cake, but rather dense, chewy, and rich.
The condensed milk caramelizes slightly during baking, coating the fruit and nuts with a glossy finish. The coconut gives it chewiness, the nuts add crunch, and the fruit provides bursts of sweetness in every bite.
This unique balance of textures is what makes it so addictive — it’s less of a traditional “cake” and more of a luxurious fruit-and-nut bar baked to perfection.
Storage and Shelf Life
One of the best things about this recipe is its long shelf life. The high sugar content from the fruit and condensed milk acts as a natural preservative.
- At Room Temperature: Wrap tightly in plastic wrap and store in an airtight container for up to 2 weeks.
- Refrigerated: Lasts up to a month. The cool temperature helps the cake stay firm.
- Frozen: Wrap in several layers of plastic and aluminum foil and freeze for up to 6 months. Thaw at room temperature overnight before serving.
In fact, the flavor improves after a few days as the ingredients meld together — making this an excellent make-ahead dessert for the holidays.
Variations
This recipe is endlessly adaptable. Here are some fun variations to try:
- Add Spices: Mix in ½ teaspoon of cinnamon, nutmeg, or allspice for a warm, spiced flavor.
- Mix Up the Fruit: Substitute raisins, dried cranberries, or chopped dried apricots for some of the cherries or pineapple.
- Add Chocolate Chips: A handful of dark chocolate chips adds richness and pairs beautifully with the sweet fruit.
- Mini Versions: Divide the mixture into muffin tins or small loaf pans for individual gifts.
Tips for Success
- Use fresh, high-quality fruit: Stale or hard candied fruit will make the cake tough.
- Don’t skip the parchment paper: It ensures easy release and prevents sticking.
- Cool completely before slicing: This prevents crumbling and helps flavors develop.
- Use a heavy pan: A sturdy metal or nonstick tube pan promotes even baking and prevents burning.
Serving Ideas
This fruit cake is delicious on its own but pairs beautifully with:
- Whipped cream or vanilla ice cream
- A drizzle of caramel or rum sauce
- Fresh berries for a refreshing contrast
- A cup of coffee or black tea
For a festive presentation, dust the top lightly with powdered sugar and garnish with extra cherries and pecans.
Conclusion
The Never Fail Fruit Cake is a time-honored classic for good reason. It’s easy to make, beautifully rich, and practically indestructible — it truly never fails.
With its chewy coconut base, colorful fruit, and nutty crunch, this cake embodies the spirit of the holidays and the comfort of homemade baking. Whether you serve it at a Christmas gathering, gift it to loved ones, or enjoy it with a warm cup of coffee, it’s sure to become a cherished part of your baking tradition.
Make it once, and you’ll understand why it’s called Never Fail — because every time you bake it, it turns out perfectly moist, flavorful, and utterly irresistible.