If you’re looking for the perfect holiday cookie, look no further than these Mint Chocolate Chip Snowball Cookies. With their melt-in-your-mouth texture, refreshing mint flavor, and snowy powdered sugar coating, they’re a crowd-pleaser for any occasion. These cookies come together quickly, are fun to make, and are perfect for holiday parties, potlucks, or even as a homemade gift. Best of all, you don’t need to chill the dough, which means less waiting and more time to enjoy these delicious treats!
Why You’ll Love This Recipe
Cool Mint Flavor
The combination of peppermint extract and mini chocolate chips creates a refreshing, festive flavor. This cool mint flavor pairs perfectly with the richness of the chocolate, giving you a sweet treat that feels both indulgent and refreshing.
Festive & Fun
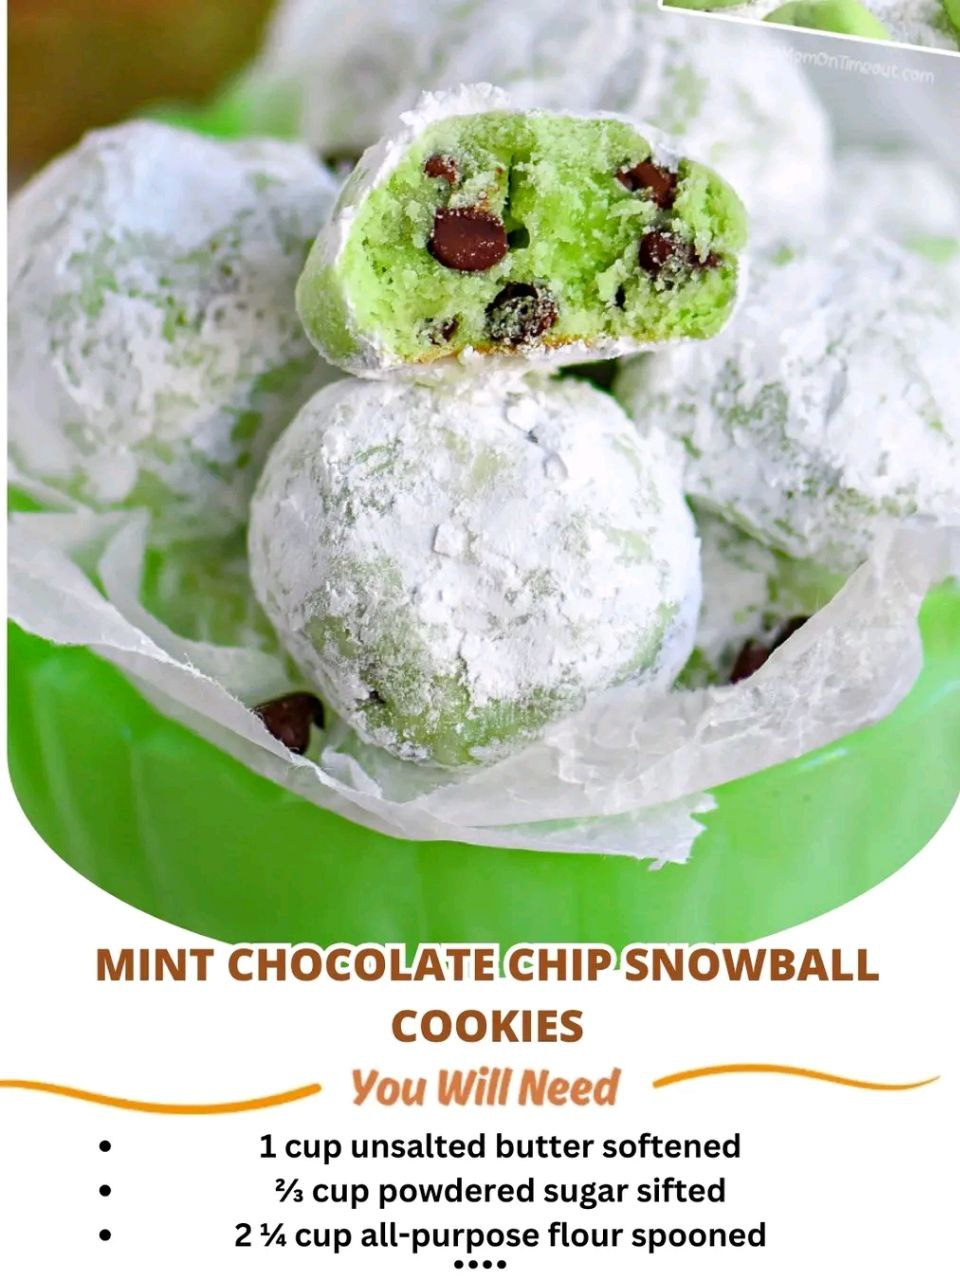
The green dough and powdered sugar “snow” make these cookies an eye-catching addition to any holiday celebration. Whether you’re baking for a Christmas gathering or just wanting to add some cheer to your day, these cookies are festive and fun.
Melty Texture
With a buttery base and soft consistency, these cookies practically melt in your mouth. Their delicate crumb and chewy texture make them irresistible, ensuring that each bite feels like a little taste of heaven.
Easy to Make
No chilling required—these cookies come together quickly with minimal effort. The dough is simple to mix, and the baking time is quick, making them an easy treat to whip up even during the busiest times of the year.
Crowd-Pleasing
These cookies are always a hit at parties, potlucks, and as homemade gifts. They’re easy to transport and share, making them a perfect choice for spreading holiday cheer with friends and family.
Ingredients You’ll Need
Makes 24-30 cookies
For the Cookies:
- 1 cup unsalted butter, softened
- 1/2 cup granulated sugar
- 1 tsp peppermint extract (or vanilla extract for a subtler mint flavor)
- 1/2 tsp almond extract (optional, for depth)
- 2 cups all-purpose flour
- 1/4 tsp salt
- 1/2 cup mini chocolate chips (or chopped dark chocolate for a richer flavor)
- Green food coloring (gel or liquid, optional for festive color)
For Coating:
- 1 cup powdered sugar, plus extra for rolling
Step-by-Step Instructions
Step 1: Preheat & Prep
Start by preheating your oven to 350°F (175°C). Line a baking sheet with parchment paper or a silicone baking mat to prevent the cookies from sticking and ensure even baking.
Step 2: Cream Butter and Sugar
In a large mixing bowl, use a hand or stand mixer to cream the softened butter and granulated sugar together until light and fluffy. This process will take about 2–3 minutes. The butter and sugar should be well combined and airy, creating the perfect base for the cookies.
Step 3: Add Flavorings
Once the butter and sugar mixture is fluffy, mix in the peppermint extract and almond extract (if using). Add a few drops of green food coloring if you’d like to give the dough a festive hue. Continue mixing until everything is fully incorporated, and the dough takes on a pleasant green tint.
Step 4: Combine Dry Ingredients
In a separate bowl, whisk together the all-purpose flour and salt. Gradually add the dry ingredients to the butter mixture, mixing on low speed to avoid flour spillage. Keep mixing until the dough comes together and becomes soft. Be careful not to overmix, as this can affect the texture of the cookies.
Fold in the mini chocolate chips (or chopped dark chocolate), ensuring they are evenly distributed throughout the dough.
Step 5: Shape the Cookies
Scoop tablespoon-sized portions of dough and roll them into balls between your palms. This helps form a smooth shape and ensures uniform cookies. Place each dough ball about 2 inches apart on the prepared baking sheet. Since the cookies don’t spread much, they can be placed closer together.
Step 6: Bake
Bake the cookies for 10-12 minutes or until they are set but still pale. They won’t brown much, so keep an eye on them to ensure they don’t overbake. The cookies will firm up as they cool, so don’t worry if they seem a bit soft when they come out of the oven.
Step 7: Coat in Powdered Sugar
Allow the cookies to cool on the baking sheet for 5 minutes before rolling them in powdered sugar. The warmth of the cookies helps the sugar stick and creates the signature “snowball” effect. Once cooled, roll the cookies again in powdered sugar for an extra snowy finish.
Why This Recipe Works
Buttery Base
The high butter content in these cookies creates a rich, melt-in-your-mouth texture that enhances the overall flavor and keeps the cookies soft and tender.
Mint-Chocolate Magic
The combination of peppermint extract and mini chocolate chips delivers a refreshing minty flavor balanced by the indulgence of chocolate. This magical pairing is what gives these cookies their irresistible taste.
Double Coating
Rolling the cookies twice in powdered sugar gives them a thick, snowy coating that stays intact. The first roll helps the sugar adhere while the second creates a more visible, festive finish.
Variations to Try
White Chocolate Chips
For a sweeter twist, swap the mini chocolate chips for white chocolate chips. The creamy sweetness of white chocolate complements the mint flavor beautifully, offering a lighter variation of the classic recipe.
Gluten-Free Option
For those who need a gluten-free version, simply use a gluten-free flour blend in place of the all-purpose flour. Be sure to check that all other ingredients, such as the extracts and chocolate chips, are gluten-free as well.
Nutty Addition
Add finely chopped pistachios or almonds to the dough for a crunchy texture and a burst of flavor. Not only will they add some color, but they’ll provide a nice contrast to the soft, melt-in-your-mouth cookies.
Non-Mint Version
If you’re not a fan of mint, you can skip the peppermint extract and substitute it with vanilla extract for a more traditional snowball cookie flavor. This will result in a classic, buttery cookie with a subtle sweetness.
Mini Size
For bite-sized treats that are perfect for parties, roll the dough into smaller balls. These mini cookies are easy to pop in your mouth and make for great additions to dessert platters or party trays.
Tips for Success
- Don’t Overbake: These cookies should remain pale and soft. Even if they seem a little underdone when you take them out of the oven, they will firm up as they cool, so don’t overbake them.
- Use Gel Food Coloring: If you want a vibrant green color, opt for gel food coloring rather than liquid. Gel-based food coloring won’t alter the texture of the dough and provides a richer color.
- Storage: Store the cookies in an airtight container at room temperature for up to 5 days. If the powdered sugar coating starts to fade, give the cookies another quick roll in powdered sugar before serving.
- Don’t Skip the Second Coating: For that snowy, festive look, make sure to coat the cookies in powdered sugar both right after baking and once they’ve cooled.
Serving Suggestions
Holiday Platter
These Mint Chocolate Chip Snowball Cookies are perfect for arranging on a dessert table along with other holiday treats like gingerbread cookies, fudge, or candy canes. They’ll add a pop of color and flavor to your spread.
Romantic Touch
For a charming homemade gift, package these cookies in small boxes or clear bags tied with ribbon. They make a thoughtful gift for friends, family, or coworkers during the holiday season.
Party Favorite
Serve these cookies alongside hot cocoa, coffee, or even a holiday punch for a cozy treat. They’re sure to be a crowd favorite at any gathering.
Final Thoughts
Mint Chocolate Chip Snowball Cookies are a delicious and festive twist on the classic snowball cookie. With their buttery texture, cool mint flavor, and snowy powdered sugar coating, these cookies are the perfect holiday treat for any occasion. Whether you’re baking them for a festive party, giving them as a gift, or enjoying them on a quiet evening at home, these cookies are sure to bring joy to anyone who tastes them.
FAQs
Can I make these cookies ahead of time?
Yes! You can bake and store the cookies in an airtight container for up to 5 days. If the powdered sugar coating fades, simply roll the cookies in more powdered sugar right before serving.
Can I freeze these cookies?
Yes! You can freeze the unbaked dough balls. Just place them on a baking sheet to freeze, then transfer them to a zip-top bag or airtight container. When you’re ready to bake, no thawing is required—just add an extra minute or two to the baking time.
Can I use different chocolate in the dough?
Yes! You can swap the mini chocolate chips for chopped dark chocolate or white chocolate chips. Each variation will give the cookies a unique flavor.
Can I make these cookies without mint?
Absolutely! Skip the peppermint extract and use vanilla extract for a more traditional flavor, and you’ll have a delightful batch of snowball cookies.
Can I make these gluten-free?
Yes, simply substitute the all-purpose flour with a gluten-free flour blend to make these cookies gluten-free.