If you’re looking for a dessert that’s easy to prepare, impressively delicious, and perfectly portioned, these Mini Strawberry Runny Cakes are exactly what you need. Each bite-sized cake offers a buttery, soft texture with a sweet, gooey center of strawberry jam that oozes out when you cut into it. They’re perfect for tea parties, family gatherings, or as a warm, comforting dessert after dinner. This detailed guide will walk you through every step of making these delightful mini cakes.
Ingredients (Yields about 12 mini cakes)
Dry Ingredients
- 250 grams (8.8 oz or 2 cups) all-purpose flour – This forms the base structure of the cakes.
- 1 teaspoon baking powder – Helps the cakes rise and become fluffy.
- ½ teaspoon salt – Balances the flavors and enhances the sweetness.
Wet Ingredients
- 250 grams (8.8 oz or 1 cup + 3 tbsp) unsalted butter, room temperature – Adds richness and a soft crumb texture.
- 250 grams (8.8 oz or 1 cup + 3 tbsp) white granulated sugar – Sweetens the batter while contributing to moisture.
- 5 large eggs, room temperature – Provides structure and ensures a tender crumb.
- 1 teaspoon pure vanilla extract – Enhances the overall flavor profile.
Filling
- Strawberry jam – Use as much as needed to fill each mini cake. The jam creates a deliciously gooey center.
Directions
Step 1: Preheat the Oven and Prepare the Molds
- Begin by preheating your oven to 350°F (175°C) to ensure an even bake.
- Prepare your mini cake molds or a mini muffin pan. Grease each mold with a thin layer of butter and lightly dust with flour to prevent sticking. Shake off any excess flour and set the molds aside.
Step 2: Cream Butter and Sugar
- In a large mixing bowl, add the unsalted butter and white granulated sugar.
- Using an electric mixer, beat the mixture on medium speed until it becomes light, fluffy, and pale in color. This step is crucial for incorporating air into the batter, which will help the cakes rise and create a soft texture.
- Scrape down the sides of the bowl as needed to ensure all ingredients are well combined. This process should take about 3-4 minutes.
Step 3: Incorporate the Eggs and Vanilla
- Reduce the mixer speed to medium-low.
- Add the eggs one at a time, beating well after each addition to ensure they are fully incorporated into the batter.
- After all eggs are added, mix in the vanilla extract. The mixture may look slightly curdled, but this is normal and will smooth out once the flour is added.
Step 4: Combine Dry Ingredients and Mix
- In a separate bowl, sift together the all-purpose flour, baking powder, and salt. Sifting ensures even distribution and removes any lumps.
- Gradually add the dry mixture to the wet ingredients, mixing on low speed. This helps prevent overmixing, which can lead to dense cakes.
- Continue mixing until you have a smooth, lump-free batter. Be careful not to overmix, as this can negatively affect the cake’s texture.
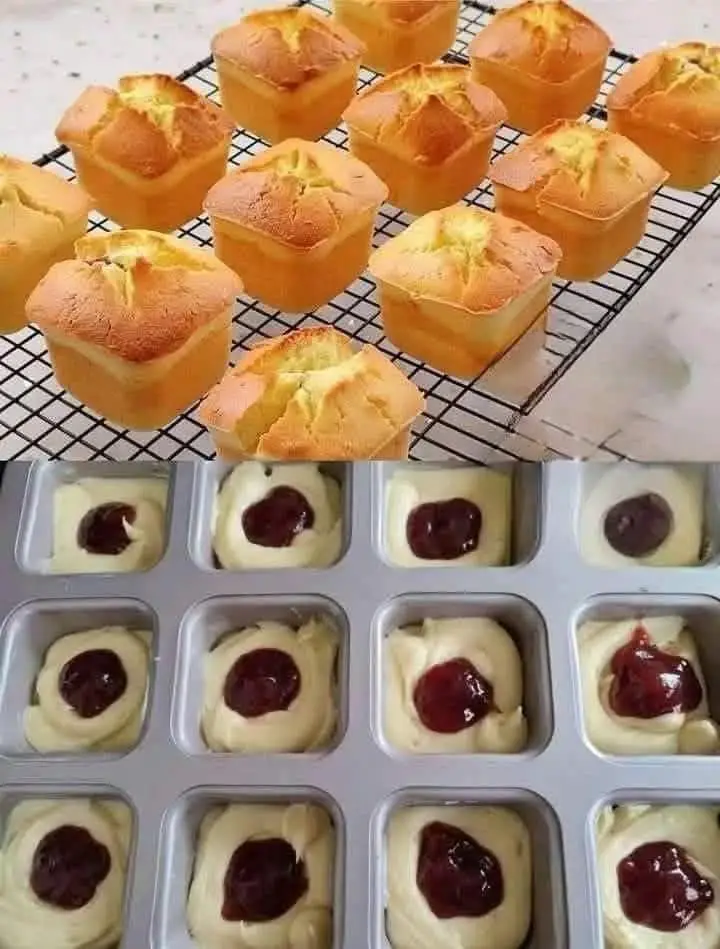
Step 5: Fill the Molds and Add Jam
- Spoon a small amount of batter into each prepared mold, filling it about halfway. This will create a base layer for the jam.
- Add a teaspoon of strawberry jam into the center of each mold. Avoid overfilling, as too much jam can cause the cakes to collapse or leak.
- Cover the jam with more batter, ensuring the filling is fully enclosed. Smooth the tops gently with a spoon to ensure even baking.
Step 6: Bake the Cakes
- Place the molds in the preheated oven and bake for 18-22 minutes, or until the tops are golden and a toothpick inserted near the side (away from the jam center) comes out clean.
- Be cautious not to overbake, as this can cause the jam center to dry out. The cakes should remain soft and moist with a molten center.
- Once baked, remove the cakes from the oven and let them cool in the molds for 5 minutes. This resting period helps the cakes firm up slightly, making them easier to remove.
Step 7: Serve Warm
- Carefully remove the cakes from the molds.
- Serve them warm to enjoy the gooey, runny strawberry center at its best.
- For an elegant touch, dust the tops with powdered sugar or serve with a scoop of vanilla ice cream.
Cooking Tips
- Use Room Temperature Ingredients: This ensures the batter mixes evenly, creating a smooth texture.
- Don’t Overfill with Jam: A teaspoon is sufficient. Too much jam can cause the cakes to leak or collapse.
- Avoid Overmixing: Overworking the batter can lead to dense, tough cakes. Mix just until the ingredients are combined.
- Check for Doneness: Insert a toothpick near the edge, avoiding the jam center, to check if the cake is cooked through.
- Serve Immediately: These cakes are best enjoyed warm to experience the full effect of the runny jam center.
Substitutions and Variations
- Different Jam Flavors: Swap strawberry jam with raspberry, blueberry, apricot, or peach jam for a unique twist.
- Chocolate Center: Replace jam with a spoonful of chocolate spread or hazelnut spread for a rich, decadent version.
- Nutty Addition: Add a small amount of crushed nuts like almonds or walnuts into the batter for added texture.
- Citrus Zest: Incorporate a teaspoon of lemon or orange zest into the batter for a refreshing flavor boost.
- Gluten-Free Option: Use a gluten-free flour blend instead of all-purpose flour for a gluten-free treat.
FAQs
1. Can I make these cakes in advance?
Yes, you can bake the cakes in advance and store them in an airtight container. Reheat in the oven for a few minutes to restore the warm, runny center.
2. How do I ensure the center stays runny?
Avoid overbaking the cakes. Remove them from the oven when the edges are set, but the center still feels slightly soft.
3. Can I freeze these cakes?
Yes, these cakes freeze well. Wrap them tightly in plastic wrap and store in an airtight container for up to 2 months. Reheat in the oven before serving.
4. Can I use salted butter?
Yes, but reduce the added salt in the recipe to ¼ teaspoon to balance the flavors.
5. What if I don’t have mini molds?
You can use a mini muffin pan or even cupcake liners. Adjust the baking time as needed and monitor the cakes closely.
Nutritional Information (Per serving, approximate values)
- Calories: 260
- Fat: 15g
- Carbohydrates: 28g
- Sugar: 15g
- Protein: 4g
- Fiber: 1g
Storage and Reheating
- Room Temperature: Store in an airtight container for up to 2 days.
- Refrigeration: Keep in the fridge for up to 5 days. Reheat slightly to restore the molten center.
- Freezing: Wrap the cakes individually and freeze for up to 2 months. Reheat in an oven at 300°F (150°C) for 5-7 minutes.
Conclusion
These Mini Strawberry Runny Cakes are the ultimate combination of simplicity and indulgence. The buttery, tender cake encasing a warm, gooey strawberry center makes for a dessert that is both comforting and elegant. Whether you’re serving them at a gathering, as a sweet finish to a meal, or simply enjoying them with a cup of tea, these cakes are guaranteed to impress.
Their versatility allows you to experiment with different fillings and flavors, ensuring that this recipe becomes a go-to in your baking repertoire. Serve them warm for the ultimate experience, and enjoy every delicious, runny bite!