There’s something irresistibly satisfying about the crunch of a perfectly baked taco shell combined with the smooth, indulgent creaminess of melted cheese. These Loaded Taco Shells with Creamy Cheese Sauce bring together the best of both worlds — a fusion of textures, colors, and bold Mexican-inspired flavors that make every bite unforgettable.
Whether you’re preparing a quick dinner for the family, planning a game-day snack, or hosting friends, this recipe guarantees to impress. It’s easy to customize, fun to assemble, and absolutely bursting with flavor. Each shell is filled with seasoned meat (or your favorite vegetarian alternative), topped with a silky, homemade cheese sauce, and finished with vibrant toppings that deliver freshness and crunch.
Why You’ll Love This Recipe
This dish isn’t just about convenience — it’s about comfort and creativity. You’ll love this recipe for several reasons:
- Simple Yet Flavorful: Easy enough for weeknights, but delicious enough for parties.
- Customizable: Works beautifully with beef, turkey, chicken, or plant-based proteins.
- Crowd-Pleaser: Great for gatherings — everyone can build their own tacos.
- Textural Perfection: Crispy shells meet creamy cheese for an unforgettable bite.
- Quick to Prepare: Minimal prep time, maximum satisfaction.
Plus, the homemade cheese sauce adds a gourmet touch that elevates the entire dish, making it taste like restaurant-quality tacos with your own personal flair.
Ingredients
For the Taco Filling
- 10–12 taco shells (hard or soft, based on preference)
- 1 pound ground beef or turkey
- 1 tablespoon olive oil
- 1 small onion, finely chopped
- 2 cloves garlic, minced
- 1 packet taco seasoning (or homemade blend of chili powder, cumin, paprika, salt, and oregano)
- 1 cup diced tomatoes
- 1 cup shredded lettuce
- 1 avocado, diced
- ½ cup sliced jalapenos (optional)
- ½ cup sour cream for topping
For the Creamy Cheese Sauce
- 2 tablespoons butter
- 2 tablespoons all-purpose flour
- 1½ cups milk (whole or 2%)
- 1 cup shredded Monterey Jack cheese
- ½ cup shredded cheddar cheese
- Salt and pepper to taste
Step-by-Step Instructions
Step 1: Prepare the Taco Shells
Preheat your oven to 350°F (175°C). Arrange the taco shells upright in a baking dish or taco holder. Bake them for about 5 minutes to crisp them up — this helps prevent sogginess once you add the fillings.
Step 2: Cook the Filling
In a skillet over medium heat, heat olive oil and sauté the chopped onion and minced garlic until fragrant and translucent. Add the ground beef or turkey, breaking it apart with a spatula. Cook until browned and fully cooked through.
Sprinkle the taco seasoning over the meat and stir well to coat evenly. If needed, add a few tablespoons of water to help the seasoning blend into the meat. Let it simmer for 3–5 minutes, then remove from heat.
Step 3: Make the Creamy Cheese Sauce
In a separate saucepan, melt butter over medium heat. Once melted, whisk in flour to create a smooth roux. Gradually pour in milk while whisking continuously to avoid lumps.
Continue stirring until the sauce begins to thicken (about 3–4 minutes). Reduce heat to low and stir in the shredded Monterey Jack and cheddar cheese. Mix until fully melted and silky smooth. Season with salt and pepper to taste.
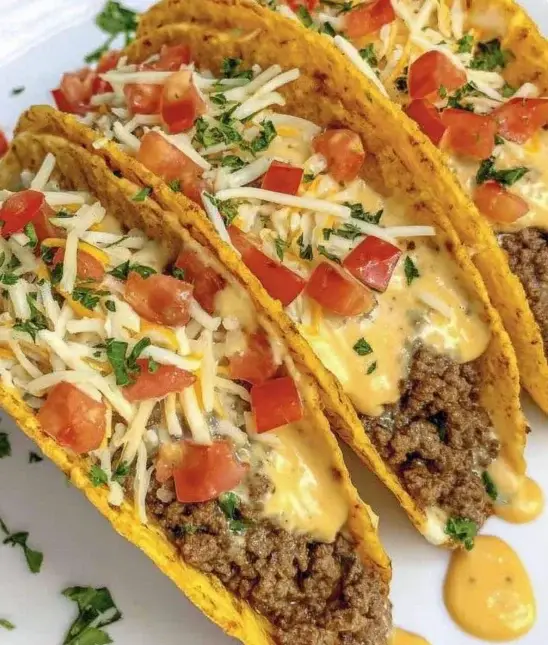
Step 4: Assemble the Loaded Taco Shells
Spoon the seasoned meat mixture into each prepared taco shell. Drizzle generously with the warm creamy cheese sauce. Top with shredded lettuce, diced tomatoes, avocado, jalapenos, and a dollop of sour cream.
Step 5: Optional Bake for Melted Perfection
If you prefer your tacos extra warm and melty, return the assembled shells to the oven for 3–5 minutes, just until the cheese sauce bubbles slightly.
Step 6: Serve and Enjoy
Remove from the oven, let cool slightly, and serve immediately. Enjoy with your favorite Mexican sides and beverages for a complete, flavor-packed meal.
Expert Tips for Success
- Prevent Soggy Shells: Always heat taco shells before filling — this keeps them crispy.
- Make It Spicy: Add a dash of cayenne or hot sauce to the meat mixture or cheese sauce.
- Keep the Cheese Sauce Smooth: Add milk gradually while whisking constantly to prevent lumps.
- Time-Saving Trick: Prepare the filling and cheese sauce ahead of time, then reheat when ready to serve.
- Vegetarian Alternative: Substitute the meat with black beans, corn, and sautéed vegetables for a plant-based twist.
- Add Crunch: Sprinkle crushed tortilla chips or crispy onions on top before serving.
Variations and Substitutions
This recipe is incredibly flexible, so you can adjust it to fit your preferences or dietary needs.
- Protein Swaps: Use ground chicken, shredded rotisserie chicken, or plant-based crumbles.
- Cheese Options: Try pepper jack for heat, or add cream cheese for extra richness.
- Taco Base: Replace taco shells with flour tortillas, pita bread, or lettuce wraps.
- Vegan Version: Use vegan cheese, dairy-free milk, and plant-based butter for the sauce.
- Add-Ons: Mix in corn, black beans, or sautéed bell peppers to enhance texture and nutrition.
You can even turn this recipe into a Loaded Taco Casserole — layer the meat, cheese sauce, and toppings in a baking dish and bake until bubbly for a family-style version.
Serving Suggestions
To make your meal feel like a true fiesta, pair your Loaded Taco Shells with Creamy Cheese Sauce with some classic Mexican sides and drinks:
- Mexican Rice or Cilantro Lime Rice: Adds a flavorful, filling side.
- Refried Beans or Black Beans: Perfect for extra protein and fiber.
- Fresh Pico de Gallo or Salsa: Adds brightness and freshness.
- Guacamole and Chips: A creamy, crunchy companion.
- Drinks: Pair with a cold cerveza, margarita, or lime-infused sparkling water.
If you’re hosting a taco night, set up a DIY taco bar where guests can build their own creations. It’s interactive, fun, and ensures everyone gets exactly what they like.
Storage and Reheating
- Refrigerate: Store leftover meat and cheese sauce separately in airtight containers for up to 3 days.
- Reheat: Warm the meat in a skillet and gently reheat the cheese sauce over low heat, stirring often.
- Avoid Reheating Shells in Microwave: This can make them soggy; instead, crisp them in the oven for a few minutes.
- Freezing: The meat and cheese sauce can be frozen separately for up to a month. Thaw and reheat before serving.
Tips for Presentation
- Serve the tacos on a large platter garnished with lime wedges and fresh cilantro.
- Drizzle a bit of extra cheese sauce on top just before serving for visual appeal.
- Add colorful toppings like red onion, corn, or bell peppers for a vibrant finish.
FAQs
Can I prepare the components of this recipe ahead of time?
Yes! You can cook the meat mixture and make the cheese sauce in advance. Store them separately in the refrigerator and reheat when it’s time to assemble.
How do I make this recipe spicier?
Add chili flakes, cayenne, or hot sauce to the meat mixture or cheese sauce. Fresh jalapeno slices or chipotle peppers in adobo sauce also work well.
Can I freeze leftover taco shells?
It’s best to enjoy the taco shells fresh for maximum crispness, but you can freeze the filling and cheese sauce separately and assemble fresh tacos later.
What are some kid-friendly modifications?
For a milder version, skip the jalapenos and use mild cheddar in the cheese sauce. Let kids build their own tacos with their favorite toppings for a fun meal experience.
Can I make this dish dairy-free?
Yes, substitute dairy-free butter, plant-based milk, and vegan cheese for the creamy sauce. You’ll still get a smooth, flavorful result.
Final Thoughts
Loaded Taco Shells with Creamy Cheese Sauce bring a playful, satisfying twist to the beloved taco. Every bite offers a perfect contrast — crunchy shells, juicy filling, and velvety cheese sauce that ties it all together.
This recipe celebrates the joy of comfort food with a creative edge. It’s fast, fun, and endlessly customizable — perfect for casual family dinners, festive parties, or a quick comfort meal. With its rich flavors and vibrant presentation, it’s guaranteed to become a staple in your recipe collection.