The Kentucky Butter Cake Cookie is a delicious twist on the classic Southern dessert, the Kentucky Butter Cake—a rich, buttery cake soaked in a sweet vanilla glaze. These cookies capture the same comforting flavors in a soft, bite-sized form that melts in your mouth. With a tender crumb, golden edges, and that signature buttery glaze soaking into every bite, they’re a crowd-pleaser for any occasion.
This recipe is simple, quick, and perfect for both beginners and seasoned bakers. Using a box of white cake mix as the base means minimal prep time, while the homemade glaze gives them that from-scratch taste and irresistible aroma. Whether you’re baking for a family gathering, a holiday cookie swap, or a cozy evening treat, these cookies will impress with their buttery sweetness and old-fashioned charm.
Ingredients
For the Cookies
- 1 box white cake mix (15.25 oz standard size)
- 2 large eggs, whisked
- ⅓ cup unsalted butter, melted
For the Glaze
- ¼ cup unsalted butter
- ½ cup granulated sugar
- 1 tablespoon water
- 1 teaspoon pure vanilla extract
Equipment Needed
- Mixing bowl
- Whisk or spatula
- Cookie scoop or tablespoon
- Baking sheet
- Parchment paper
- Saucepan (for glaze)
- Wire cooling rack
Step-by-Step Instructions
Step 1: Preheat the Oven
Start by preheating your oven to 350°F (175°C). Line a baking sheet with parchment paper or a silicone baking mat to prevent sticking and ensure even browning.
Step 2: Prepare the Cookie Dough
In a large mixing bowl, combine the white cake mix, whisked eggs, and melted butter. Stir with a spatula or wooden spoon until all ingredients are well combined.
The dough will be thick, similar to soft sugar cookie dough. It should pull away from the sides of the bowl but still be easy to scoop. If the dough feels too sticky, let it rest for a few minutes to firm up slightly as the butter cools.
Step 3: Shape the Cookies
Using a cookie scoop or tablespoon, portion the dough into 1½-inch balls and place them on the prepared baking sheet, leaving about 2 inches of space between each cookie to allow for spreading.
You can gently flatten each dough ball with the back of a spoon or your fingers if you prefer a more uniform shape.
Step 4: Bake the Cookies
Bake in the preheated oven for 7 to 8 minutes, or until the edges are set and just starting to turn golden. The centers may look slightly soft—that’s perfect, as they will continue to bake on the hot tray after removal.
Avoid overbaking to keep the cookies moist and tender.
Step 5: Cool the Cookies
Let the cookies cool on the baking sheet for about 4 to 5 minutes, then transfer them carefully to a wire cooling rack. Cooling them slightly before moving helps prevent breaking, as they’re very soft when hot.
Step 6: Prepare the Butter Glaze
While the cookies cool, make the buttery glaze that gives these cookies their signature flavor.
In a small saucepan, combine ¼ cup butter, ½ cup sugar, and 1 tablespoon water. Heat over medium-low, whisking constantly until the sugar dissolves completely and the mixture becomes smooth. This will take about 4 minutes—do not let it boil vigorously, as that can cause crystallization.
Once the sugar has fully dissolved, remove from heat and stir in 1 teaspoon vanilla extract. The glaze will smell rich and buttery with a sweet vanilla aroma.
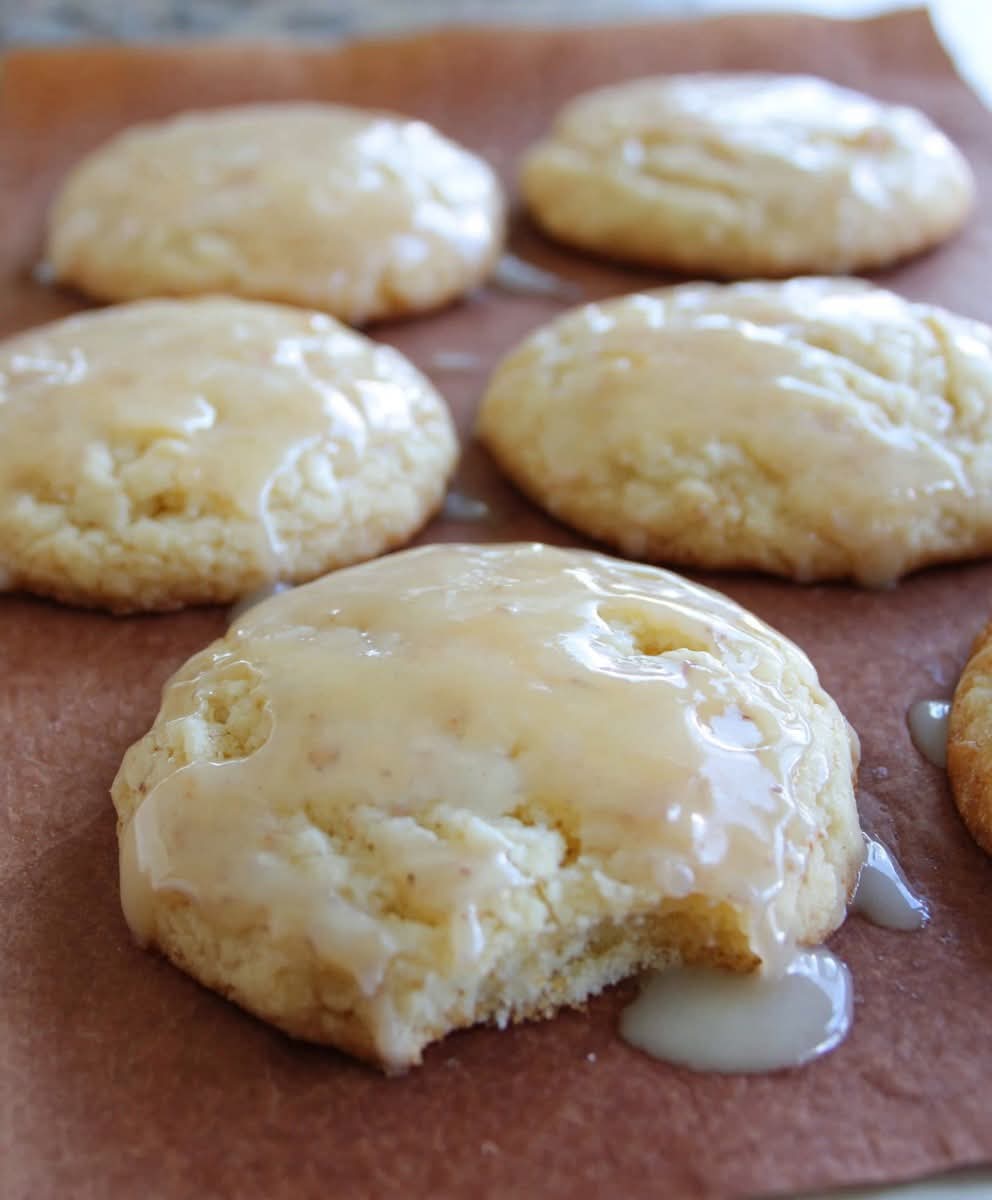
Step 7: Glaze the Cookies
While the cookies are still warm (but not hot), spoon about 1 teaspoon of glaze over each cookie. Allow the glaze to soak in—it will seep slightly into the tops, giving them a glossy finish and an extra layer of buttery sweetness.
You can use a small spoon or pastry brush to spread it evenly, ensuring each cookie gets a nice coating.
Let the cookies rest for about 10–15 minutes, until the glaze begins to set.
Step 8: Finish and Serve
Once the glaze has set, optionally sprinkle the tops with powdered sugar for a pretty, bakery-style finish.
The result is a soft, buttery cookie with a tender crumb and a delicate vanilla glaze that adds both flavor and shine.
Serve them warm for the ultimate comfort treat or allow them to cool completely for easy storage.
Flavor Notes and Texture
These cookies are a wonderful blend of soft, chewy, and melt-in-your-mouth textures. The cake mix gives them a light, fluffy structure, while the butter adds richness. The glaze soaks into the cookie surface, creating a moist, buttery layer that makes every bite indulgent.
They’re reminiscent of butter pound cake or vanilla shortbread but with a slightly denser, more cookie-like feel.
Variations and Add-Ins
While the traditional version is perfect as is, you can personalize this recipe with fun twists:
- Lemon Butter Cookies: Use a lemon cake mix instead of white, and add 1 tablespoon of lemon juice and zest to the glaze.
- Almond Butter Cookies: Add ½ teaspoon almond extract to both the dough and glaze for a nutty aroma.
- Cinnamon Swirl: Sprinkle cinnamon sugar on top before baking for a warm spice note.
- Glazed Sandwich Cookies: Spread a layer of buttercream or whipped cream cheese between two cookies for a rich sandwich-style treat.
- Nutty Crunch: Top the glazed cookies with crushed pecans or almonds while the glaze is still wet.
Storage and Shelf Life
- Room Temperature: Store in an airtight container for up to 5 days.
- Refrigeration: Extend freshness up to 7 days by refrigerating them. Allow to come to room temperature before serving for the best flavor.
- Freezing: Freeze the cookies (without glaze) for up to 2 months. When ready to serve, thaw and warm slightly, then prepare fresh glaze and drizzle before serving.
If the glaze softens during storage, you can reheat it gently and spoon a bit more on top to refresh the flavor.
Tips for Perfect Cookies
- Do not overmix the dough. Overmixing can make the cookies tough instead of soft. Mix only until combined.
- Measure butter accurately. Too much melted butter can make the dough greasy and cause spreading.
- Use parchment paper. It ensures easy removal and prevents the bottoms from browning too quickly.
- Bake in batches. If baking multiple trays, bake one at a time in the center of the oven for even heat distribution.
- Glaze while warm. Warm cookies absorb the glaze better, creating that signature buttery crust.
Serving Suggestions
These cookies are incredibly versatile. Try pairing them with:
- Coffee or tea for a cozy afternoon snack.
- Vanilla ice cream for a warm-and-cold dessert contrast.
- Hot chocolate during winter for an indulgent pairing.
- Whipped cream and fruit for a light, elegant presentation at brunch.
Frequently Asked Questions (FAQs)
1. Can I use yellow cake mix instead of white?
Yes. Yellow cake mix adds a deeper buttery flavor and slightly richer color. Both versions work beautifully.
2. Can I use oil instead of melted butter in the cookie dough?
While oil can work in a pinch, butter gives these cookies their signature taste. If you must substitute, use an equal amount of vegetable oil, but note that the flavor will be less rich.
3. My glaze crystallized—what happened?
This can happen if the sugar wasn’t fully dissolved or the mixture boiled too vigorously. Keep the heat low and stir constantly until the sugar completely dissolves.
4. How do I know when the cookies are done baking?
The cookies should be set at the edges and slightly soft in the center. They’ll continue cooking slightly on the hot baking sheet after removal.
5. Can I double this recipe?
Absolutely. You can easily double or triple it for larger batches—perfect for parties or holidays. Just mix each batch separately to maintain consistent texture.
6. Can I make the glaze ahead of time?
The glaze is best made fresh, as it thickens as it cools. If needed, rewarm it gently on the stove or in the microwave before glazing.
7. Why do my cookies spread too much?
If the dough is too warm, refrigerate it for 10–15 minutes before baking. This helps the butter solidify slightly and reduces spreading.
8. How can I make them look extra pretty?
Use a piping bag to drizzle the glaze neatly, then dust lightly with powdered sugar once set. You can also garnish with small edible pearls or crushed nuts for decoration.
9. Can I make these gluten-free?
Yes. Substitute a gluten-free white cake mix and check that all other ingredients are gluten-free certified. The texture will be slightly softer but still delicious.
10. What makes these cookies “Kentucky Butter Cake” style?
The defining element is the butter glaze, which is poured over the baked cookie much like the glaze used on a Kentucky Butter Cake. It soaks in slightly, giving a sweet, buttery crust that’s moist and rich.
Conclusion
The Kentucky Butter Cake Cookie combines the nostalgia of a traditional Southern dessert with the convenience of a quick, modern cookie recipe. Every bite delivers the comforting flavor of butter, sugar, and vanilla in perfect harmony. The tender texture and sweet glaze make these cookies unforgettable—simple enough for a weeknight bake, yet special enough for any celebration.
Once you’ve made them, you’ll understand why this recipe is a favorite among bakers everywhere: buttery, soft, golden, and simply irresistible.