Filling a deep raised garden bed can seem like a daunting task, especially if you’re worried about the cost of purchasing enough soil to fill it completely. However, there are many cost-effective, sustainable ways to fill a raised bed without breaking the bank. By using layers of inexpensive materials, you can reduce costs while still creating a healthy environment for your plants to thrive.
In this guide, we’ll walk you through how to fill a deep raised bed using readily available, affordable materials while promoting soil health, good drainage, and long-term fertility.
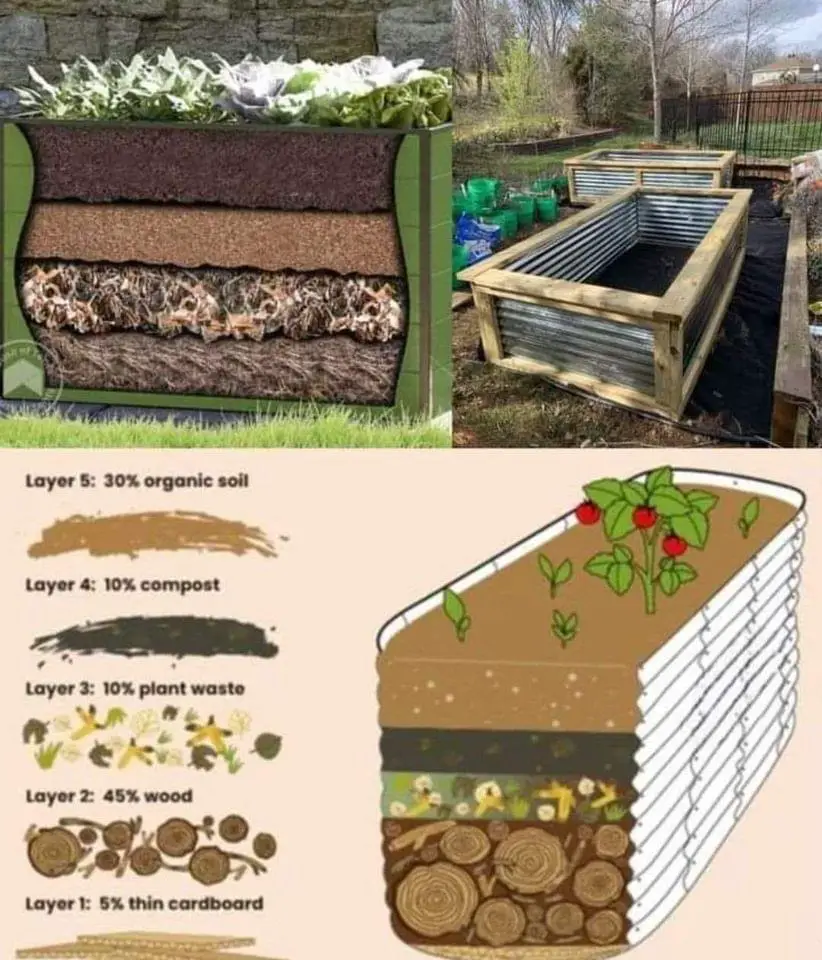
Why Use a Layered Approach to Fill a Raised Bed?
The layered approach not only helps save on the amount of soil needed but also benefits the long-term health of your garden bed. By utilizing different materials, you’re essentially creating a natural composting system within the bed, which will gradually decompose and enrich the soil over time. This method, inspired by hugelkultur (a traditional gardening method), helps with:
- Improved drainage: Larger materials at the bottom of the bed allow water to drain more efficiently.
- Enhanced soil fertility: Organic matter breaks down over time, releasing nutrients into the soil.
- Cost savings: You use less expensive materials for the base, reserving premium soil for the top layer where your plants need it most.
Now, let’s dive into how to fill your deep raised bed in a cheap and easy way.
1. Start with the Base: Bulk Materials
To fill the bottom third or half of your raised bed, use inexpensive, bulky materials that you may already have on hand. These materials will create a base that allows for good drainage and aeration while breaking down slowly over time to enrich the soil.
Materials to Use:
- Logs or large branches: These provide structure and take a long time to decompose, releasing nutrients gradually.
- Dead leaves: Fallen leaves are a great filler material and will break down over time.
- Straw or hay: These materials are affordable and help with water retention and drainage.
- Cardboard: Flattened cardboard can also be used as a base layer, helping to suppress weeds and break down into the soil over time.
Tip: Try to use what you already have in your yard or find bulk materials like wood and leaves from neighbors or local parks.
2. Add Organic Matter
Once you’ve created a solid base with bulk materials, it’s time to start adding organic matter. This middle layer will help promote healthy soil microbes and provide nutrients for your plants as it decomposes.
Materials to Use:
- Compostable kitchen scraps: Vegetable peels, coffee grounds, and eggshells work well in this layer.
- Unfinished compost: If you have compost that hasn’t fully broken down, this is a great place to add it.
- Manure: Aged manure (from cows, chickens, or horses) is full of nitrogen and great for enriching the soil.
Tip: If you don’t have your own compost or manure, consider checking local farms or garden centers for inexpensive or free sources.
3. Add a Middle Layer for Drainage and Nutrients
Next, create a layer that helps with drainage and provides nutrients to the soil above. This layer will be essential for creating the right environment for plant roots.
Materials to Use:
- Garden soil: Reuse soil from other parts of your garden, or purchase inexpensive garden soil.
- Compost: Adding finished compost will help introduce essential nutrients to your raised bed.
- Aged mulch or wood chips: These materials can help improve drainage while also enriching the soil as they break down.
Tip: Layering mulch or wood chips between garden soil and compost ensures that water drains effectively while still holding enough moisture for your plants.
4. Top Layer: High-Quality Soil
The top layer is where your plants will root and grow, so it’s essential to use the best quality soil you can afford. This layer should be around 6 to 12 inches deep, depending on the type of plants you’re growing.
Materials to Use:
- Nutrient-rich compost: Compost is filled with the nutrients plants need to grow strong and healthy.
- Potting soil: If you’re growing vegetables, herbs, or flowers, a high-quality potting mix will provide essential nutrients and help retain moisture.
- A mix of garden soil and compost: You can create your own topsoil by mixing compost and garden soil.
Tip: If you’re growing root vegetables or plants that require deep roots, make sure the top layer is at least 12 inches deep to give them enough room to grow.
5. Water and Settle the Layers
After adding each layer, it’s important to water the bed. Watering helps settle the materials and encourages the decomposition process, especially for organic matter like compost and kitchen scraps.
- Water each layer thoroughly: This ensures that the materials settle properly and fill any air pockets.
- Promote decomposition: Watering helps kick-start the decomposition of organic materials in the lower layers, which will improve the quality of your soil over time.
6. Mulch the Surface
Finally, cover the surface of your raised bed with mulch. Mulching helps retain moisture, suppress weeds, and regulate soil temperature, which is crucial for healthy plant growth.
Materials to Use:
- Straw: Straw is a great option for mulching raised beds as it decomposes slowly and retains moisture well.
- Grass clippings: Grass is another affordable option that helps keep weeds at bay.
- Wood chips: These can be used for longer-term mulch as they break down slowly.
Tip: Apply mulch about 2 to 3 inches thick to get the best results.
FAQs
1. How deep should my raised bed be?
For most vegetables, a raised bed that’s at least 12 inches deep is sufficient. Root vegetables like carrots and potatoes may require a deeper bed (18–24 inches).
2. Can I use rocks in the bottom of my raised bed?
While rocks can improve drainage, they don’t decompose like organic materials, so using logs, branches, or other compostable materials is a better option for the long-term health of your soil.
3. How often should I water a newly filled raised bed?
After filling the bed, water each layer thoroughly. For ongoing care, water the bed as needed, ensuring the top 6 inches of soil stay consistently moist, especially in hot weather.
4. Can I plant immediately after filling the bed?
Yes, as long as the top 6–12 inches of soil are high-quality and nutrient-rich, you can plant immediately after filling your raised bed.
5. Do I need to replace the bulk materials every year?
No, the bulk materials at the bottom of the bed will break down slowly over several years. You may need to top off the soil layer with fresh compost or garden soil each growing season as the materials decompose and settle.
By following this easy, layered approach, you can fill your deep raised bed in a way that’s cost-effective and beneficial for your plants. This method not only saves you money but also promotes a healthy, nutrient-rich environment for growing strong, vibrant plants year after year.