How to Make Delicious Homemade Pasties with Just 4 Ingredients
If you’re looking for a simple yet satisfying snack, homemade pasties are an excellent choice. These crispy, golden treats are perfect for any occasion, and the best part is that they only require four basic ingredients. Whether you’re a seasoned chef or just starting out, this recipe is incredibly easy to follow and can be customized with your favorite fillings.
In this article, we’ll walk you through each step of the process and share helpful tips for making the best pasties. Additionally, we’ll answer some frequently asked questions and provide alternatives for fillings. Let’s get started!
Ingredients for Homemade Pasties
- 1 cup of water
- 2 cups of all-purpose flour (wheat flour)
- 1 teaspoon of salt
- Filling options: cheese, ham, ground beef, or any other filling of your choice
These four basic ingredients form the foundation of the dough, and the filling options are endless. You can opt for classic fillings like cheese and ham or experiment with different ingredients like spinach and feta, spiced vegetables, or even sweet options like Nutella and banana.
Step-by-Step Instructions for Making Homemade Pasties
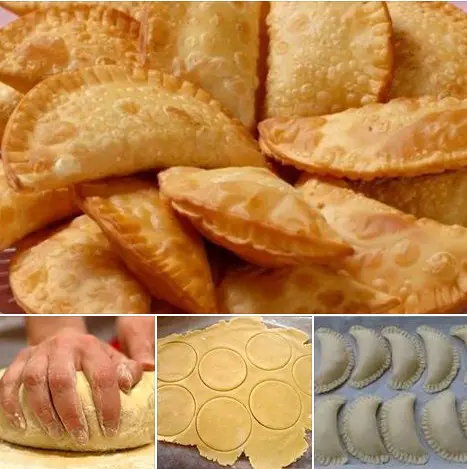
Step 1: Prepare the Dough
Start by combining the flour, water, and salt in a large mixing bowl. Mix the ingredients together until a smooth dough forms. The dough should be soft, elastic, and not sticky. If the dough feels too sticky, add a little more flour, and if it’s too dry, add a small amount of water.
Knead the dough for about 10 minutes on a lightly floured surface. Kneading helps develop the gluten, which gives the dough its stretchy texture and ensures that your pasties will be tender and crispy once fried.
Step 2: Roll Out the Dough
Once the dough is smooth and elastic, roll it out on a surface dusted with a bit of wheat flour. Roll it until the dough is very thin, about 1/8 inch thick. A thinner dough will ensure a crispier result and help the filling stand out without being overwhelmed by too much bread.
Step 3: Cut the Dough into Circles
Using a round cutter or the rim of a glass, cut the dough into circles. The size of the circles can vary depending on how large you want your pasties. For bite-sized snacks, go for smaller circles, and for a more filling snack, make them larger.
Step 4: Add the Filling
Now comes the fun part! Place a small spoonful of filling in the center of each dough circle. Be careful not to overfill them; too much filling can cause the dough to burst open while frying. Popular fillings include cheese, ham, and ground beef, but feel free to get creative with your favorite ingredients.
Step 5: Seal the Pasties
Once the filling is in place, moisten the edges of the dough with a little water. Fold the dough over to form a half-moon shape and use a fork to press down on the edges, sealing the pasties. This step ensures that the filling stays inside while cooking and gives the pasties their signature crimped edge.
Step 6: Fry the Pasties
Heat a pan with oil over medium heat until it’s hot enough to fry. Carefully place the pasties in the oil and fry them until they turn golden brown. This should take about 3-4 minutes on each side. Once they’re perfectly golden and crispy, remove them from the oil and place them on a paper towel-lined plate to drain any excess oil.
Step 7: Serve and Enjoy
Your homemade pasties are now ready to be enjoyed! Serve them hot, as a snack or appetizer, with your favorite dipping sauces like ketchup, salsa, or even sour cream.
Tips for Making Perfect Homemade Pasties
1. Achieving the Right Dough Consistency
The key to perfect pasties lies in the dough. The dough should be firm but soft enough to roll out easily. If it’s too sticky, add a bit more flour. If it’s too dry, a splash of water will do the trick. Knead the dough well to make sure it’s elastic, ensuring that the pasties are both tender and crispy.
2. Rolling the Dough Thin
Roll the dough as thin as possible without tearing it. A thin dough is essential for achieving the desired crispiness. If the dough is too thick, your pasties may turn out too bready and won’t have that satisfying crunch.
3. Experimenting with Fillings
The beauty of this recipe is its versatility. While classic fillings like cheese and ham are always delicious, don’t hesitate to experiment with other ingredients. Try mixing vegetables, spices, or even sweet fillings for dessert pasties. Spinach and feta, curried potatoes, or even Nutella with bananas are fun options to try.
4. Sealing the Pasties Properly
To prevent your pasties from bursting open while frying, be sure to seal the edges tightly. Use a fork to crimp the edges firmly after folding the dough over the filling.
5. Frying at the Right Temperature
Make sure your oil is hot enough before frying the pasties. If the oil is too cool, the pasties will absorb too much oil and become greasy. If it’s too hot, they will brown too quickly on the outside while remaining undercooked inside. Fry the pasties in batches, and don’t overcrowd the pan.
Nutritional Information (per serving)
While the exact nutritional content will vary depending on the filling you choose, here’s an estimate for basic cheese-filled pasties:
- Calories: Approximately 200-250 kcal per pasty (depending on size and filling)
- Carbohydrates: 25g
- Protein: 6g
- Fat: 10g
- Sodium: 400-500mg (depending on filling and seasoning)
FAQs About Homemade Pasties
1. Can I bake these pasties instead of frying them?
Yes, if you prefer a healthier alternative to frying, you can bake the pasties. Preheat your oven to 375°F (190°C), place the pasties on a baking sheet lined with parchment paper, and bake for 20-25 minutes or until golden brown. Be sure to brush them with a little oil or egg wash to help them crisp up.
2. Can I freeze the pasties for later?
Absolutely! These pasties freeze well and can be stored for up to three months. To freeze, assemble the pasties but don’t fry them. Instead, lay them on a baking sheet and freeze until solid, then transfer them to a freezer-safe bag or container. When you’re ready to enjoy them, you can fry them straight from the freezer—just add a couple of extra minutes to the frying time.
3. What fillings work best for homemade pasties?
The possibilities are endless! Classic savory fillings include cheese, ham, and ground beef, but you can also use shredded chicken, sautéed mushrooms, or a vegetable mix. For a sweet twist, try fillings like Nutella, chocolate chips, or fruit jams.
4. How can I make gluten-free pasties?
To make gluten-free pasties, substitute the all-purpose flour with a gluten-free flour blend. You may need to adjust the amount of water to achieve the right dough consistency, as gluten-free flours can behave differently from wheat flour.
5. Can I make the dough in advance?
Yes, you can prepare the dough ahead of time. Wrap it tightly in plastic wrap and store it in the refrigerator for up to 24 hours. When you’re ready to use it, let it come to room temperature before rolling it out.
Conclusion: A Simple and Satisfying Snack
Making homemade pasties is easier than you might think, and with just four simple ingredients, you can whip up a batch in no time. Whether you prefer savory or sweet fillings, these versatile treats are sure to please everyone. Perfect as a snack, appetizer, or even a light meal, pasties are a go-to recipe when you’re craving something tasty and satisfying.
So, get creative with your fillings and enjoy these crispy, golden delights fresh from your kitchen!