Stubborn laundry stains are a constant frustration. Whether it’s a splash of coffee on your favorite shirt or a mystery spot on your kid’s school uniform, some stains seem impossible to remove. But before you toss that clothing item in the donation pile or spend extra money on commercial stain fighters, try making your own powerful stain remover at home.
This homemade laundry stain remover is affordable, easy to mix, and shockingly effective—even on old, set-in stains. With just two basic ingredients, you’ll have a reliable, chemical-free way to tackle everything from grease and wine to grass and food splatters.
Why Make Your Own Stain Remover?
Many commercial stain removers are loaded with synthetic fragrances, harsh surfactants, and dyes. These can irritate sensitive skin, damage delicate fabrics, and even leave behind residues that don’t fully wash out.
By making your own, you gain complete control over what touches your clothes—and your skin. Plus, it’s surprisingly cost-effective and works just as well, if not better, than many store-bought brands.
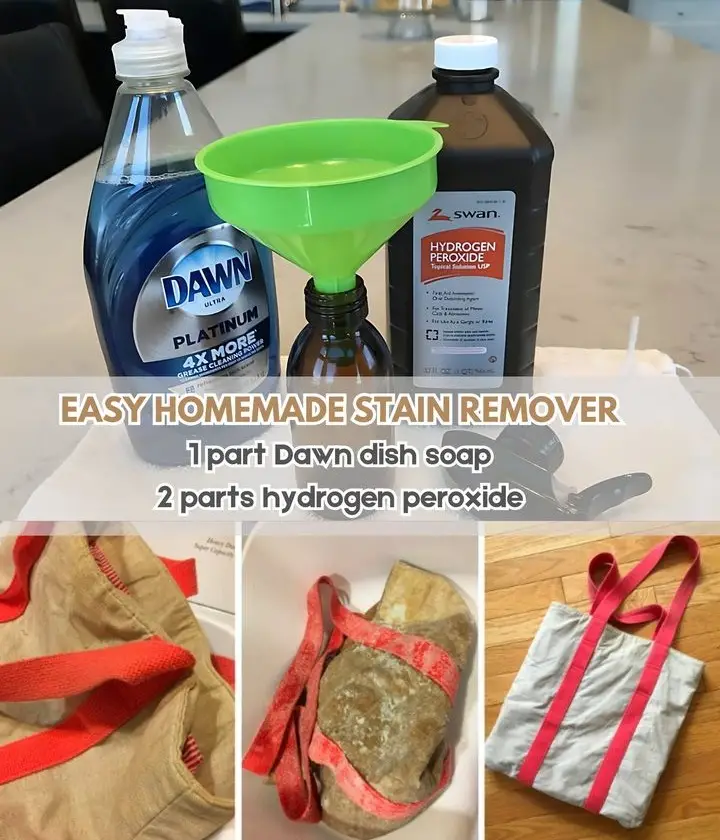
Ingredients You’ll Need
- 2 parts hydrogen peroxide (3%)
- 1 part Dawn dish soap (original blue formula)
- A clean spray bottle
That’s it. These two ingredients are easy to find in any household and work together like a charm.
- Hydrogen Peroxide acts as a natural bleach and oxidizer. It breaks down color-based stains and disinfects the fabric.
- Blue Dawn Dish Soap cuts through grease, oils, and protein-based stains like blood and sweat. Its gentle formula makes it safe for most fabrics.
Step-by-Step Instructions
Prepare the Mixture
Start by pouring 2 parts of hydrogen peroxide and 1 part of original blue Dawn dish soap into a clean spray bottle. If you’re using measuring cups, that means for every 1 cup of dish soap, add 2 cups of hydrogen peroxide.
Close the bottle tightly and shake it gently to combine. The solution should be a pale blue and slightly bubbly.
Apply the Stain Remover
Spray the solution directly onto the stained area of the fabric. Make sure the stain is completely saturated. Gently rub the fabric together or use a soft brush to work the solution into the fibers.
This stain remover is safe for use on most washable fabrics, but for delicate materials, always test on a small, hidden area first to ensure there’s no discoloration.
Let It Sit
Allow the solution to sit on the stain for at least 15 minutes, but for older, set-in stains, you can let it sit for up to an hour. You’ll often notice the stain beginning to lift even before you throw the item in the wash.
Wash As Usual
After treating the stain, wash the item in your washing machine using your usual laundry detergent. Use the warmest water recommended for that fabric type for best results.
Once the cycle is finished, check to see if the stain is gone before putting the clothing in the dryer. Heat can set stains permanently, so if you still see the stain, repeat the treatment.
What Types of Stains Does It Work On?
This homemade stain remover is incredibly versatile. Here’s a list of common stains it tackles effectively:
- Grease and oil (cooking oil, motor oil)
- Blood (fresh or dried)
- Sweat stains
- Wine
- Tomato sauce
- Grass stains
- Coffee and tea
- Ink (non-permanent types)
- Makeup (foundation, lipstick, mascara)
- Baby messes (spit-up, diaper accidents)
Even older, yellowed stains can fade dramatically with a couple of treatments using this mixture.
Tips for Best Results
- Shake before each use: Hydrogen peroxide breaks down over time, so give the bottle a good shake before every use to re-mix the solution.
- Store in a dark bottle or dark place: Light deactivates hydrogen peroxide. Use an opaque or amber spray bottle, or store the solution in a cabinet away from sunlight.
- Don’t store long-term: For best results, mix small batches and use within a week or two. The longer it sits, the less effective it may become.
- Double up for tough stains: For really stubborn or old stains, apply the solution, let it sit, and then sprinkle a little baking soda on top before scrubbing gently.
- Use a soft brush for texture fabrics: A toothbrush or laundry brush can help work the solution into tougher fabrics like denim or canvas.
Common Mistakes to Avoid
- Using it on silk, wool, or dry-clean-only items: This solution is best for durable, washable fabrics.
- Leaving it on too long on colored fabrics: Hydrogen peroxide can have a mild bleaching effect, especially on darker fabrics. Always test first.
- Skipping the test patch: If you’re unsure how your fabric will react, do a patch test first on the inside hem or other hidden area.
How It Compares to Commercial Stain Removers
Unlike many commercial products, this homemade version:
- Contains no synthetic dyes or artificial fragrances
- Doesn’t leave residue or film on fabric
- Costs just pennies per use
- Is made from items already in most households
- Works on both fresh and dried stains
- Is safe for use around pets and kids
FAQs
Can I use this stain remover on colored clothes?
Yes, but use with caution. Hydrogen peroxide can lighten some dark or bright colors. Always test it on a hidden section of the garment first.
How long should I let it sit before washing?
Let it sit for at least 15 minutes. For tougher or older stains, let it sit for up to an hour.
Can I use it on delicate fabrics like silk or wool?
No, this solution is best for cotton, polyester, and other durable, washable fabrics. Avoid using it on delicate or dry-clean-only materials.
Does it work on old, set-in stains?
Yes, many users find it works remarkably well on stains that have already been washed and dried. Multiple treatments may be needed.
How long does the mixture stay effective?
Hydrogen peroxide loses strength over time, especially when exposed to light. Use the mixture within a week or two for best results, and store it in a dark, cool place.
Can I make a larger batch and keep it?
You can, but small batches are better since the peroxide will degrade over time. If you make a larger batch, store it in an opaque container and label it with the date.
Final Thoughts
There’s no need to spend extra on name-brand stain removers when a few simple ingredients from your kitchen and bathroom can do the job just as well. This homemade laundry stain remover is a game-changer—affordable, fast, and shockingly effective.
From baby onesies to gym clothes, this solution will help keep your laundry looking clean and smelling fresh. Just mix, spray, and wash—laundry day just got a whole lot easier.