There’s something comforting about the smell of freshly baked bread, but when you add buttery garlic and herbs, it becomes irresistible. These homemade garlic rolls are soft, fluffy, and bursting with flavor, making them the perfect side dish for any meal. Whether you’re serving them with pasta, soup, or grilled meats, these rolls will take your meal to the next level.
The best part? You don’t need to be a professional baker to make them. With a simple list of ingredients and easy-to-follow steps, you’ll have a batch of fresh, warm garlic rolls ready in no time.
Why You’ll Love These Garlic Rolls
✔ Soft and Buttery Texture – Every bite is melt-in-your-mouth soft.
✔ Perfect for Any Meal – Serve them with soups, pasta, or grilled meats.
✔ Easy to Make – No advanced baking skills required.
✔ Garlic and Herb Goodness – Brushed with flavorful garlic butter.
✔ Customizable – Add cheese, extra herbs, or make them spicy.
Ingredients for Homemade Garlic Rolls
For the Dough:
- 400 g (3 ¼ cups) all-purpose flour
- 50 g (¼ cup) sugar
- 5 g (1 tsp.) salt
- 7 g (2 ¼ tsp.) dry yeast
- 250 ml (1 cup) warm milk (around 110°F/45°C, to activate the yeast)
- 1 large egg (room temperature)
- 55 g (¼ cup) unsalted butter, softened
- 8 g (1 tbsp.) chopped garlic
For the Garlic Butter Topping:
- 8 g (1 tbsp.) minced garlic
- 1 g (2 tsp.) dried parsley (or fresh parsley, finely chopped)
- 55 g (⅓ cup) melted salted butter
Step-by-Step Instructions
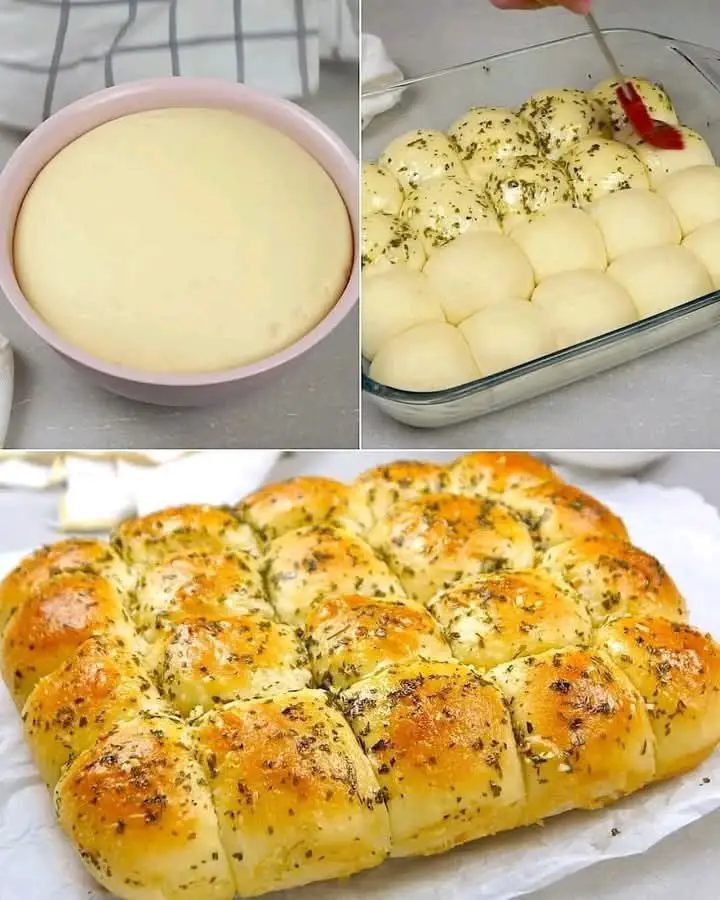
Step 1: Prepare the Dough
- In a large mixing bowl, whisk together flour, sugar, salt, and yeast.
- Add the warm milk and egg, then mix until combined.
- Knead the dough using a stand mixer (or by hand) for 5 minutes.
- Cover and let the dough rest for 20 minutes.
Step 2: Add Butter and Garlic
- Add the softened butter and chopped garlic to the dough.
- Knead again until the dough becomes smooth and elastic.
- Transfer the dough to a greased bowl, cover, and let it rise for 1 hour.
Step 3: Shape the Rolls
- Place the dough on a floured surface and shape it into a square.
- Divide it into 25 equal pieces and roll each into a ball.
Step 4: Second Rise
- Arrange the dough balls in a greased baking dish.
- Cover and let them rise for 30 minutes.
Step 5: Prepare the Garlic Butter
- In a bowl, mix melted butter, minced garlic, and parsley.
Step 6: Bake the Rolls
- Preheat the oven to 180°C (350°F).
- Brush the rolls with half of the garlic butter.
- Bake for 15–17 minutes, until golden brown.
Step 7: Final Touch
- Brush the warm rolls with the remaining garlic butter.
- Serve and enjoy!
Expert Tips for Perfect Garlic Rolls
✔ Use Fresh Garlic: It gives the strongest flavor.
✔ Warm Milk is Key: It helps activate the yeast.
✔ Let the Dough Rise Fully: This creates light, fluffy rolls.
✔ Brush Butter Twice: Once before baking and again after for extra flavor.
FAQs About Garlic Rolls
Can I Use Instant Yeast Instead of Dry Yeast?
Yes! Instant yeast can be used in the same amount. Just mix it directly into the flour—no need to activate it in warm milk.
Why Didn’t My Dough Rise?
This could be due to expired yeast, cold milk, or a cool room temperature. Make sure the yeast is fresh and the dough is kept in a warm place.
Can I Make These Rolls Ahead of Time?
Yes! You can refrigerate the dough overnight after the first rise. When ready to bake, let the dough come to room temperature before shaping.
How Can I Make Cheesy Garlic Rolls?
Before baking, sprinkle grated mozzarella or Parmesan on top. You can also stuff cheese inside each roll for an extra cheesy surprise.
Can I Freeze Garlic Rolls?
Absolutely! Freeze the baked rolls in an airtight container for up to 3 months. Reheat in an oven at 350°F (180°C) for 10 minutes.
What Can I Serve These Rolls With?
They pair perfectly with pasta, soup, roasted meats, or as a snack with marinara sauce.
How Do I Store Leftover Rolls?
Store in an airtight container at room temperature for 2 days or in the fridge for up to a week.
Variations & Additions
✔ Spicy Garlic Rolls: Add red pepper flakes to the garlic butter.
✔ Herb Rolls: Mix oregano, thyme, or rosemary into the dough.
✔ Sweet & Savory Rolls: Brush with honey and Parmesan after baking.
✔ Stuffed Rolls: Fill with cheese, garlic butter, or caramelized onions.
Serving Suggestions
✔ With Soup: Perfect with tomato soup or creamy mushroom soup.
✔ With Pasta: Serve alongside spaghetti or fettuccine Alfredo.
✔ With BBQ or Grilled Meats: A great side for steak or ribs.
✔ As a Sandwich Base: Slice open and fill with chicken or cheese.
✔ As an Appetizer: Serve warm with garlic aioli or marinara sauce.
Storage & Reheating Tips
How to Store Garlic Rolls
- Keep at room temperature for 2 days in an airtight container.
- Store in the fridge for up to 1 week.
How to Reheat Garlic Rolls
✔ Oven: 350°F (180°C) for 5 minutes.
✔ Microwave: 10–15 seconds (may become slightly chewy).
Conclusion
Homemade garlic rolls are the ultimate comfort food, offering a soft texture, rich buttery flavor, and a delicious garlic kick. Whether you serve them as a side dish or enjoy them on their own, they’re guaranteed to impress.
With simple ingredients and easy steps, you’ll never want store-bought rolls again. Try this recipe today and enjoy fresh, warm, and flavorful garlic rolls straight from your oven!