Homemade Crunch Bars are one of those treats that instantly bring back childhood memories—but with a major upgrade. These bars are crispy, crunchy, chocolatey, and perfectly sweet, yet made with simple pantry ingredients you can actually feel good about. The best part? They taste even better than the classic store-bought candy bar, and you don’t need any baking skills to pull them off.
This recipe comes together in minutes, uses just a handful of ingredients, and delivers that irresistible snap and crunch everyone loves. They’re naturally vegan, dairy-free, and gluten-free (with certified cereal), making them perfect for sharing with family and friends who have different dietary needs. Whether you’re making a quick dessert, a lunchbox treat, or a healthier candy alternative, these homemade crunch bars check every box.
What sets this version apart is the balance. The chocolate layer is rich but not overly sweet, the peanut butter adds creaminess and depth, and the crispy rice cereal brings that light, airy crunch that makes each bite satisfying. Once you try them homemade, it’s hard to go back to packaged bars.
Why Make Homemade Crunch Bars
Making crunch bars at home gives you full control over flavor, sweetness, and ingredients. Store-bought versions often contain preservatives, artificial flavors, and excess sugar. When you make them yourself, you get clean ingredients and fresher taste.
Another reason people love this recipe is speed. From start to finish, active prep takes about five minutes. The rest of the time is just chilling while the bars firm up. No oven, no candy thermometer, no complicated steps.
Homemade crunch bars are also incredibly versatile. You can swap nut butters, adjust sweetness, or add extras like nuts or seeds. They’re easy to customize while still keeping that classic crunch bar texture.
Ingredients Overview
Crispy Rice Cereal
Crispy rice cereal provides the signature crunch. Use a gluten-free variety if needed. The cereal should be light and airy, not dense, to keep the bars crisp instead of hard.
Chocolate Chips
Chocolate is the star of the recipe. Paleo or vegan chocolate chips work perfectly, but any good-quality dairy-free chocolate will do. Choose semi-sweet for balance or dark chocolate for a deeper flavor.
Peanut Butter
Peanut butter adds richness and helps bind the bars together. Natural peanut butter with a smooth texture works best. You can substitute almond butter, cashew butter, sunflower seed butter, or tahini if preferred.
Maple Syrup
Maple syrup provides natural sweetness and keeps the bars soft enough to bite without being sticky. Keto maple syrup can be used for a lower-sugar option.
Coconut Oil
Coconut oil helps the chocolate mixture melt smoothly and firm up once chilled. You can substitute grass-fed butter if dairy is not an issue.
Equipment You’ll Need
Mixing Bowl
A large bowl is needed to hold the crispy rice cereal and allow room for mixing without crushing it too much.
Heat-Safe Bowl or Saucepan
Used to melt the chocolate, peanut butter, coconut oil, and maple syrup together. A microwave-safe bowl or small saucepan both work.
Spatula
A spatula makes it easy to fold the cereal into the chocolate mixture evenly and scrape everything into the pan.
Baking Dish
An 8 × 8-inch pan is ideal for thick bars, but a larger tray can be used for thinner ones.
Step-by-Step Instructions
Prepare the Pan
Line an 8 × 8-inch baking dish or deep baking tray with parchment paper. Leave some overhang on the sides to make lifting the bars out easier once they’re set. Set aside.
Add the Cereal
Pour the crispy rice cereal into a large mixing bowl and set it aside. Make sure the cereal is evenly measured so the bars aren’t too dry or too soft.
Melt the Chocolate Mixture
In a microwave-safe bowl or small saucepan, combine the chocolate chips, peanut butter, maple syrup, and coconut oil. Heat gently until everything is melted.
If using a microwave, heat in short intervals, stirring between each one to prevent scorching. If using the stovetop, melt over low heat and stir continuously.
Once melted, whisk or stir until the mixture is completely smooth and glossy.
Combine with the Cereal
Pour the warm chocolate mixture over the crispy rice cereal. Using a spatula, gently mix until all the cereal is evenly coated. Take your time to avoid crushing the cereal too much.
Press into the Pan
Transfer the mixture into the lined baking dish. Use the spatula or the back of a spoon to press it down evenly and firmly. This step helps the bars hold together when sliced.
Chill Until Firm
Place the pan in the refrigerator for at least one hour, or until the bars are fully set and firm to the touch.
Slice and Serve
Once chilled, lift the slab out of the pan using the parchment paper. Place it on a cutting board and slice into bars or squares using a sharp knife.
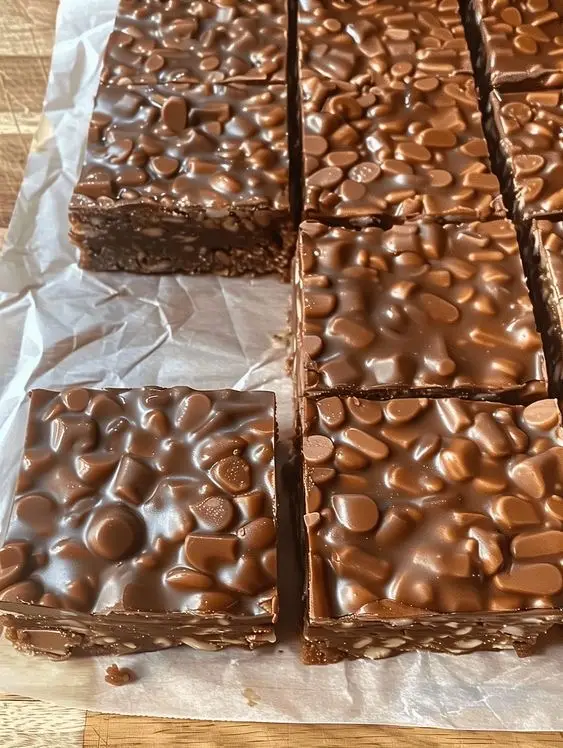
Texture and Flavor Notes
The finished bars should be crisp yet tender, with a clean snap when bitten into. The chocolate layer is smooth and rich, while the cereal stays crunchy instead of soggy. The peanut butter adds depth without overpowering the chocolate.
If you prefer softer bars, let them sit at room temperature for a few minutes before serving. For extra firm, candy-bar-style texture, keep them chilled.
Storage and Freezing
Storing at Room Temperature
Crunch bars can be stored at room temperature in a sealed container for up to two weeks. Keep them away from direct heat to prevent melting.
Refrigeration
For a firmer texture, store the bars in the refrigerator. They’ll stay fresh for several weeks when properly covered.
Freezing
Wrap individual bars in parchment paper and place them in a zip-top bag or airtight container. They freeze well for up to six months. Thaw at room temperature for a few minutes before eating.
Customization Ideas
You can easily adapt this recipe to suit different tastes and dietary needs.
Add a pinch of sea salt on top before chilling for a sweet-salty contrast. Stir in chopped nuts, seeds, or shredded coconut for extra texture. Use dark chocolate with 70% cocoa for a richer, less sweet bar. Swap peanut butter for almond or sunflower seed butter for an allergy-friendly version.
For a festive twist, drizzle melted white vegan chocolate over the top or sprinkle with crushed freeze-dried berries.
Tips for Perfect Homemade Crunch Bars
Use fresh, crisp cereal for the best crunch. Stale cereal will result in dull texture.
Melt the chocolate gently to avoid burning or grainy texture.
Mix carefully to keep the cereal intact and airy.
Press the mixture firmly into the pan so the bars don’t crumble.
Chill fully before slicing for clean, sharp edges.
Use a warm knife for smoother cuts if the bars are very firm.
Store in a cool place to maintain the best texture.
FAQs
Can I make these crunch bars nut-free?
Yes. Replace peanut butter with sunflower seed butter or tahini for a completely nut-free version.
Are homemade crunch bars gluten-free?
They can be, as long as you use certified gluten-free crispy rice cereal.
Can I reduce the sweetness?
Yes. Use dark chocolate and slightly reduce the maple syrup for a less sweet bar.
Why are my bars too soft?
This usually means the chocolate mixture needs more time to chill, or the ratio of cereal to liquid is too low.
Can I double the recipe?
Absolutely. Use a larger pan and double all ingredients evenly.
Do these bars melt easily?
They can soften in warm temperatures, so store them in a cool place or refrigerator if your kitchen is warm.
Homemade Crunch Bars prove that you don’t need complicated steps or processed ingredients to recreate a classic candy bar at home. With just a few pantry staples and a little chilling time, you get crispy, chocolatey bars that taste nostalgic yet fresh and modern. Once you make them yourself, they quickly become a go-to treat for any occasion.