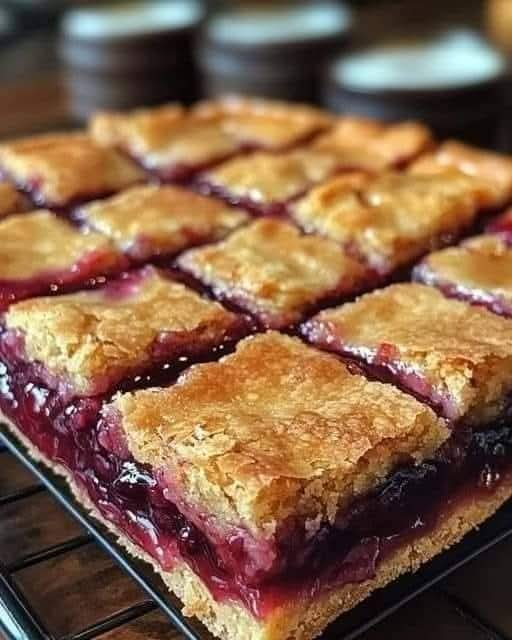
If you’re craving a cherry pie but want to skip the hassle of making a pie crust from scratch, these Homemade Cherry Pie Bars are the perfect solution. With a buttery, oat-filled crust and a tangy, sweet cherry filling, these bars offer all the delightful flavors of a traditional cherry pie in a convenient, easy-to-make form.
The best part? The crust and crumble topping come together in one pan, making this recipe incredibly simple. Top it off with a drizzle of almond frosting for a perfect finishing touch. Whether you’re serving them for a special occasion or as a sweet treat for the family, these cherry pie bars are sure to impress!
Let’s dive into this delicious recipe that saves you time while delivering all the comfort of a classic pie.
Why You’ll Love This Recipe
✔ No Pie Crust Hassle – Skip the pie crust and make everything in one pan.
✔ Quick and Easy – The filling cooks quickly, and the crust and topping are simple to make.
✔ Perfect for Any Occasion – Ideal for family gatherings, picnics, or just an afternoon treat.
✔ Tart and Sweet – The combination of sour cherries and almond frosting is absolutely irresistible.
✔ Make Ahead Friendly – The bars keep well in the fridge, making them great for meal prep.
Ingredients
For the Crust and Topping:
- 1.5 cups (188g) all-purpose flour, spooned and leveled
- 1 cup (85g) old-fashioned rolled oats
- 2 tablespoons (11g) old-fashioned rolled oats, set aside
- ½ cup (100g) packed light or dark brown sugar
- 1 teaspoon baking powder
- 1 teaspoon grated lemon peel
- ⅛ teaspoon salt
- 10 tablespoons (142g) unsalted melted butter
- 1 teaspoon pure vanilla extract
For the Cherry Filling:
- 1.5 tablespoons (11g) cornstarch
- 3.5 cups (525g) frozen sour cherries, do not thaw
- ½ cup (100g) white sugar
- 1 teaspoon freshly squeezed lemon juice
- ¼ teaspoon almond extract
Optional Almond Frosting:
- Almond-flavored icing to drizzle on top (optional)
Step-by-Step Instructions
Step 1: Prepare the Crust and Topping
- Preheat the oven to 350°F (175°C) and grease a 9×9-inch baking pan or line it with parchment paper.
- In a large bowl, combine the flour, oats, brown sugar, baking powder, lemon peel, and salt.
- Add the melted butter and vanilla extract to the dry ingredients and stir until combined.
- Press about ¾ of the mixture into the bottom of the prepared pan to form the crust. Set the remaining mixture aside to use for the crumble topping.
Step 2: Make the Cherry Filling
- In a medium saucepan, whisk together the cornstarch and sugar.
- Add the frozen sour cherries, lemon juice, and almond extract.
- Cook over medium heat, stirring frequently, until the mixture begins to thicken and the cherries release their juices, about 5-7 minutes.
- Once thickened, remove the filling from the heat and pour it over the prepared crust in the baking pan.
Step 3: Add the Topping and Bake
- Sprinkle the remaining oat mixture evenly over the cherry filling.
- Bake the bars in the preheated oven for 30-35 minutes, or until the topping is golden brown and the filling is bubbly.
Step 4: Cool and Add Frosting
- Allow the bars to cool in the pan for at least 2 hours to set properly.
- For the frosting, drizzle almond-flavored icing over the cooled bars (optional).
Step 5: Slice and Serve
- Once completely cool, slice the bars into 16 squares.
- Serve them chilled or at room temperature.
Cooking Tips for the Best Cherry Pie Bars
✔ Don’t Thaw the Cherries – Using frozen cherries without thawing them helps keep the filling from becoming too runny.
✔ Chill Before Cutting – Allow the bars to cool completely before cutting to ensure clean slices.
✔ Adjust Sweetness – If you prefer a sweeter filling, add an extra tablespoon of sugar to the cherries.
✔ Make Ahead – These bars can be prepared a day ahead, and the flavors improve as they sit.
Substitutions and Variations
- Use Fresh Cherries – If fresh sour cherries are available, use them in place of frozen.
- Add Spices – For extra flavor, consider adding a pinch of cinnamon or nutmeg to the filling.
- Gluten-Free Option – Swap the all-purpose flour for a gluten-free flour blend.
- Add Nuts – For a crunchy topping, stir in some chopped almonds or walnuts to the oat mixture.
- Vegan Version – Replace the butter with a vegan butter substitute and use a flax egg to make the recipe egg-free.
Serving Suggestions
These Homemade Cherry Pie Bars pair wonderfully with:
- Vanilla Ice Cream – A scoop of vanilla ice cream adds a creamy contrast to the tart cherry filling.
- Whipped Cream – A dollop of fresh whipped cream on top is always a good choice.
- Coffee or Tea – Perfect with a warm drink, especially in the afternoon.
- Fresh Berries – Serve alongside fresh raspberries or strawberries for an extra fruity touch.
Frequently Asked Questions (FAQs)
Can I Make These Bars Ahead of Time?
Yes! These bars can be prepared a day or two ahead and stored in an airtight container in the fridge.
How Do I Store Leftovers?
Store leftover bars in an airtight container in the refrigerator for up to 4 days.
Can I Freeze These Cherry Pie Bars?
Yes! To freeze:
- Let the bars cool completely.
- Wrap them tightly in plastic wrap and foil.
- Freeze for up to 3 months.
- Thaw at room temperature before serving.
Can I Use a Different Fruit?
Absolutely! You can swap out the sour cherries for blueberries, strawberries, or apples for a different twist.
Conclusion
These Homemade Cherry Pie Bars bring all the deliciousness of a classic cherry pie without the fuss of pie crust. With a simple, buttery crust, tangy cherry filling, and optional almond frosting, they’re a treat you’ll want to make again and again.
Perfect for family gatherings, picnics, or just as a sweet snack, these cherry pie bars are sure to satisfy your sweet tooth. Enjoy!