There’s something magical about the smell of fresh-baked bread filling your kitchen—and even more so when it’s infused with the irresistible aroma of garlic butter. These Homemade Garlic Dinner Rolls are tender, fluffy, and brushed with a fragrant garlic-parsley butter that makes each bite simply unforgettable. Whether you’re serving them at a family dinner, holiday gathering, or alongside soup, these rolls are guaranteed to disappear quickly.
This recipe is easy enough for beginners and satisfying for seasoned bakers. The dough is soft and buttery, and the final garlic butter glaze makes it absolutely crave-worthy.
Ingredients
For the Dough
- 400 g (3 ¼ cups) all-purpose flour
- 50 g (¼ cup) granulated sugar
- 5 g (1 teaspoon) salt
- 7 g dry yeast (instant or active dry)
- 250 ml (1 cup) lukewarm milk
- 1 large egg
- 55 g (¼ cup) unsalted butter, softened
- 8 g (1 tablespoon) minced garlic
For the Garlic Butter Topping
- 8 g (1 tablespoon) minced garlic
- 1 g (2 teaspoons) dried parsley
- 55 g (⅓ cup) salted butter, melted
Step-by-Step Instructions
Prepare the Dough
In a large mixing bowl, combine the flour, sugar, salt, and dry yeast. Mix them together to ensure even distribution of the dry ingredients.
Pour in the lukewarm milk and add the egg. Using a dough hook on a stand mixer or your hands, knead the dough for about 5 minutes, until it begins to come together into a soft dough. Cover the bowl with a clean kitchen towel and let it rest for 20 minutes.
This short rest helps hydrate the flour and makes the dough easier to knead in the next step.
Incorporate Butter and Garlic
After the dough has rested, add the softened butter and minced garlic to the dough. Continue kneading the dough (preferably with a stand mixer) for another 8–10 minutes until it becomes elastic, smooth, and slightly tacky.
The garlic gets fully incorporated into the dough, giving the rolls a subtle, savory flavor from the inside out.
First Rise
Lightly oil a clean bowl and transfer the kneaded dough into it. Cover the bowl with a kitchen towel or plastic wrap and place it in a warm spot. Allow the dough to rise for 1 hour or until it has doubled in size.
You’ll know it’s ready when you gently press the top and it springs back slowly.
Shape the Rolls
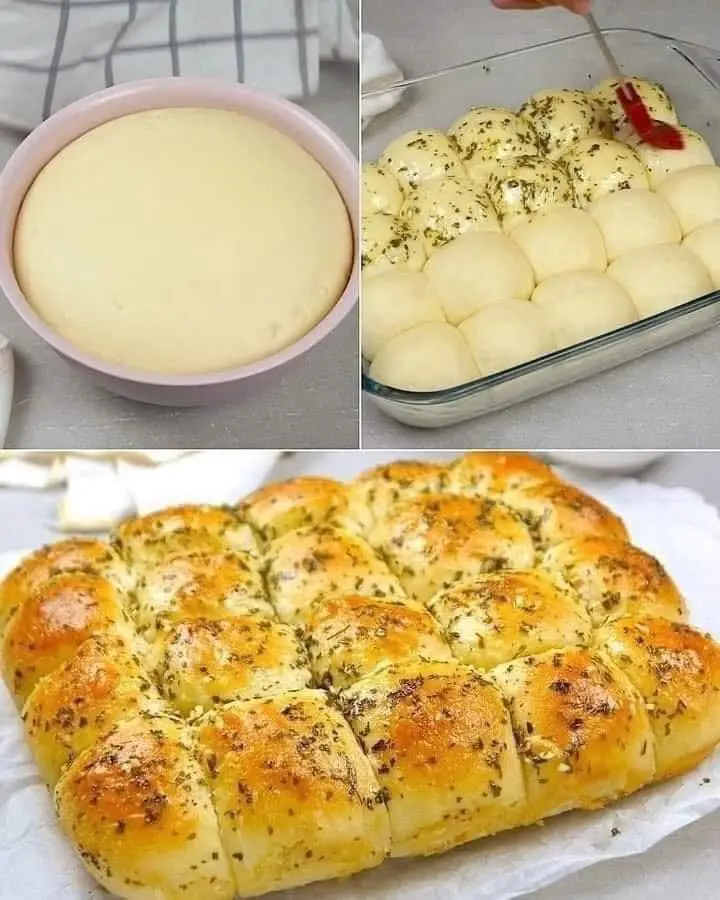
Once the dough has risen, punch it down gently to release the gas. Transfer it to a lightly floured surface and shape it into a square. Using a bench scraper or knife, divide the dough into 25 equal pieces.
Roll each piece into a smooth ball by tucking the edges under and rolling gently between your palms. Place the dough balls onto a greased baking pan, arranging them close together but with a bit of space in between.
Second Rise
Cover the shaped rolls with a kitchen towel and let them rise again for 30 minutes. During this time, they’ll puff up and become even softer and more delicate.
Make the Garlic Butter
While the rolls are rising, prepare the garlic butter topping. In a small bowl, mix together the melted salted butter, minced garlic, and dried parsley. Stir well to combine all the flavors.
This garlic butter will be used twice—once before baking and once after—to maximize flavor.
Bake the Rolls
Preheat your oven to 180°C (350°F).
Once the rolls have finished their second rise, brush the tops generously with the garlic butter mixture. Bake in the preheated oven for 15–17 minutes, or until the tops are golden brown and the rolls sound slightly hollow when tapped.
As soon as they come out of the oven, brush them again with the remaining garlic butter while they’re still warm. This second brush infuses even more flavor and gives the rolls a glossy, irresistible finish.
Tips for Best Results
- Use Warm Milk, Not Hot: Lukewarm milk (around 100°F or 38°C) helps activate the yeast without killing it.
- Use Bread Flour for Extra Chewiness: Although all-purpose flour works great, bread flour will give you a slightly chewier and more structured roll.
- Let the Dough Rise in a Warm, Draft-Free Place: The inside of a turned-off oven with the light on works perfectly.
- Softened Butter Is Key: Make sure your butter is at room temperature when adding it to the dough. Cold butter won’t incorporate well.
- For a Crispy Bottom: Sprinkle a tiny bit of coarse salt or grated Parmesan on the bottom of the pan before arranging the rolls.
- Add Cheese on Top: For an extra indulgent version, sprinkle grated mozzarella or Parmesan cheese on top during the last 5 minutes of baking.
- Freeze for Later: These rolls freeze well after baking. Cool completely, then store in a freezer-safe bag. Reheat in the oven at 300°F for 10 minutes.
Serving Suggestions
- Serve them warm alongside pasta, soups, or roasted chicken.
- Split them open and use as mini sliders for leftover turkey, roast beef, or pulled pork.
- Use them for breakfast sandwiches with eggs and cheese.
- Pair with dipping oils or marinara for a breadbasket starter.
Frequently Asked Questions
Can I use active dry yeast instead of instant yeast?
Yes, but you’ll need to proof it first. Dissolve the active dry yeast in the warm milk along with a pinch of sugar and let it sit for 5–10 minutes until foamy before mixing with the other ingredients.
Can I make the dough ahead of time?
Yes. After kneading, place the dough in a greased bowl, cover tightly, and refrigerate overnight. Let it come to room temperature and rise before shaping.
What if I don’t have a stand mixer?
You can knead the dough by hand. It will take about 10–12 minutes of steady kneading until it becomes elastic and smooth.
Can I substitute the butter with margarine or oil?
Butter is best for flavor, but margarine can work in a pinch. Avoid using oil for this recipe—it changes the structure and flavor of the rolls.
How do I store leftovers?
Keep rolls in an airtight container at room temperature for up to 2 days. Reheat in the oven or microwave before serving for best taste.
Can I double the recipe?
Absolutely! This recipe doubles well. Just make sure to use a larger baking pan or bake in two batches.
Final Thoughts
These Homemade Garlic Dinner Rolls are warm, fluffy, buttery, and packed with flavor. They’re easy to make with pantry staples, and the soft texture combined with rich garlic butter makes them a true comfort food.
Perfect for family meals, festive gatherings, or casual dinners, this is one recipe you’ll come back to again and again. Just like Grandma’s cooking, they’re simple, soulful, and sure to bring everyone to the table.