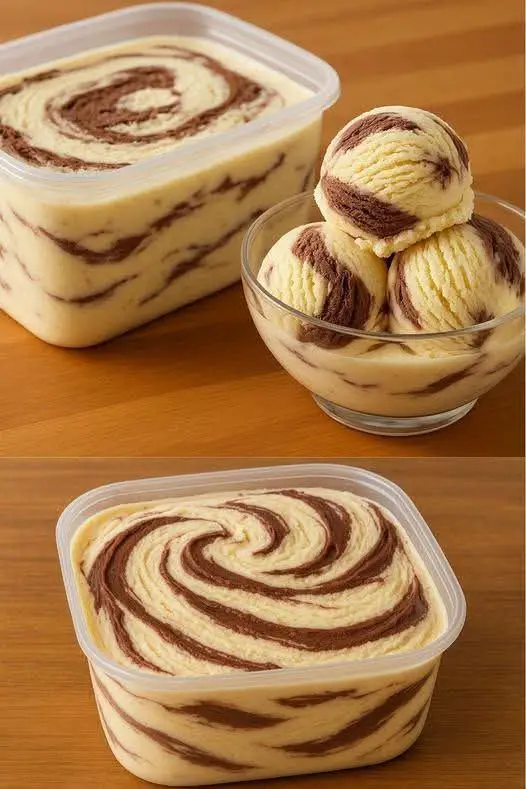
Homemade ice cream has a special charm. It feels indulgent, comforting, and surprisingly satisfying to make from scratch. This Easy Homemade Ice Cream recipe proves that you don’t need an ice cream machine, complicated steps, or rare ingredients to create a dessert that rivals store-bought varieties. With a silky vanilla base and a luscious chocolate truffle ganache swirled throughout, this ice cream is rich, smooth, and irresistibly creamy.
What makes this recipe truly special is its simplicity. Everything comes together with the help of a blender and a freezer. There’s no churning, no cooking the base, and no stress. The use of sweetened condensed milk and heavy cream guarantees a soft, scoopable texture without icy crystals, while powdered milk adds extra creaminess and depth.
Whether you’re making dessert for a family gathering, a weekend treat, or simply stocking your freezer with something special, this recipe delivers consistent, delicious results every time.
Why This Homemade Ice Cream Works So Well
This recipe relies on a classic no-churn method that balances fat, sugar, and air. Sweetened condensed milk replaces traditional custard, eliminating the need for eggs and stovetop cooking. Its high sugar content lowers the freezing point, keeping the ice cream smooth even after hours in the freezer.
Heavy cream provides richness and body, while powdered milk enhances the milk flavor and improves texture. The truffle ganache adds contrast — deep chocolate ribbons cutting through the sweet vanilla base, creating a dessert that feels luxurious with minimal effort.
Ingredient Breakdown
Ice Cream Base
Sweetened condensed milk
This is the backbone of the recipe. It sweetens the ice cream and prevents ice crystals, ensuring a smooth and creamy texture.
Heavy cream
Heavy cream adds fat, which is essential for richness and structure. It gives the ice cream its velvety mouthfeel.
Powdered milk
Powdered milk boosts creaminess and intensifies the dairy flavor. It also helps stabilize the texture.
Vanilla extract
Vanilla adds warmth and depth, balancing the sweetness and pairing perfectly with the chocolate ganache.
Truffle Ganache
Chocolate
Semi-sweet or milk chocolate works beautifully. Semi-sweet offers a deeper, more intense flavor, while milk chocolate creates a sweeter, softer contrast.
Heavy cream
Cream transforms melted chocolate into a smooth, glossy ganache that swirls effortlessly into the ice cream.
Step-by-Step Instructions Explained
Step 1: Preparing the Ice Cream Base
Blending the condensed milk, heavy cream, powdered milk, and vanilla extract ensures everything is fully incorporated. This step creates a uniform base that freezes evenly and delivers consistent flavor in every scoop.
Pouring the mixture into a freezer-safe container and freezing it briefly allows the base to thicken slightly before adding the ganache. This prevents the chocolate from sinking straight to the bottom.
Step 2: Making the Truffle Ganache
Melting the chocolate gently is key. Using a double boiler or short microwave intervals prevents scorching and keeps the ganache smooth.
Once the cream is added, the mixture becomes glossy and silky. Letting it cool slightly is important — hot ganache can melt the ice cream base and blur the swirl effect.
Step 3: Assembling the Ice Cream
After two hours of freezing, stirring the ice cream base breaks up early ice crystals and improves texture. Swirling in the ganache gently creates beautiful ribbons of chocolate without fully mixing it in.
Returning the container to the freezer allows the ice cream to set completely while preserving the marbled appearance.
Texture and Flavor
This ice cream is exceptionally creamy, dense, and rich. The vanilla base is smooth and milky, while the chocolate ganache adds a luxurious bitterness that balances the sweetness perfectly. Each scoop delivers both flavors without overwhelming the palate.
Tips for Best Results
- Use full-fat ingredients for the creamiest texture
- Let the ganache cool slightly before swirling
- Don’t overmix when adding the chocolate
- Cover the ice cream tightly to prevent freezer odors
- Let the ice cream sit at room temperature for 5 minutes before scooping
Variations You Can Try
This base recipe is incredibly versatile. You can easily customize it by adding:
- Crushed cookies or biscuits
- Chopped nuts
- Caramel sauce instead of ganache
- Fruit purée swirls
- Espresso powder for a coffee-flavored base
Once you master the base, the flavor possibilities are endless.
Serving Suggestions
Serve this ice cream on its own or elevate it with:
- Chocolate shavings
- Whipped cream
- Fresh berries
- Waffle cones or bowls
- A drizzle of chocolate or caramel sauce
It’s perfect for dinner parties, birthdays, or quiet evenings at home.
Storage Instructions
Store the ice cream in an airtight container in the freezer for up to 2 weeks. For best texture, press a layer of plastic wrap directly against the surface before sealing. This prevents ice crystals from forming.
FAQs
1. Do I need an ice cream maker for this recipe?
No. This is a no-churn recipe designed to work perfectly without special equipment.
2. Can I use only milk chocolate or dark chocolate?
Yes. Choose your preferred chocolate based on how sweet or intense you want the ganache to be.
3. Why add powdered milk?
Powdered milk improves creaminess and enhances the overall dairy flavor without adding extra liquid.
4. Can I reduce the sweetness?
You can use darker chocolate for the ganache to balance sweetness, but reducing condensed milk may affect texture.
5. How long should I freeze it before serving?
Freeze for at least 6 hours total. Let it soften slightly at room temperature before scooping.
6. Can I add mix-ins like nuts or cookies?
Yes. Fold them in during the swirling stage for even distribution.
Conclusion
This Easy Homemade Ice Cream recipe proves that making ice cream at home doesn’t have to be complicated. With simple ingredients, minimal effort, and no special equipment, you can create a dessert that’s rich, creamy, and deeply satisfying.
The smooth vanilla base paired with silky chocolate truffle ganache delivers a luxurious experience in every bite. Once you try this recipe, it’s likely to become a staple in your freezer — a reliable, crowd-pleasing dessert you’ll return to again and again.