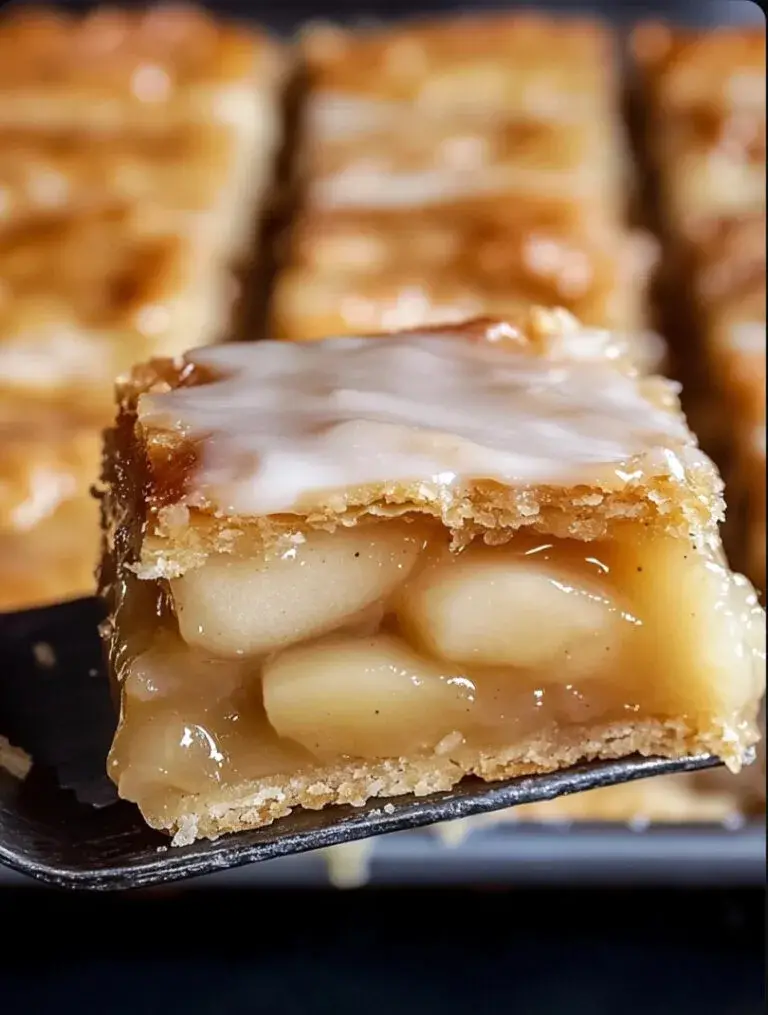
Chicago-style bakery apple slices are more than just dessert—they’re a warm memory served in sweet, flaky squares. Once a beloved treat in Chicago’s corner bakeries, these apple slices were known for their soft, buttery crust, thick apple filling, and drizzle of simple glaze. Unlike a traditional pie, these are baked in a sheet pan and cut into generous squares, making them the ideal dessert for potlucks, parties, or family dinners.
If you’ve ever strolled past a bakery window in the Midwest, you might recognize these golden apple slices with their glistening glaze. And now, you can recreate that nostalgic experience in your own kitchen.
Why You’ll Love Chicago-Style Apple Slices
Feeds a Crowd
Baked in a large pan and sliced into squares, this dessert is built for sharing—perfect for holidays, gatherings, and casual get-togethers.
Buttery, Flaky Crust
The tender crust offers a delicious contrast to the sweet, cinnamon-spiced apple filling. It’s rich, soft, and crisp in all the right places.
Simple Ingredients
With pantry staples like flour, butter, and sugar, this recipe is accessible to every home baker.
Nostalgic Flavor
For many, this treat brings back memories of after-school bakery visits or family Sunday dinners. It’s comfort food in dessert form.
Ingredients
For the Crust
- 3 cups all-purpose flour
- 1 tablespoon granulated sugar
- 1 teaspoon salt
- 1 cup unsalted butter, cold and cubed
- 2 large eggs
- 5–6 tablespoons cold water
For the Apple Filling
- 8 cups apples (6–8 medium apples), peeled and thinly sliced
- ¾ cup granulated sugar
- ¼ cup packed light brown sugar
- 2 tablespoons all-purpose flour
- 1 teaspoon ground cinnamon
- ¼ teaspoon ground nutmeg
- 1 tablespoon lemon juice
- 1 tablespoon unsalted butter, melted
For the Glaze
- 1 cup powdered sugar
- 2–3 tablespoons milk
- ½ teaspoon vanilla extract
Step-by-Step Instructions
Prepare the Dough
In a large bowl, whisk the flour, sugar, and salt together. Add the cold butter cubes and cut them into the flour using a pastry cutter or your fingertips. You’re aiming for a coarse crumb texture with visible bits of butter.
In a separate bowl, whisk the eggs with 5 tablespoons of cold water. Gradually pour the egg mixture into the flour and butter, stirring just until a dough starts to come together. If it’s too dry, add an extra tablespoon of water.
Divide the dough in half, shape into two discs, wrap each in plastic, and refrigerate for at least 30 minutes.
Preheat the Oven
Preheat your oven to 375°F (190°C). Grease a 9×13-inch baking pan for thick slices, or use a 15×10-inch jelly roll pan for thinner ones.
Make the Apple Filling
In a large mixing bowl, combine sliced apples with granulated sugar, brown sugar, flour, cinnamon, nutmeg, and lemon juice. Toss everything until the apple slices are evenly coated.
Assemble the Bottom Crust
On a lightly floured surface, roll one chilled dough disc into a rectangle slightly larger than your baking pan. Transfer it into the pan, pressing gently into the corners and up the sides.
Add the Filling
Spread the apple mixture evenly over the crust. Drizzle the melted butter over the apples for extra richness.
Add the Top Crust
Roll out the second dough disc into a rectangle and place it over the apple filling. Pinch the edges of the top and bottom crusts together to seal. Use a small knife to cut several slits in the top crust—this allows steam to escape during baking.
Bake
Place the pan in your preheated oven and bake for 40–45 minutes. The crust should be golden brown, and the apple filling should be tender and bubbling. If the crust edges brown too quickly, tent them with foil during the final 10 minutes.
Make the Glaze
While the apple slices cool slightly, whisk together powdered sugar, milk, and vanilla extract in a small bowl until smooth. Adjust the consistency with more milk if needed.
Glaze and Serve
Drizzle the glaze evenly over the warm apple slices. Allow it to set for 10–15 minutes, then cut into squares. Serve warm, room temperature, or chilled.
Tips for Perfect Apple Slices
- Keep the butter cold for the flakiest crust. If your kitchen is warm, chill the flour mixture before adding water.
- Mix apple types for the best flavor—Granny Smith adds tartness, while Honeycrisp brings sweetness and crunch.
- Don’t overwork the dough—mix just until it comes together to avoid a tough crust.
- Let it cool before glazing so the icing doesn’t melt into the crust and disappear.
- Make ahead by preparing the dough a day early and storing it in the fridge.
Flavor Variations
Streusel Topping
Swap the top crust for a buttery streusel made with flour, brown sugar, oats, and butter for a crumbly finish.
Caramel Apple Slices
Drizzle caramel sauce over the apples before sealing with the top crust for a richer flavor.
Nutty Apple Slices
Mix in ½ cup chopped pecans or walnuts with the apple filling for extra crunch.
Cinnamon Glaze
Replace vanilla extract in the glaze with a pinch of ground cinnamon for extra spice.
Serving Suggestions
These slices are versatile enough to serve for brunch, dessert, or even a sweet snack.
- Warm with vanilla ice cream: A classic pairing that highlights the warm apple filling.
- With whipped cream and cinnamon: Light and airy, perfect for a lighter finish.
- Chilled for picnics: Once cooled, these slices hold their shape well and travel beautifully.
FAQs
Can I make the dough ahead of time?
Yes. Prepare and refrigerate the dough up to 2 days in advance. You can also freeze it for up to 3 months—just thaw in the fridge overnight.
Can I use store-bought pie dough?
You can. While homemade crust is more flavorful, pre-made dough is a great time-saving alternative. Roll it to fit your pan as directed.
What kind of apples should I use?
Granny Smith is a go-to for tartness, but Honeycrisp, Jonagold, and Fuji work beautifully. A mix provides depth and balance.
How do I store leftovers?
Keep apple slices in an airtight container at room temperature for up to 2 days or in the fridge for up to 5 days. Reheat briefly in the oven or microwave before serving.
Can I freeze apple slices?
Yes. Freeze in a single layer, then transfer to a container. Reheat in a 350°F oven for 10–15 minutes for best results.
Final Thoughts
Chicago-style bakery apple slices are a celebration of simplicity and tradition. Their old-school charm lies in the contrast of a flaky, buttery crust and sweet, spiced apples—all brought together under a glossy glaze. Easy to make, simple to share, and endlessly nostalgic, this sheet-pan dessert is a must-have in any home baker’s recipe box.
So dust off your rolling pin, grab some apples, and bake up a taste of Chicago bakery magic. One bite and you’ll understand why these apple slices have stood the test of time—flaky, fruity, and full of comfort in every square.