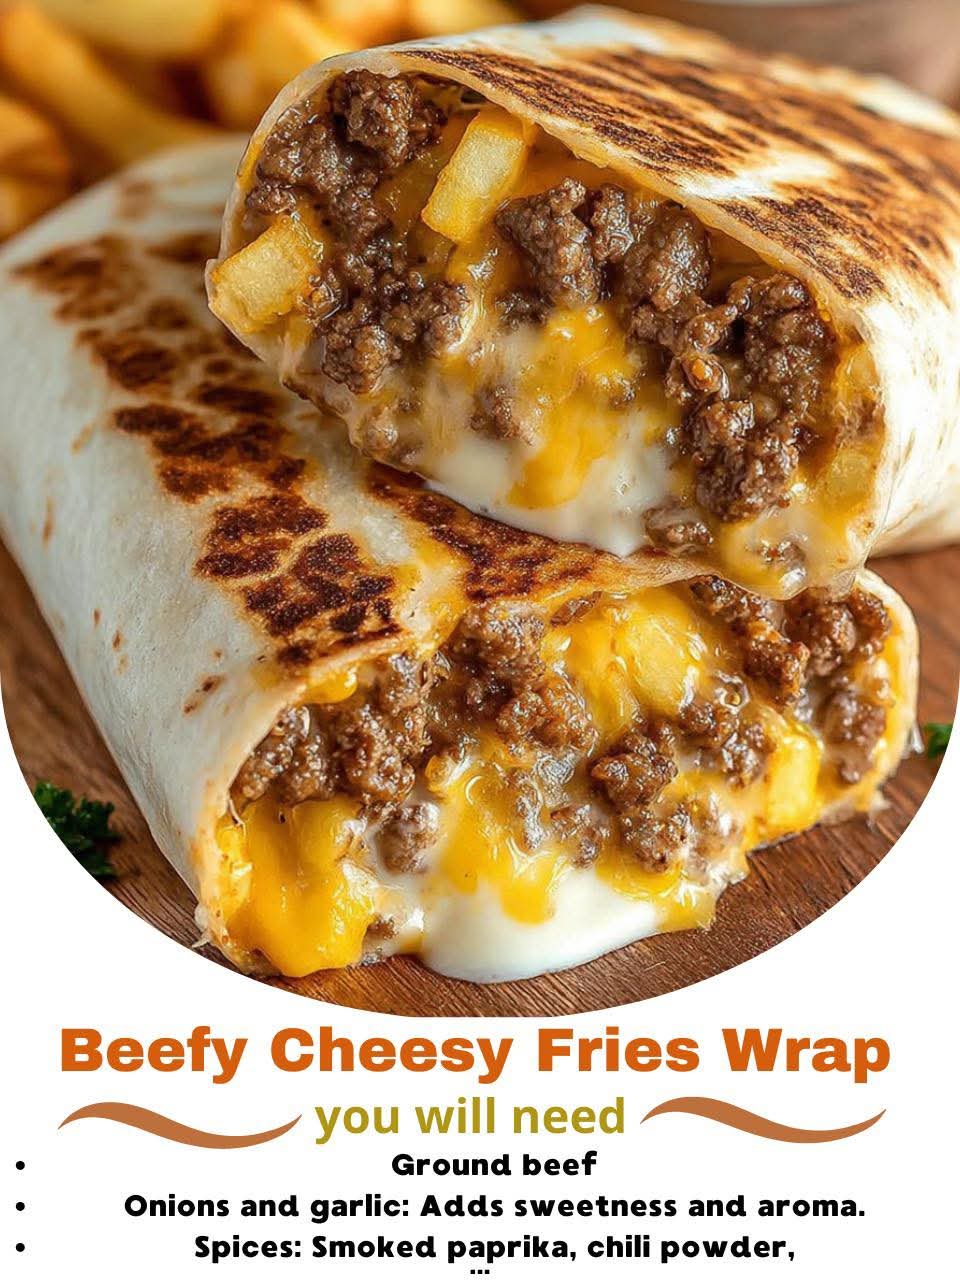
If you love cheesy beef, crispy fries, and hearty wraps, this Beefy Cheesy Fries Wrap is about to become one of your all-time favorite meals. Combining the flavors of a loaded burger and the satisfaction of crispy fries all tucked neatly into a warm tortilla, this wrap is perfect for lunch, dinner, or even a game-day treat. It’s quick to prepare, indulgent, and customizable to fit every craving.
This detailed guide will walk you through each step, from making the perfect beef filling to assembling and wrapping everything for the best texture and flavor. Let’s get cooking!
Ingredients
For the Beef Filling:
- 1 lb (450g) ground beef (80/20 for a good fat-to-meat ratio)
- 1 small onion, finely chopped
- 2 cloves garlic, minced
- 1 teaspoon smoked paprika
- 1 teaspoon chili powder
- ½ teaspoon ground cumin
- ½ teaspoon dried oregano
- ½ teaspoon salt (or to taste)
- ¼ teaspoon black pepper
- ¼ cup beef broth (optional, for juicier filling)
For the Fries:
- 2–3 cups frozen fries (shoestring, crinkle-cut, or steak fries all work)
- Or make homemade fries using fresh potatoes, olive oil, and salt.
For the Wraps:
- 4 large flour tortillas (10–12 inches)
- 2 cups shredded cheese (cheddar, Monterey Jack, or mozzarella)
- Optional Toppings:
- Sliced jalapeños
- Diced tomatoes
- Shredded lettuce
- Sour cream or ranch dressing
- Pickles or onions for extra crunch
Step-by-Step Instructions
Step 1: Prepare the Fries
- Bake Frozen Fries:
- Preheat your oven to 425°F (220°C).
- Spread the fries on a baking sheet in a single layer.
- Bake for 20–25 minutes, flipping halfway through for even crispiness.
- Season lightly with salt after baking.
- For Homemade Fries:
- Cut potatoes into fries, rinse under cold water, and pat dry.
- Toss with olive oil and salt.
- Bake at 425°F (220°C) for 25–30 minutes, flipping halfway until golden and crispy.
Tip: For the crispiest fries, soak them in water for 30 minutes before baking to remove extra starch.
Step 2: Cook the Beef Filling
- Heat a large skillet over medium-high heat.
- Add a drizzle of oil, then sauté the chopped onion until translucent (about 2 minutes).
- Add the minced garlic and cook for another 30 seconds until fragrant.
- Add the ground beef and cook, breaking it apart with a spatula.
- Once browned, drain any excess fat.
- Stir in the smoked paprika, chili powder, cumin, oregano, salt, and pepper. Mix well to coat the beef in seasoning.
- For a juicier texture, pour in ¼ cup beef broth and let it simmer for 3–4 minutes until slightly reduced.
Flavor Tip: You can add a tablespoon of barbecue sauce, ketchup, or Worcestershire sauce to deepen the flavor.
Step 3: Warm the Tortillas
- Warm each tortilla in the microwave wrapped in a damp paper towel for about 20 seconds to make them soft and pliable.
- Alternatively, heat them for 10–15 seconds per side in a dry skillet until slightly blistered and warm.
Tip: Don’t skip this step — warm tortillas roll much easier and won’t tear.
Step 4: Assemble the Wraps
- Lay a tortilla flat on a clean surface or cutting board.
- Spoon a generous portion of cooked beef into the center.
- Top with a handful of crispy fries and a generous sprinkle of shredded cheese.
- Add your favorite toppings — such as jalapeños for spice, diced tomatoes for freshness, or sour cream for creaminess.
- Drizzle with ranch or chipotle sauce if desired.
Layering Tip: Keep the filling in the center of the tortilla, leaving room around the edges for folding.
Step 5: Wrap It Up
- Fold the sides of the tortilla inward.
- Then fold the bottom up and roll tightly like a burrito.
- Make sure the seam side is facing down.
If you have extra filling, repeat with remaining tortillas.
Step 6: Optional – Sauté or Press for Crispiness
- Heat a clean skillet or grill pan over medium heat.
- Place the wrapped tortilla seam-side down and press gently.
- Cook for 1–2 minutes per side until golden brown and crispy.
This step locks in the fillings and adds a delicious crunch similar to a grilled burrito or panini.
Step 7: Slice and Serve
- Slice the wraps in half for easier handling.
- Serve immediately while warm, with extra fries or dipping sauces on the side.
Serving Suggestion: Pair with ketchup, ranch, chipotle mayo, or even cheese sauce for dipping.
Tips for the Best Beefy Cheesy Fries Wraps
- Use fresh hot fries: They help melt the cheese and stay crispy longer inside the wrap.
- Avoid soggy wraps: Don’t overload with sauce or wet toppings before wrapping.
- Crisp before serving: Pan-toasting the wrap adds structure and restaurant-style flavor.
- Customize freely: Swap fries for tater tots or curly fries for a fun twist.
- Add crunch: A handful of crushed tortilla chips or lettuce can balance the richness.
- Make it spicy: Add chipotle powder, hot sauce, or jalapeños for heat.
Flavor Variations
- Tex-Mex Style: Add refried beans, salsa, and avocado.
- BBQ Beef Wrap: Use BBQ sauce instead of chili seasoning and add cheddar and fried onions.
- Bacon Ranch Version: Add crispy bacon bits and a drizzle of ranch dressing.
- Philly Cheesesteak Twist: Use thinly sliced beef, peppers, onions, and provolone.
- Loaded Nacho Wrap: Add queso, crushed tortilla chips, and guacamole.
Storage and Reheating
- Refrigerate: Wrap leftovers tightly in foil or plastic wrap and store in the fridge for up to 2 days.
- Reheat: Toast in a skillet or air fryer for 3–4 minutes per side until warm and crispy again. Avoid microwaving — it softens the wrap and fries.
- Freezer-Friendly: Wrap unbaked wraps in foil and freeze for up to 1 month. Reheat in the oven at 350°F (175°C) for 15–20 minutes.
Nutritional Information (Approx. per Wrap)
- Calories: 550–650 (depending on fries and toppings)
- Protein: 25–30g
- Carbohydrates: 45–50g
- Fat: 28–35g
- Fiber: 3g
- Sodium: 850mg
FAQs About Beefy Cheesy Fries Wraps
1. Can I use ground turkey or chicken instead of beef?
Yes! Ground turkey or chicken works great as a leaner alternative. Just add an extra drizzle of oil and a splash of broth to prevent dryness.
2. Can I make these wraps vegetarian?
Absolutely. Substitute the beef with seasoned black beans, lentils, or plant-based crumbles. Add sautéed peppers and onions for extra texture.
3. How do I keep the fries crispy inside the wrap?
Use freshly baked fries and avoid overfilling with sauce. Wrapping them tightly and crisping the wrap in a skillet helps maintain texture.
4. What type of cheese melts best?
Cheddar and Monterey Jack are great choices. Mozzarella gives you a stretchy melt, while pepper jack adds a mild kick.
5. Can I make these wraps ahead of time?
Yes. You can prepare the beef and fries separately in advance, then assemble and crisp the wraps just before serving.
6. How can I make it healthier?
Use baked or air-fried fries, whole-wheat tortillas, lean meat, and reduced-fat cheese. You can also add veggies like spinach or bell peppers.
7. What’s the best sauce to serve with it?
Classic choices include ranch, chipotle mayo, spicy ketchup, or garlic aioli. For extra tang, try a drizzle of BBQ or buffalo sauce.
8. Can I air-fry the wrap instead of pan-toasting?
Yes! Air-fry at 375°F (190°C) for 5–7 minutes, flipping halfway. It will be perfectly crispy without needing extra oil.
9. What can I serve with these wraps?
A simple side salad, coleslaw, or extra fries works great. You can also serve with a refreshing cucumber yogurt dip or salsa.
10. How do I prevent my wrap from breaking?
Warm the tortilla first, don’t overfill, and fold tightly. Using soft flour tortillas makes rolling easier.
Conclusion
The Beefy Cheesy Fries Wrap is the ultimate fusion of comfort food favorites — cheesy, savory, crispy, and full of flavor. It’s a satisfying handheld meal that combines all the goodness of loaded fries and a cheeseburger in one easy-to-eat wrap.
Whether you’re making a quick weeknight dinner, prepping for game night, or feeding a crowd, these wraps are endlessly customizable and always crowd-pleasing. With simple pantry ingredients, a little creativity, and this detailed guide, you can bring restaurant-style indulgence right to your table — no takeout required.