Banana Pudding Cups take everything people love about classic banana pudding and turn it into an easy, no-bake dessert served in perfectly portioned cups. Creamy vanilla pudding, fluffy whipped cream, ripe bananas, and soft vanilla wafers come together in beautiful layers that feel nostalgic, comforting, and indulgent without being heavy. This dessert is simple to prepare, requires no oven time, and fits almost any occasion—from casual family dinners to holidays, potlucks, and parties.
What truly sets banana pudding cups apart is their balance. The pudding is rich but light, the bananas add natural sweetness and freshness, and the wafers soften into a cake-like texture as they chill. Each spoonful delivers a familiar flavor that feels both cozy and refreshing. Whether you grew up enjoying Southern-style banana pudding or you are trying it for the first time, this individual version makes it even more appealing and practical.
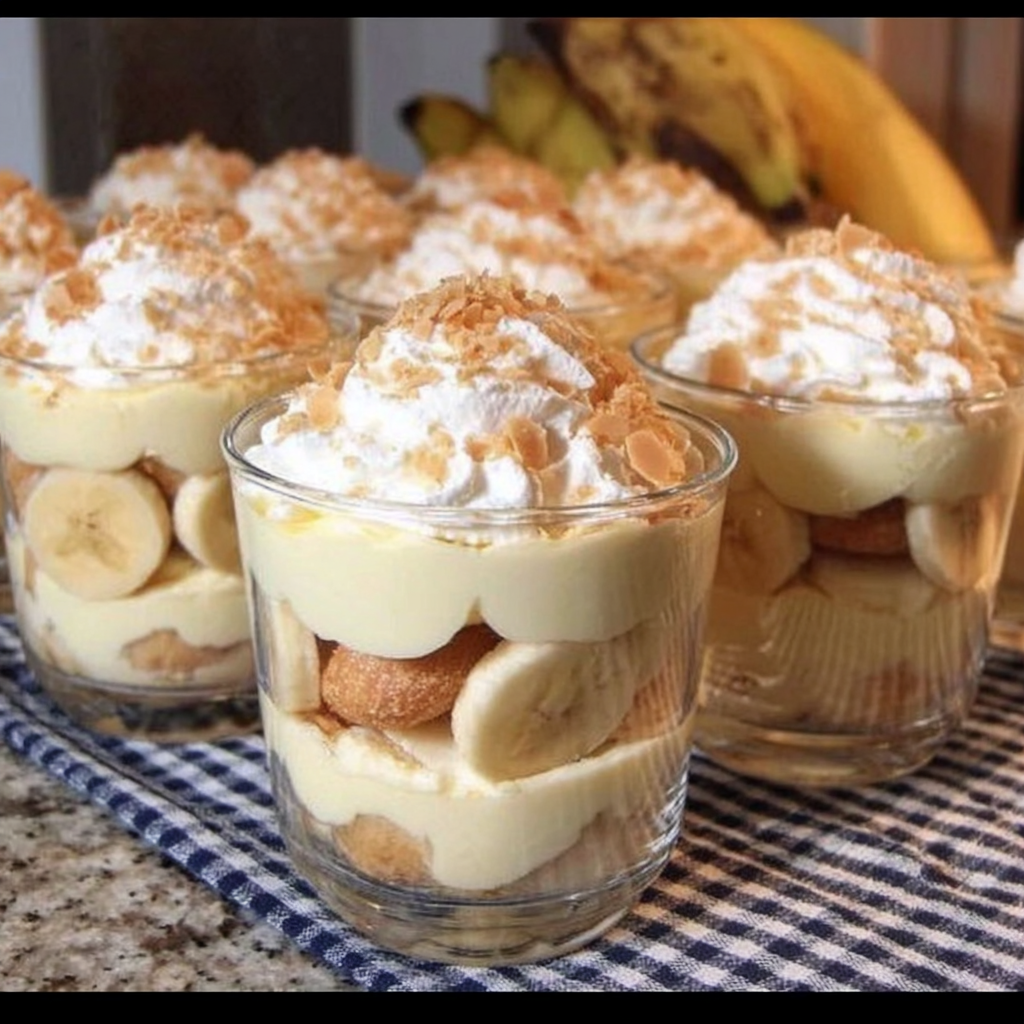
Because these cups are assembled ahead of time and served chilled, they are ideal for busy schedules. You can prepare them hours in advance, store them in the refrigerator, and serve them when needed without any last-minute stress. They also look stunning when layered in clear cups or jars, making them as visually pleasing as they are delicious.
Why Banana Pudding Cups Are So Popular
A classic dessert with modern convenience
Traditional banana pudding is often made in a large dish and scooped out for serving. While delicious, it can be messy and less practical for gatherings. Banana pudding cups solve that problem by offering neat, individual portions that are easy to serve and transport.
No-bake and beginner-friendly
One of the biggest advantages of this recipe is that it requires no baking at all. There is no oven, no stovetop cooking, and no complicated techniques. If you can whisk, fold, and layer, you can make this dessert successfully every time.
Perfect for make-ahead planning
Banana pudding cups actually taste better after chilling. This allows the flavors to blend and the wafers to soften. That makes them an excellent choice for events where you want to prepare desserts in advance.
Ingredients You Will Need
For the pudding base
Cold milk is essential for helping the instant pudding set quickly and smoothly. Using very cold milk ensures a thick, creamy texture without lumps.
Instant vanilla pudding mix provides consistent results and saves time. It delivers classic vanilla flavor that pairs perfectly with bananas and wafers.
For the whipped cream
Heavy whipping cream adds richness and lightness. When whipped properly, it gives the pudding cups a fluffy, mousse-like texture.
Powdered sugar sweetens the cream gently without making it grainy.
Vanilla extract enhances the overall flavor and ties all the layers together.
For layering
Ripe bananas are the heart of this dessert. They should be yellow with a few brown spots, which indicates natural sweetness without being mushy.
Vanilla wafers create the signature texture. As they chill, they soften into tender layers that resemble cake.
Step-by-Step Preparation
Preparing the pudding mixture
In a medium bowl, whisk the cold milk with the instant vanilla pudding mix for about two minutes. The mixture should thicken noticeably. Allow it to rest for a few minutes while you prepare the whipped cream. This brief resting time helps the pudding fully set.
Whipping the cream
In a separate bowl, combine the heavy whipping cream, powdered sugar, and vanilla extract. Beat until stiff peaks form. The cream should hold its shape but still look smooth and glossy. Overwhipping can cause a grainy texture, so stop as soon as stiff peaks appear.
Combining pudding and whipped cream
Gently fold the whipped cream into the prepared pudding. You can fold in half of the whipped cream for a slightly richer texture or all of it for a lighter, airier consistency. Use a gentle folding motion to keep the mixture fluffy.
Assembling the cups
Choose clear dessert cups, glasses, or small jars for the best presentation. Start with a layer of vanilla wafers at the bottom. Add a layer of sliced bananas, then spoon in a generous layer of the pudding mixture. Repeat the layers until the cups are filled, finishing with pudding on top.
Chilling for best results
Cover the cups and refrigerate for at least two hours. This chilling time allows the wafers to soften and the flavors to meld together, creating that classic banana pudding taste.
Flavor Variations to Try
Chocolate banana pudding cups
Swap vanilla pudding for chocolate pudding to create a richer, dessert-style version that chocolate lovers will enjoy.
Banana cheesecake cups
Fold softened cream cheese into the pudding mixture for a tangy, cheesecake-inspired flavor and thicker texture.
Peanut butter banana cups
Add a swirl of peanut butter between layers or mix a small amount into the pudding for a nutty twist.
Strawberry banana cups
Layer sliced strawberries along with bananas for a fresh, fruity variation that adds color and brightness.
Sugar-free or lighter option
Use sugar-free pudding mix and light whipped topping for a lower-sugar version that still tastes satisfying.
Serving Suggestions
Serve banana pudding cups well chilled for the best texture and flavor. Top them with crushed vanilla wafers, a dollop of whipped cream, or a fresh banana slice just before serving. These cups pair beautifully with coffee, iced tea, or a cold glass of milk.
They work especially well as grab-and-go desserts at parties, picnics, barbecues, birthdays, and holiday gatherings. Because they are individually portioned, guests can easily enjoy them without extra serving utensils.
Tips for Perfect Banana Pudding Cups
Use very cold milk to ensure the pudding sets quickly and smoothly.
Choose ripe but firm bananas for the best flavor and texture.
Avoid overmixing when folding whipped cream to keep the dessert light.
Layer carefully for a clean, attractive presentation.
Cover the cups tightly in the refrigerator to prevent the pudding from absorbing other food odors.
For the freshest look, add banana slices close to serving time if possible.
Storage and Make-Ahead Advice
Banana pudding cups can be made up to 24 hours in advance and stored in the refrigerator. After that time, the bananas may start to darken and the texture may become softer. If preparing ahead, consider adding a thin layer of pudding between bananas and wafers to reduce air exposure.
Freezing is not recommended, as the texture of bananas and pudding changes when thawed.
FAQs
Can I make banana pudding cups ahead of time?
Yes, they can be prepared up to one day in advance and kept refrigerated until ready to serve.
How do I keep bananas from turning brown?
Lightly toss banana slices in lemon juice or assemble the cups close to serving time to slow oxidation.
Can I use homemade pudding instead of instant?
Yes, homemade vanilla pudding works very well. Allow it to cool completely before assembling the cups.
What can I use instead of vanilla wafers?
Shortbread cookies, graham crackers, or butter cookies are excellent substitutes.
Can these banana pudding cups be frozen?
Freezing is not recommended, as it negatively affects the texture of both pudding and bananas.
Conclusion
Banana Pudding Cups are a timeless dessert made simple, elegant, and perfectly portioned. With creamy layers, fresh bananas, and soft vanilla wafers, they deliver comfort and nostalgia in every bite. Their no-bake preparation, make-ahead convenience, and crowd-pleasing flavor make them a reliable choice for any occasion.